Yin Yoga for Lower Back Pain: 7 Poses That Actually Work
If you’ve been pushing through aggressive stretches and high-intensity workouts only to wake up with the same nagging lower back pain, it’s time to try the opposite approach: holding completely still.
You’ve tried conventional stretching routines that promised relief but left you feeling worse. The idea of spending another hour at a yoga class intimidates you, especially when you can barely touch your toes.
You’re tired of well-meaning advice to “just strengthen your core” when simply getting through your workday leaves your lower back screaming. And you need something that works around your tight schedule and doesn’t require you to be already flexible.
Here’s what most people miss: the pain isn’t always about weakness. It’s about restriction. Your fascia—the connective tissue wrapping every muscle, bone, and organ—gets stuck from sitting, repetitive movement, and stress. Aggressive stretching can actually aggravate this. But slow, passive pressure? That’s where transformation happens.
Holding still for 3-5 minutes creates more powerful fascial release than dozens of quick stretches ever could.
This is where yin yoga for lower back pain changes the game. Unlike vinyasa flows or power yoga that demand active engagement, yin yoga lets gravity do the work.
You’ll learn the exact poses physical therapists recommend when traditional methods don’t deliver results, plus a proven 20-minute sequence you can do entirely on your living room floor with household items. Most people notice measurable improvement within 2-3 weeks of consistent practice.
What Makes Yin Yoga Different for Lower Back Relief

Yin yoga operates on a completely different principle than the yoga styles you’ve probably encountered. Where vinyasa and hatha yoga target muscles through active engagement and movement, yin yoga for back pain targets fascia and connective tissue through sustained, passive pressure.
Here’s the science: fascia is a continuous network of collagen fibers that responds to how you move (or don’t move). When you sit for eight hours, drive in traffic, or repeat the same movement pattern daily, fascial fibers develop adhesions—essentially, they get sticky and restricted.
A 30-second stretch doesn’t have time to influence these deep restrictions. But 3-5 minutes of passive pressure signals your nervous system to relax and allows the tissue to actually remodel itself.
The research is clear: passive stretching outperforms active stretching when the goal is fascial release and pain reduction.
A study on chronic pain management found that slow, sustained stretching activated the parasympathetic nervous system—your rest-and-digest mode—which directly reduces pain perception and muscle guarding. When you’re in fight-or-flight mode (which chronic pain creates), your muscles tighten further. Yin yoga breaks that cycle.
Yin vs. Other Yoga Styles
The differences matter when you’re dealing with pain. Vinyasa yoga uses 30-second holds and dynamic movement—great for cardiovascular health, terrible for fascial restriction. Hatha yoga is gentler but still active. Restorative yoga uses props but often includes lighter stretches. Yin yoga for lower back specifically holds poses for 3-5 minutes in a completely passive state, allowing gravity and time—not muscular effort—to create change.
This matters because your nervous system responds to intensity and duration. A “power through” approach—whether it’s aggressive stretching or intense yoga—signals threat to your body. Your muscles respond by tightening more. Yin yoga sends the opposite signal: safety. You’re held by props, you’re not moving, you’re breathing deeply. Your body learns to release.
The Nervous System Reset
Chronic lower back pain creates a feedback loop: pain triggers stress, stress tightens muscles, tight muscles create more pain. Breaking this cycle requires more than physical work—it requires nervous system recalibration. When you hold a yin yoga for back pose for 4-5 minutes, your heart rate drops, your breath deepens, and your parasympathetic nervous system activates. This is the nervous system equivalent of flipping a switch from “threat alert” to “all clear.”
The permission to be still is itself therapeutic. Most of us are conditioned to believe that harder work equals better results. Yin yoga proves the opposite. By doing less and staying longer, you access deeper tissue and create a safety signal that allows your entire system to relax. This is why people often cry during yin yoga—trauma and tension are literally stored in fascia, and slow, supported pressure releases both.
Yin Yoga for Lower Back Pain: How It Works

The Fascia Connection
Your fascia is a continuous web of connective tissue that wraps around every structure in your body. Unlike muscle, which is designed to contract and release, fascia is designed for support and sliding. When you repeat the same posture or movement thousands of times—like sitting at a desk—fascia develops adhesions, essentially sticking to itself or to nearby structures. This restriction is often the root cause of lower back pain that doesn’t respond to stretching or strengthening.
The lower back is particularly vulnerable because it’s caught between two highly mobile areas: your thoracic spine (upper back) and your hips. If your hip flexors are tight from sitting, your lower back compensates by overworking. If your thoracic spine is stiff, your lower back takes on extra rotation. If your glutes are weak or inactive, your lower back stabilizes instead. Yin yoga for lower back pain addresses all three by slowly opening the hips, decompressing the spine, and resetting the nervous system’s protective response.
The mechanism is elegant: when you lie in Supported Child’s Pose for 4 minutes, you’re not forcing anything. Gravity gently pulls your spine into traction. Your breath deepens into your back ribs. Your nervous system recognizes safety. The fascia gradually releases its grip. This is why yin yoga often produces results where foam rolling, massage, or aggressive stretching failed—those modalities create temporary relief, but yin yoga creates lasting tissue remodeling.
Decompression and Space Creation
One of the most powerful effects of yin yoga for back is spinal decompression. When you’re upright—sitting, standing, or even in many active yoga poses—gravity compresses your spine. Discs experience pressure. Vertebrae settle closer together. Nerve roots can get pinched. Over time, this compression contributes to pain and stiffness.
Yin poses like Supported Child’s Pose and Supine Twist create gentle traction. You’re lying down, so gravity works with you instead of against you. Props—bolsters, blocks, blankets—support your body so you don’t have to use muscular effort to stay in the pose. This is crucial: props don’t make poses easier in the sense of “less intense.” They make poses more effective by allowing you to relax completely. When your muscles relax, the deeper fascial layers can actually change.
This decompression is measurable. Research on spinal decompression therapy shows that even mild, sustained traction increases disc height and reduces nerve compression. Yin yoga achieves similar effects through positioning and time, with zero equipment cost and complete safety for most people.
The Parasympathetic Activation
Your autonomic nervous system has two modes: sympathetic (fight-or-flight) and parasympathetic (rest-and-digest). Chronic pain keeps you stuck in sympathetic mode. Your muscles stay tense, your breathing stays shallow, your pain sensitivity increases. To heal, you need to flip the switch to parasympathetic.
Yin yoga is one of the most direct ways to activate parasympathetic response. The long holds, the supported positioning, the slow breathing—all of these signal safety to your nervous system. Within 2-3 minutes of holding a pose, your heart rate variability increases, indicating parasympathetic activation. This reduced stress response directly decreases pain perception. You’re not just stretching tissue; you’re rewiring how your nervous system interprets sensation.
Yin Yoga Poses for Lower Back: The Essential Seven
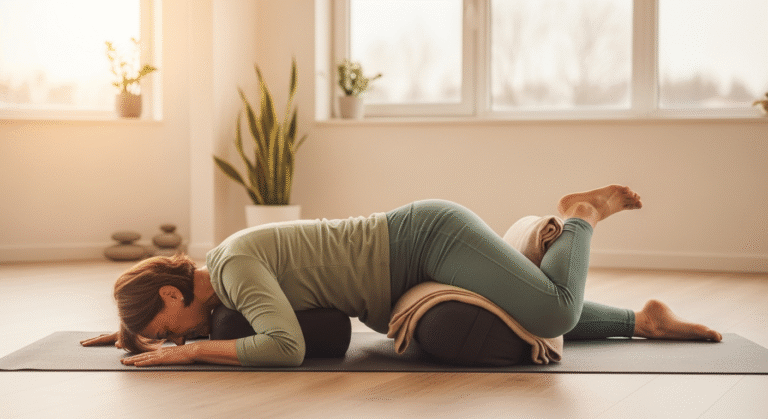
1. Supported Child’s Pose
Setup: Kneel on your mat with knees wide enough that your big toes touch or come close. Place a bolster (or stacked pillows/cushions) lengthwise between your thighs. Fold forward, draping your torso over the bolster. Your forehead rests on stacked fists or a small pillow.
What you’ll feel: Gentle traction along your entire spine, release in your lower back muscles, and a sense of being supported and held. This is the foundational pose for yin yoga for lower back pain.
Hold time: 4-5 minutes. Set a gentle timer so you’re not tempted to check the clock.
Modifications: If your hips are very tight, add a blanket under your knees. If the bolster height bothers you, stack blankets under your forehead so your neck stays neutral. If you don’t have a bolster, use couch cushions stacked and tied together, or even a rolled sleeping bag.
Breath cue: Inhale through your nose for 4 counts, exhale through your mouth for 6 counts. The longer exhale activates parasympathetic response.
2. Supine Twist
Setup: Lie on your back with knees bent. Drop both knees to the right side, keeping your hips as square as possible. Extend your arms in a T-position, or place your left hand on your right knee for a gentler variation.
What you’ll feel: A stretch through your outer hip and lower back on the top side. This is one of the most effective yin poses for lower back because it addresses rotation restriction.
Hold time: 4-5 minutes per side. Don’t rush the transitions between sides.
Modifications: Place a bolster or stacked blankets between your knees to reduce the range. If your shoulders lift off the floor, reduce the knee drop angle by 50%. You should feel a dull, achy stretch—never sharp pain.
Exit strategy: Use your hands to gently guide your knees back to center. Don’t use your core to lift—let your hands do the work.
3. Dragon Pose (Low Lunge Variation)
Setup: Start in a low lunge with your back knee down on a blanket for padding. Your hands rest on blocks or the floor inside your front foot. Your torso is upright or slightly folded forward.
What you’ll feel: A deep stretch in your hip flexors on the back leg side. Tight hip flexors are one of the primary drivers of lower back pain because they pull your pelvis forward, increasing lower back arch. This pose is essential for yin yoga for back pain relief.
Hold time: 3-4 minutes per side.
Modifications: If your hip flexors are very tight, place a folded blanket under your back knee and reduce your lunge depth by 50%. You should be able to relax into this pose—if you’re gripping, you’ve gone too deep.
Common mistake: Clenching your glutes. Let them be completely soft. The stretch should come from the hip flexor, not from muscular effort.
4. Sleeping Swan (Supported Pigeon)
Setup: Sit with your front shin angled across your mat (not perpendicular—this protects your knee). Your back leg extends straight behind you. Place a bolster or stacked blankets lengthwise along your front leg. Fold forward, draping your torso over the bolster.
What you’ll feel: An intense stretch in your outer hip and glute on the front leg side. This is where sciatic pain often originates, making this one of the most powerful yin yoga for lower back poses.
Hold time: 5 minutes per side. Yes, five. The longer hold is why this pose is so effective.
Modifications: Decrease your front shin angle by bringing your heel closer to your opposite hip—this reduces intensity. Use more props under your torso so you’re not hanging into the stretch. You should feel supported, not collapsed.
Red flag: Sharp knee pain means stop immediately and try Supine Figure-4 instead (lie on your back, cross one ankle over the opposite knee, and gently pull the bottom leg toward your chest).
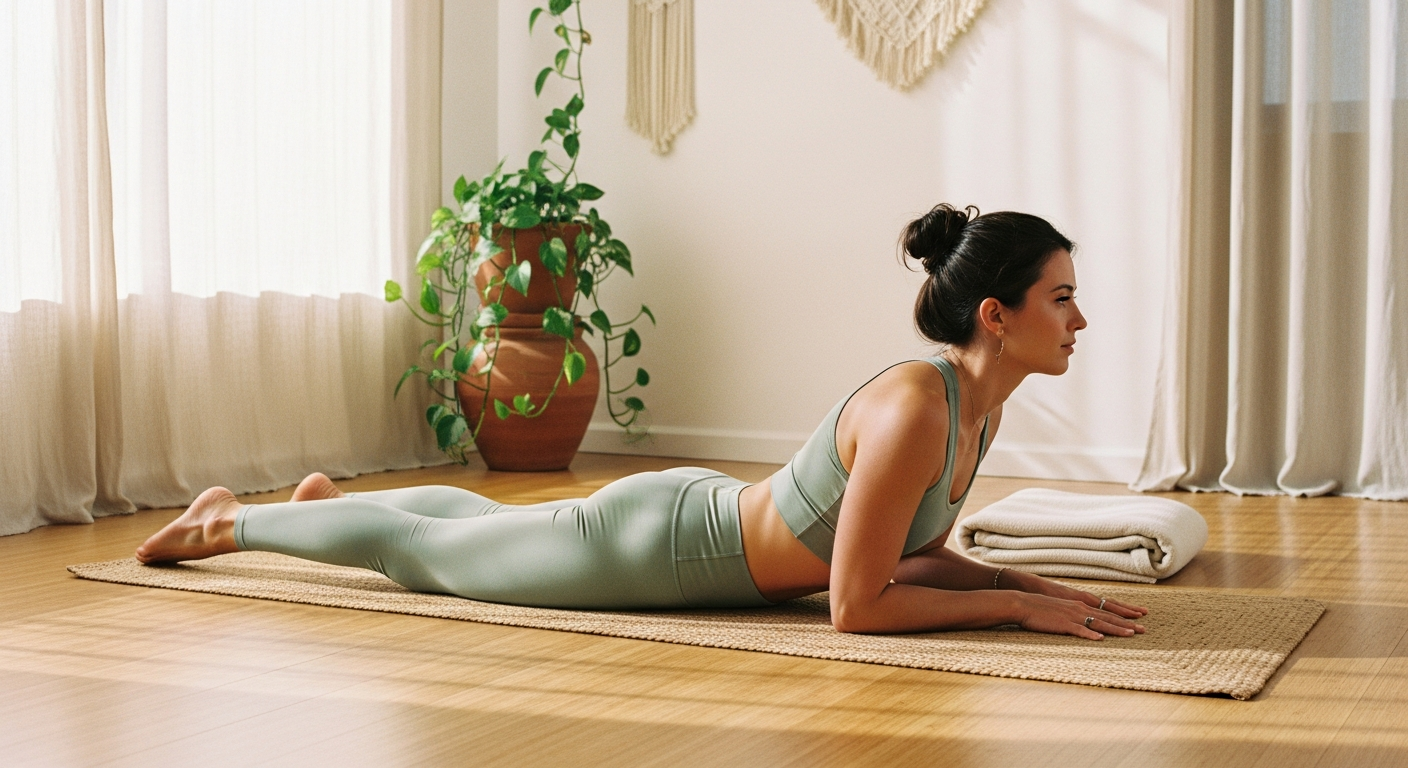
5. Sphinx Pose (Gentle Backbend)
Setup: Lie on your belly with your forearms flat on the mat, elbows directly under your shoulders. Your legs are extended or feet hip-width apart. You can prop your chest on a bolster if full weight on your forearms feels too intense.
What you’ll feel: A gentle compression in your lower back and opening across your front body. This gentle backbend is crucial for yin yoga for lower back pain because it counteracts the forward-folded postures most of us spend our day in.
Hold time: 3-4 minutes.
Modifications: Reduce prop height under your chest if the sensation is too intense. Add a blanket under your hips for anterior pelvic tilt support.
Common mistake: Clenching your glutes and lower belly. Let them be soft. The backbend should come from your thoracic spine (upper back), not from muscular gripping.
6. Shoelace Pose (Seated Hip Stack)
Setup: Sit upright with your knees stacked (bottom leg bent, top leg bent and stacked on top). Your feet are wide to the sides. You can stay upright on props or fold forward over your legs.
What you’ll feel: A deep, asymmetrical stretch in your outer hips and lower back. The asymmetry is normal—one side will feel tighter than the other.
Hold time: 3-4 minutes per side.
Modifications: Sit on 2-3 blocks if your hips are very tight. Keep your torso upright instead of folding forward. As your hips open over weeks, you can gradually fold deeper.
Alternative: If Shoelace feels inaccessible, use a simple cross-legged seated forward fold instead. The principle is the same—sustained, passive hip opening.
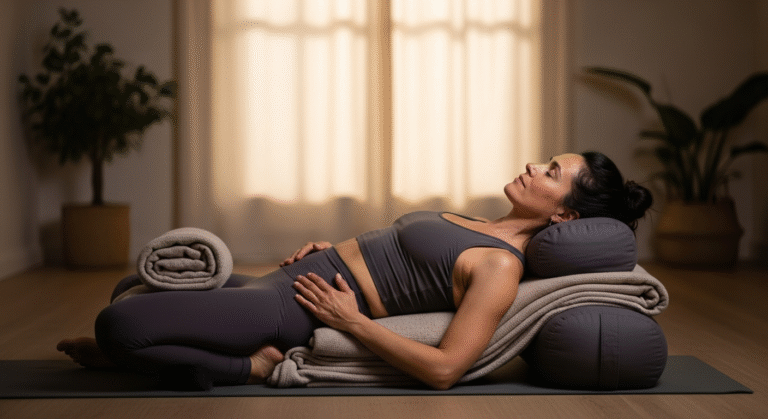
7. Savasana with Bolster (Final Integration)
Setup: Lie on your back with a bolster under your knees to reduce your lower back arch. Your arms rest at your sides, palms up. Your head rests flat or on a small pillow.