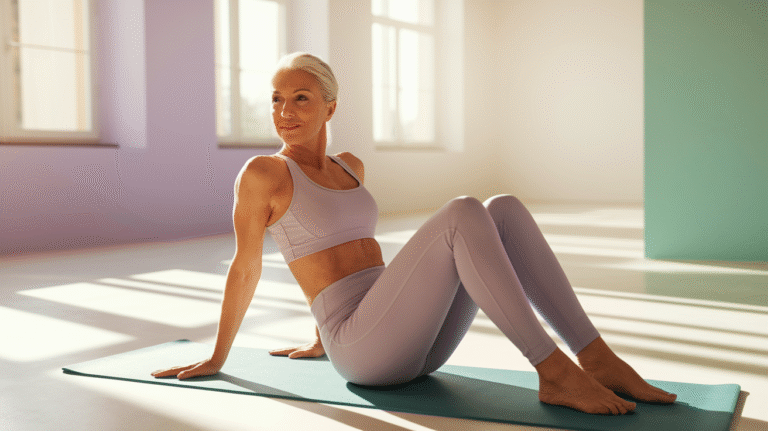
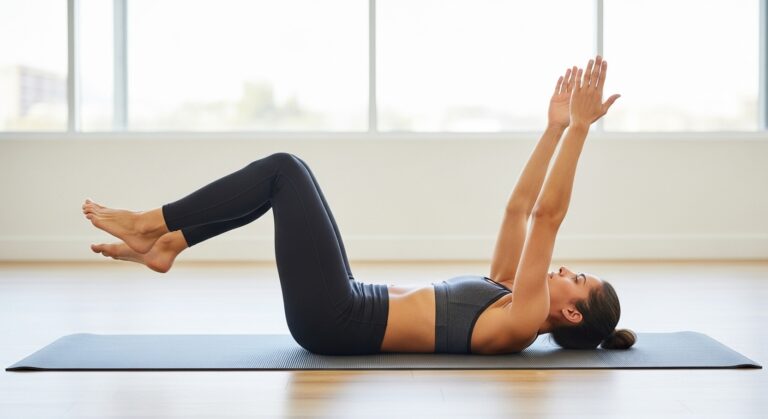
Gentle yin yoga sequence for women over 40
At 45, Sarah thought her days of feeling flexible and pain-free were behind her. Her mornings started with stiff joints that required a full five minutes just to straighten up from bed. Her evenings ended with a dull, persistent lower back ache that no amount of ibuprofen seemed to touch.
The high-intensity interval training she used to love—those 6 AM boot camps that once made her feel invincible—now left her exhausted for days, her body screaming for recovery time it never quite got.
Then she discovered something that changed everything, and it didn’t require a single burpee, jumping jack, or gym membership.
Here’s what nobody tells you about fitness after 40: your body isn’t broken. It’s just speaking a different language now, and most traditional workout programs are still shouting in the dialect of your 20s.
The drop in collagen production (starting around age 25, accelerating after 40), the hormonal shifts of perimenopause, the chronic stress of juggling work and family—these aren’t failures. They’re physiological realities that demand a smarter approach.
The gym intimidation factor gets worse, not better, when you’re surrounded by 25-year-olds doing box jumps while you’re wondering if your knees will forgive you for yesterday’s lunge session.
Add time constraints—the impossibility of finding 90 minutes for a gym trip when you barely have 30 minutes to yourself—and it’s no wonder previous workout plans haven’t stuck.
This is where yin yoga becomes a powerful, proven alternative. In the next 2,500 words, I’m going to walk you through a complete 30-45 minute sequence you can do at home, in your pajamas if you want, that targets exactly what your body needs right now: deep fascial release, joint mobility, nervous system regulation, and the kind of sustainable flexibility that doesn’t require you to force anything.
You’ll learn the eight essential poses, how to modify each one for your body, what props you actually need (spoiler: probably things you already own), and realistic timelines for results. No hype.
No promises of transformation in 7 days. Just effective, science-backed movement that works with your changing body instead of against it.
Why Yin Yoga Is a Powerful Practice for Women Over 40

What Makes Yin Yoga Different (and Effective)
Yin yoga isn’t just “easy yoga” or “stretching for people who can’t do real exercise.” It’s a specific practice where you hold passive poses for 3-5 minutes, targeting the connective tissue—fascia, ligaments, tendons—rather than just muscles.
While yang-style practices (vinyasa, power yoga, most gym workouts) focus on muscular engagement and rhythmic movement, yin yoga applies gentle, sustained stress to your deeper tissues.
Here’s why this matters after 40: your fascia, the web-like connective tissue that surrounds every muscle, organ, and bone in your body, becomes less hydrated and more rigid with age.
Research in the Journal of Bodywork and Movement Therapies shows that sustained, gentle stretching can actually rehydrate fascial tissue and restore its elasticity—something quick, dynamic stretching can’t achieve.
When you hold a yin pose for 4-5 minutes, you’re giving your fascia time to slowly lengthen and reorganize, like warming cold honey until it flows again.
This works when other programs fail because it aligns with your body’s natural changes. You’re not fighting decreased recovery capacity or trying to out-exercise stress hormones. You’re working strategically with your parasympathetic nervous system, the “rest and digest” mode that becomes harder to access when you’re constantly in go-mode.
The Proven Benefits Your Body Actually Needs Right Now
The benefits of yin yoga aren’t just about touching your toes (though improved flexibility without forcing or straining is absolutely one outcome). After three months of consistent practice, most women notice measurable improvements in hip and shoulder range of motion—the two areas where we accumulate the most tension from sitting, driving, and carrying stress in our bodies.
But the real transformation happens deeper. Yin yoga provides natural hormone balance support during perimenopause and menopause by reducing cortisol, your primary stress hormone.
When cortisol stays chronically elevated—from high-intensity workouts, work pressure, inadequate sleep—it interferes with estrogen and progesterone production and makes it nearly impossible to lose that stubborn midsection weight.
A 2018 study in the International Journal of Yoga found that women who practiced yin yoga twice weekly for 12 weeks showed significant reductions in cortisol levels and reported better sleep quality.
Speaking of sleep: the gentle compression and release of yin poses stimulates your vagus nerve, the major highway of your parasympathetic nervous system.
Better vagal tone equals better sleep, better digestion, and better stress resilience. And joint health? The long holds in yin poses actually help lubricate your joints by encouraging synovial fluid production.
This is especially powerful for hips, lower back, and shoulders—exactly where women over 40 report the most pain and stiffness.
Why This Isn’t Just “Easy Yoga”—It’s Strategic Recovery
Let me be clear: passive doesn’t mean weak. Holding a yin pose for five minutes requires mental strength that most burpees don’t touch.
Your mind will beg you to move, to fidget, to check your phone. Staying present with discomfort—not pain, but the deep sensation of tissue releasing—builds a different kind of strength: the ability to be with what is instead of constantly pushing for more.
Yin yoga complements, not replaces, other activities. If you walk, do light strength training, or enjoy occasional higher-intensity movement, yin becomes your strategic recovery tool.
It’s what allows your body to actually adapt to the stress you’re placing on it. Without adequate recovery, you’re just accumulating fatigue, not building fitness.
This is about building strength through flexibility and patience—qualities that matter far more in your 40s, 50s, and beyond than how many push-ups you can bang out.
Understanding Your Changing Body: What’s Really Happening After 40

The Physical Shifts You’re Experiencing (And Why They’re Normal)
Starting in your mid-20s, your body produces about 1% less collagen each year. By 40, you’ve lost roughly 15-20% of your collagen stores.
Collagen is the primary structural protein in your connective tissue, so less of it means joints feel stiffer, skin loses elasticity, and you don’t bounce back from workouts the way you used to. This isn’t failure—it’s biology.
Add hormonal changes to the mix. Even if you’re not in full menopause, perimenopause can start in your late 30s or early 40s.
Fluctuating estrogen levels affect everything from muscle tone to how your body stores fat to how quickly you recover from exercise.
Estrogen has a protective effect on joints and tendons; as it declines, you become more prone to injury from high-impact activities.
This is why you genuinely can’t—and shouldn’t—work out like you did at 25. Your 25-year-old body had different hormonal support, better collagen production, and probably less accumulated stress. Trying to force that same intensity now isn’t discipline; it’s working against your physiology.
Why Traditional High-Intensity Workouts May Be Working Against You
Here’s the truth about cortisol that most fitness programs ignore: exercise is a stressor. When you’re already stressed from work, relationships, inadequate sleep, and the mental load of managing a household, adding intense workouts can push your cortisol levels into chronic elevation.
High cortisol tells your body to store fat around your midsection, breaks down muscle tissue, suppresses your immune system, and keeps you in a constant state of fight-or-flight.
The recovery time your body actually needs now is longer than it used to be. Where you might have done high-intensity training five days a week in your 30s, your 40-something body might need 48-72 hours between intense sessions. Without that recovery, you’re creating inflammation, not fitness.
Chronic inflammation is at the root of most age-related health issues—joint pain, metabolic dysfunction, even cognitive decline.
Gentle movement like yin yoga helps reduce inflammation by activating your parasympathetic nervous system and improving lymphatic circulation, which clears inflammatory waste products from your tissues.
The Mind-Body Connection You Can’t Ignore Anymore
Your nervous system doesn’t distinguish between physical stress (hard workout), mental stress (work deadline), or emotional stress (family conflict).
It all registers as threat. When you’re constantly in sympathetic nervous system activation—the gas pedal—your body never gets a chance to repair, digest properly, or regulate hormones effectively.
Yin yoga activates the parasympathetic nervous system—the brake pedal. This isn’t woo-woo; it’s measurable physiology. Heart rate variability, a key marker of stress resilience, improves with regular yin practice.
This matters because real results come from working smarter, not just harder. A body stuck in stress mode will fight you on every fitness and weight loss goal. A body that feels safe enough to relax will actually let go of what it’s been holding onto.
Preparing for Your Yin Yoga Practice: What You Actually Need

Essential Props (No Expensive Equipment Required)
You don’t need a $120 yoga mat or specialty bolsters. Here’s what actually works:
Yoga mat or soft surface: Any mat will do, or even a thick blanket folded on carpet. You want enough cushioning that your knees don’t press into hard floor.
2-3 pillows, cushions, or yoga bolsters: Standard bed pillows work perfectly. Firmer is better than super-soft. These provide support under your torso, knees, or head.
1-2 yoga blocks or thick books: Hardcover books stacked to about 4-6 inches high work as well as blocks. You’ll use these to bring the floor closer to you.
Blanket for warmth and support: Your body temperature drops when you’re still. A blanket keeps you warm and can fold under joints for extra padding.
Optional extras: An eye pillow blocks light and adds gentle pressure that signals relaxation to your nervous system. A drop of lavender oil on your wrists creates a sensory anchor for your practice.
Total cost if you buy nothing: $0. You already own these things.
Creating Your Perfect Practice Space at Home
You don’t need a dedicated yoga room. A corner of your bedroom, a spot in the living room after the kids are in bed, even a patch of floor in your home office works. The key is consistency of location—your nervous system starts to associate that space with relaxation, making it easier to drop into the practice.
Lighting matters more than you’d think. Harsh overhead lights keep you in alert mode. Dim the lights, use a lamp, or practice in natural evening light. Slightly cool room temperature (68-70°F) is ideal; you’ll warm up from internal heat, and cool air prevents drowsiness.
Setting boundaries with family is non-negotiable. Thirty to forty-five minutes of uninterrupted time isn’t selfish—it’s the minimum investment in your physical and mental health. Put your phone in another room. Tell your family this is your time. If you can’t protect this boundary, you’re teaching everyone (including yourself) that your wellbeing comes last.
The Right Mindset: Letting Go of “No Pain, No Gain”
This is where most women struggle. We’ve been conditioned to believe that effective exercise should hurt, should push us to our limit, should leave us sore and sweaty. Yin yoga requires redefining what “effective” looks like.
The 70% rule is your guide: never push to your maximum edge. Find the first point of resistance—where you feel sensation but could absolutely hold the pose for 5 minutes—and stop there. That’s your edge. Going deeper doesn’t create better results; it triggers your nervous system’s protective response, causing muscles to tighten instead of release.
Patience isn’t just a nice concept here; it’s the actual mechanism of change. Fascia releases slowly. Your nervous system needs time to trust that it’s safe to let go. Forcing faster results breaks trust with your body and usually leads to injury or burnout.
Your Complete Gentle Yin Yoga Sequence (30-45 Minutes)

Pose 1 – Child’s Pose (3-5 minutes): Ground and Center
How to do it: Start kneeling with knees either together or wide apart (wide-knee version creates more hip opening). Sit your hips back toward your heels and fold forward, extending arms in front of you or resting them alongside your body. Place a folded blanket or pillow under your torso if there’s space between your chest and thighs. Support your forehead on stacked hands, a block, or a cushion.
What you’ll feel: Gentle stretch through your hips, lower back, and shoulders. Your breath naturally deepens as your belly presses into your thighs on each inhale.
Modifications: If your hips don’t reach your heels, place a cushion between your seat and heels for support. If your forehead doesn’t reach the floor comfortably, stack props higher—no straining your neck.
Why it’s powerful: This immediately activates your parasympathetic nervous system. The gentle compression on your belly stimulates your vagus nerve, signaling your body that it’s safe to relax. This is your foundation pose—if you only have 5 minutes, do this.
Pose 2 – Supported Butterfly (4-5 minutes): Open Your Hips
How to do it: Sit with the soles of your feet together, knees falling open to the sides. Place a cushion or bolster lengthwise behind you, then slowly recline back onto it, supporting your spine and head. Let your arms rest to the sides, palms up. If your knees are high in the air, place blocks or pillows under each thigh for support.
What you’ll feel: Deep release through your inner thighs, hip flexors, and groin. You might feel sensation in your lower back as it settles into the support.
Modifications: Slide your feet farther from your pelvis to reduce intensity. Elevate your hips on a folded blanket to decrease the hip opening. The goal is sustainable sensation, not maximum stretch.
Benefits for 40+: Women hold tremendous tension and stored emotions in the hips. This pose targets exactly where you’ve been clenching through stress, long work hours, and the physical demands of daily life. Don’t be surprised if emotions surface—this is normal and actually beneficial.
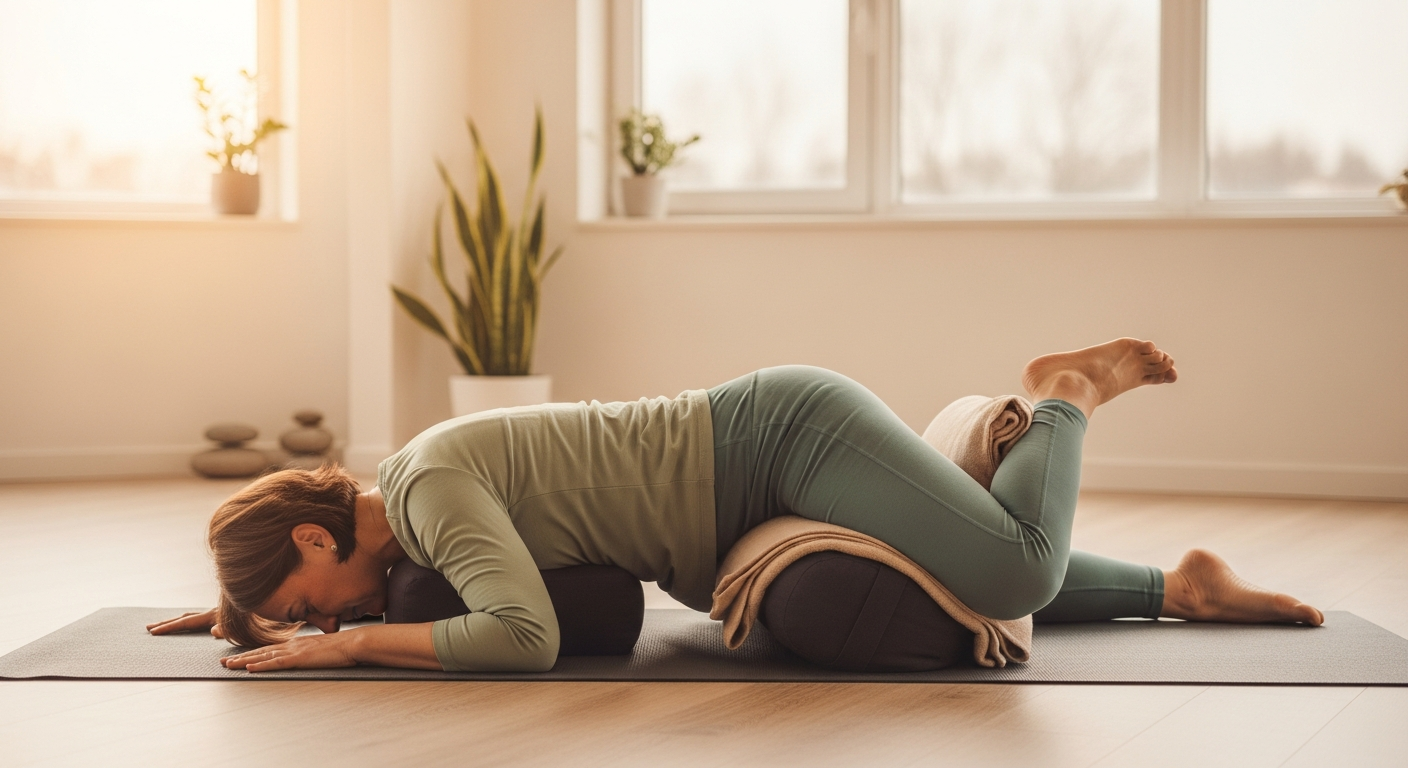
Pose 3 – Caterpillar Pose (4-5 minutes): Decompress Your Spine
How to do it: Sit with legs extended straight in front of you. Place a bolster or stacked pillows across your thighs. Fold forward from your hips, resting your torso on the support and letting your head hang heavy. Your arms can drape over the bolster or rest on the floor. If your hamstrings are tight, bend your knees generously and place a rolled blanket under them.
What you’ll feel: Gentle traction along your entire spine, from tailbone to neck. Hamstring stretch without forcing. Your lower back slowly releases tension you didn’t know you were holding.
Modifications: Sitting on a folded blanket tilts your pelvis forward and makes the fold easier. More knee bend equals less intensity—there’s zero shame in bent knees. You can also sit in a chair and fold forward over your thighs.
Why it transforms: This directly counteracts hours of sitting at a desk, driving, or standing with a forward-tilted pelvis. The gentle compression on your belly also aids digestion and stimulates your parasympathetic response.
Pose 4 – Reclining Twist (4 minutes each side): Wring Out Tension
How to do it: Lie on your back and draw your right knee into your chest. Extend your left leg long on the mat. Guide your right knee across your body toward the left side, letting it rest on a pillow if it doesn’t reach the floor. Extend your right arm to the side, keeping your right shoulder grounded. Your gaze can follow your right hand or stay neutral.
What you’ll feel: Rotation through your mid and lower back. Gentle stretch across your chest and shoulder. Possible gurgling in your belly—that’s your digestive system responding to the twist.
Modifications: Place a thick pillow between your knees and the floor for support. If your shoulder lifts off the mat, that’s fine—don’t force it down. Stack two or three pillows under your knee if needed.
Proven benefits: Twists compress and release your internal organs, stimulating digestion and promoting detoxification through your lymphatic system. They also help rehydrate the discs between your vertebrae.
After 4 minutes, draw both knees to your chest, rock gently side to side to release your lower back, then repeat on the second side.
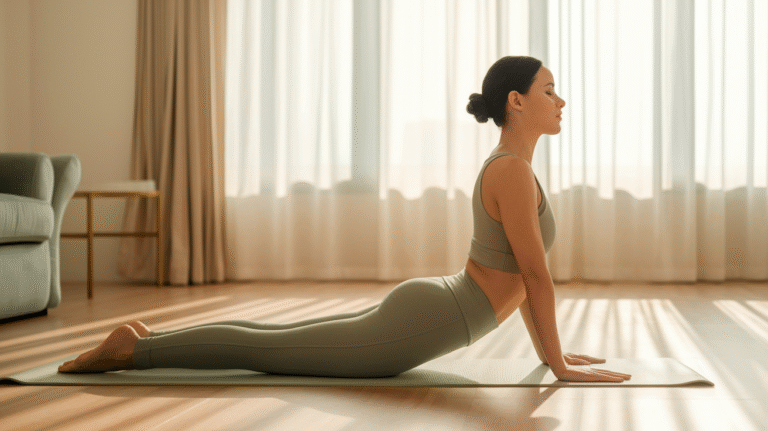
Pose 5 – Sphinx or Seal Pose (3-4 minutes): Gentle Backbend
How to do it: Lie on your belly. For Sphinx (gentler), prop yourself on your forearms with elbows under shoulders. For Seal (deeper), press up onto straight arms, hands under shoulders. Let your belly soften completely—don’t engage your core. Your lower back will compress; this is intentional and beneficial.
What you’ll feel: Gentle compression in your lower back, stretch through your hip flexors and belly. Some people feel this in their upper back between shoulder blades.
Modifications: Move your elbows forward (Sphinx) or hands forward (Seal) to reduce the backbend. Place a folded blanket under your pelvis if you feel pinching in your lower back. If both versions feel too intense, skip this pose entirely.
Results you’ll notice: Improved posture as you counteract the constant forward fold of modern life. Reduced lower back pain as you restore the natural curve of your lumbar spine. Stronger back muscles from the gentle engagement required to hold the pose.
Pose 6 – Thread the Needle (3-4 minutes each side): Shoulder and Upper Back Release
How to do it: Start on hands and knees. Slide your right arm under your left arm, threading it through until your right shoulder and ear rest on the mat. Your left hand can stay planted, reach forward, or rest on your lower back. Let your hips stay relatively level above your knees.
What you’ll feel: Deep stretch between your shoulder blades, through the back of your right shoulder, and along the right side of your neck. Gentle twist in your mid-back.
Modifications: Place a folded blanket or pillow under your head and shoulder for support. Adjust how far you thread through based on sensation—stop when you feel the stretch, don’t push to maximum.
Why it’s effective: This targets exactly where stress accumulates—between your shoulder blades, in your upper back, across the tops of your shoulders.