yin yoga sequence for summer
Feeling overheated, overwhelmed, and burnt out this summer? While everyone’s pushing high-intensity workouts and beach body boot camps, your body might be craving something completely different—a cooling, restorative practice that delivers powerful results without the sweat.
When I first encountered yin yoga during a particularly brutal July heat wave, I was skeptical. I’d spent years believing that “real” fitness meant dripping sweat and burning muscles.
But after three weeks of holding passive stretches for 3-5 minutes each in my living room, something shifted. My chronic hip tightness from running eased, my sleep improved, and ironically, my performance in higher-intensity workouts actually increased. The secret? I’d finally given my overworked nervous system permission to recover.
Here’s what most fitness content won’t tell you: summer isn’t just about looking good in a swimsuit. It’s a season that demands a different approach to movement—one that addresses the physiological stress of heat, the accumulated tension from months of training, and the reality that busy professionals and parents need effective practices they can do at home in 45 minutes or less.
This proven yin yoga sequence does exactly that, and you don’t need expensive equipment, a gym membership, or previous yoga experience to start.
Why Summer Needs a Different Yoga Approach

Understanding Summer’s Fire Element in Traditional Chinese Medicine
Traditional Chinese Medicine correlates summer with the fire element, which governs the heart and small intestine meridians. Before you dismiss this as esoteric philosophy, understand that these meridians map to fascial lines and nerve pathways that modern anatomy recognizes. The heart meridian runs down the inner arm—exactly where many of us hold tension from desk work and phone scrolling. The small intestine meridian traces the outer arm and shoulder blade, a common site of chronic tightness.
During summer, excess “fire” energy accumulates both physically (literal heat exposure) and emotionally (overstimulation from longer days and packed schedules). Your body responds by contracting, protecting, and eventually breaking down if you don’t provide cooling, restorative input. This isn’t mysticism—it’s your autonomic nervous system responding to environmental stressors.
The connection between seasonal energy and your body’s needs is straightforward: when external temperatures rise, your body works harder to maintain homeostasis. Adding intense exercise on top of that creates a compounding stress response. This is why so many people hit a wall in July and August, even when their spring training was going strong.
The Science Behind Cooling Down Your Practice
Yin yoga activates your parasympathetic nervous system—the “rest and digest” mode that allows actual recovery to happen. Research published in the *International Journal of Yoga Therapy* shows that holding passive stretches for 3-5 minutes triggers a measurably different physiological response than dynamic movement. Your heart rate variability improves, cortisol levels drop, and connective tissue (fascia) begins to remodel in ways that short-duration stretching simply cannot achieve.
Here’s what actually happens: when you hold a yin pose for several minutes, you’re applying gentle, sustained tension to your fascia—the connective tissue web that surrounds every muscle, bone, and organ. Unlike muscles, which respond to rhythmic contraction and release, fascia needs time under tension to hydrate, reorganize, and release adhesions. Think of it like slowly stretching taffy versus yanking it—one creates lasting change, the other just creates temporary deformation.
The powerful results for flexibility and recovery come from this targeted fascial work. A 2019 study in the *Journal of Bodywork and Movement Therapies* found that participants who practiced yin yoga twice weekly for 12 weeks showed significant improvements in hamstring and hip flexibility compared to control groups—improvements that lasted months after the study ended.
Common Summer Fitness Mistakes That Yin Yoga Solves
The biggest mistake I see (and made myself for years): overtraining in heat without adequate recovery. Your body doesn’t distinguish between training stress and environmental stress—cortisol is cortisol. When you stack a HIIT workout on top of 90-degree temperatures and poor sleep from hot nights, you’re not building fitness. You’re accumulating damage.
Ignoring hydration and connective tissue health is the second critical error. Most people think hydration means drinking water, but your fascia needs movement to actually absorb that water. Static positions held for several minutes create a “squeeze and soak” effect—compression followed by release that literally pumps fluid through your connective tissue.
Many fitness enthusiasts push yang energy (active, heating, intense) when their body desperately needs yin balance (passive, cooling, restorative). This isn’t about being lazy. Research consistently shows that recovery is when adaptation happens. The workout breaks you down; the rest builds you back stronger.
This gentler approach complements your existing workout routine perfectly. For muscle builders, improved fascial mobility means better range of motion and reduced injury risk. For weight loss seekers, better parasympathetic activation means improved cortisol regulation—critical because chronically elevated cortisol actively prevents fat loss. For beginners, it builds body awareness and confidence without the intimidation factor of a packed gym.
The Proven Benefits of Yin Yoga for Summer Wellness

Physical Transformation You Can Feel
Deep fascial release sculpts better posture and alignment in ways that strength training alone cannot. I notice this most in my shoulders—years of desk work had created a forward hunch that no amount of rows or face pulls could fully correct. Three months of consistent yin practice targeting my chest and shoulder fascia created visible changes in my standing posture.
Improved joint mobility comes from targeting the connective tissue around joints, not just the muscles crossing them. Your hip capsule, for example, is made of dense fascia that needs sustained, gentle stress to maintain elasticity. This is especially important as we age—joint capsule stiffness is one of the primary drivers of age-related mobility loss, and it’s completely preventable with the right approach.
Enhanced circulation combats summer sluggishness through a mechanism called “myofascial release.” When you compress tissue for several minutes then release, you create a flush of fresh blood flow—like squeezing a sponge then letting it re-expand. This isn’t just theory. Studies using thermal imaging show measurably increased blood flow to areas targeted with sustained, passive stretching.
Better sleep quality during hot, restless nights happens because yin yoga directly downregulates your sympathetic nervous system. A 2020 study in *BMC Complementary Medicine and Therapies* found that participants practicing yin yoga before bed showed significant improvements in sleep quality scores and reductions in the time needed to fall asleep. The mechanism? Lower cortisol, increased melatonin production, and reduced muscle tension that allows your body to fully relax.
Mental and Emotional Results
Stress reduction for busy professionals juggling work and summer activities isn’t just about feeling calmer—it’s about measurable changes in stress biomarkers. The same parasympathetic activation that improves physical recovery also reduces anxiety, improves focus, and enhances emotional regulation. When you’re holding a challenging pose for four minutes, you’re literally training your nervous system to stay calm under discomfort—a skill that transfers directly to stressful meetings and overwhelming to-do lists.
Emotional release stored in hips, shoulders, and connective tissue sounds New Age until you experience it. Here’s the physiology: your body stores stress responses in your fascia through chronic muscle contraction and tissue adhesions. When that tissue finally releases after minutes of sustained stretching, it’s common to experience unexpected emotions—sometimes tears, sometimes relief, sometimes just a profound sense of letting go. This isn’t magical; it’s your nervous system processing and releasing accumulated stress.
Cultivating patience and mindfulness in a yin practice builds skills that transform your entire fitness journey. When you can sit with discomfort for five minutes without fidgeting, checking your phone, or giving up, you’re developing the exact mental resilience that separates people who achieve long-term results from those who quit after three weeks.
How Yin Complements Your Other Fitness Goals
For weight loss seekers, supporting cortisol regulation through regular yin practice addresses one of the most overlooked barriers to fat loss. Chronically elevated cortisol increases abdominal fat storage, disrupts hunger hormones, and reduces insulin sensitivity. You can’t out-cardio bad stress management—I learned this the hard way after months of increasing my running volume while my waist measurement stayed stubbornly unchanged.
For muscle builders, preventing injury and improving range of motion directly translates to better training performance. Limited ankle mobility ruins your squat depth. Tight hip flexors compromise your deadlift setup. Restricted thoracic spine rotation limits your pressing strength. Yin yoga addresses these mobility bottlenecks without the fatigue that interferes with your strength sessions.
For beginners, building body awareness without overwhelming intensity creates a foundation for all other movement. You learn what “good” sensation versus pain actually feels like. You develop the patience to progress gradually instead of forcing results. You prove to yourself that you can commit to a practice and see real changes—confidence that carries over when you’re ready to add other training modalities.
For home workout fans, this is a complete practice requiring minimal space and zero equipment. You can do this entire sequence in a 6×4 foot area with items you already own. No monthly fees, no commute, no waiting for equipment, no intimidation.
Essential Preparation for Your Summer Yin Practice

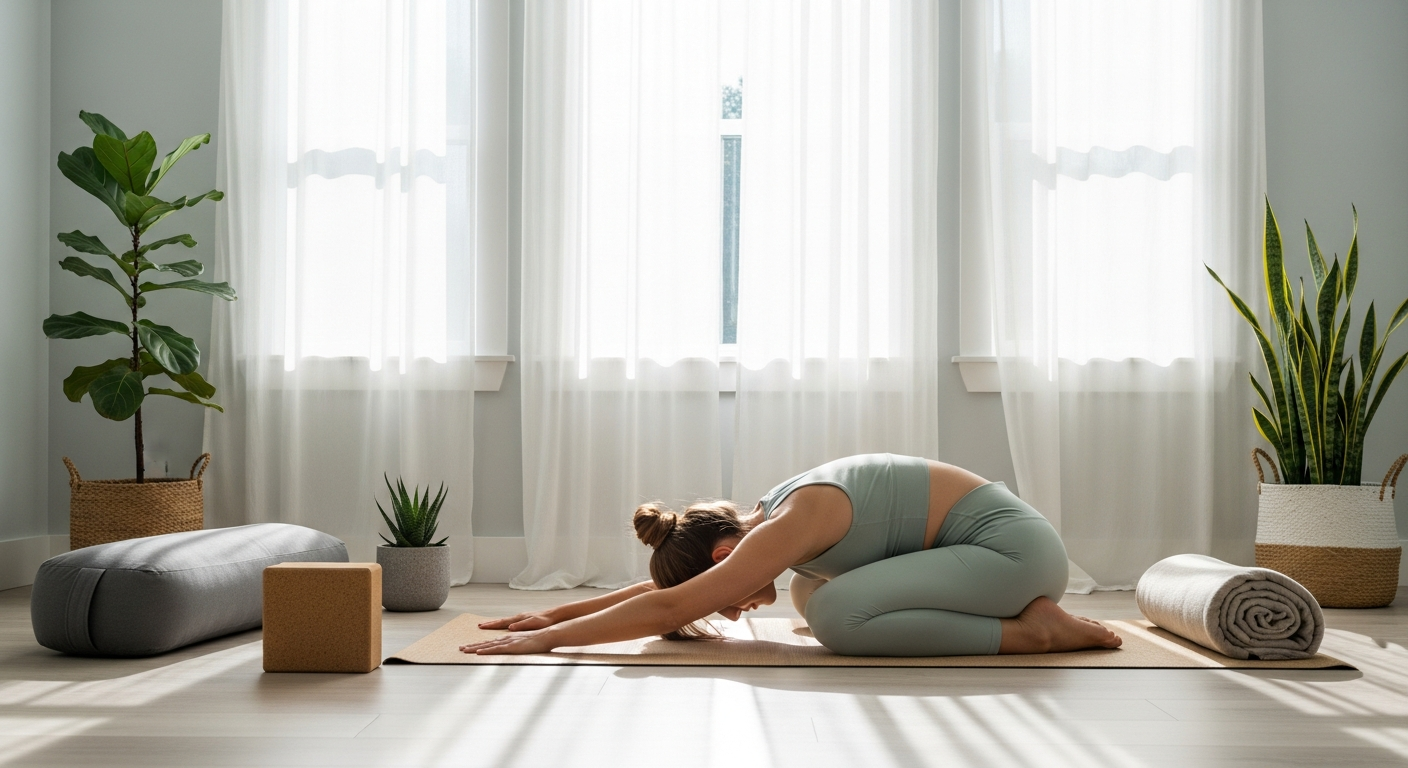
Creating Your Cooling Practice Space at Home
The best times of day to practice are early morning (before 8 AM) or evening (after 7 PM) when temperatures naturally drop. I prefer evening practice—it signals to my body that the day’s demands are over and it’s time to transition into rest mode. Morning practice works beautifully if you need to start your day from a grounded, calm place instead of immediately jumping into emails and stress.
Setting up a comfortable, distraction-free zone requires less than you think. Clear a space large enough to lie down with arms and legs extended. Turn off notifications on your phone—or better yet, leave it in another room. This practice demands presence in a way that scrolling between sets never will.
Props you’ll need: yoga blocks (or thick books), a bolster (or couch cushion), blankets (or towels), and optionally an eye pillow (or folded washcloth). I resisted using props for months, thinking I should be “flexible enough” without them. That’s ego talking. Props allow you to relax into poses instead of fighting them—which is the entire point of yin practice.
Creating ambiance matters more than you might expect. Dim lighting signals to your nervous system that it’s time to wind down. A slightly cool room (68-72°F if possible) prevents overheating during long holds. Some practitioners like a fan on low for gentle air movement. I keep a glass of room-temperature water nearby for sipping between poses.
What to Know Before You Begin
Hold each pose for 3-5 minutes for proven results—this is the minimum time needed for fascial remodeling to begin. Beginners can start with 2-3 minutes and gradually increase. Advanced practitioners might hold for 5-7 minutes. The key is finding your edge: the point where you feel intense sensation but can still breathe deeply and relax.
The difference between “good” sensation and pain is critical to understand. Good sensation feels like a deep stretch or pressure that’s uncomfortable but not sharp. It might be intense, but it doesn’t trigger a protective response. Pain feels sharp, burning, or electric—it makes you want to escape immediately. Pain means you’ve gone too far. Back off until you find sensation you can breathe into.
Breathing techniques enhance the cooling effect: inhale through your nose for a count of four, exhale through your nose for a count of six. This 4-6 breathing pattern activates your parasympathetic nervous system and creates a natural cooling sensation. Some traditions teach exhaling through an open mouth with a “ha” sound for additional cooling—experiment and see what works for you.
Why stillness feels challenging at first: your nervous system is accustomed to constant stimulation and movement. Sitting still forces you to confront whatever you’ve been avoiding—discomfort, boredom, anxious thoughts, physical sensation. This is okay. This is actually the practice. Every time you choose to stay instead of fidget, you’re rewiring your stress response.
Hydration and Timing Tips
Pre-practice hydration strategies for summer: drink 16-20 ounces of water 60-90 minutes before practice, then sip as needed. Avoid chugging water immediately before—a sloshing stomach makes forward folds miserable. If you’re practicing in the evening after a hot day, you might need additional electrolytes. I add a pinch of sea salt to my water on particularly sweaty days.
Don’t eat a heavy meal for at least 2-3 hours beforehand. A light snack 60 minutes before is fine, but lying on a full stomach in forward folds is uncomfortable at best and nauseating at worst. I learned this after attempting yin practice 45 minutes after a large dinner—not recommended.
If you’re practicing outdoors, choose shade and bring extra support for your head (the ground is harder than your yoga mat). Outdoor practice can be beautiful but adds variables—bugs, uneven surfaces, temperature fluctuations. I suggest mastering the sequence indoors first.
Set realistic expectations for your first few sessions: you probably won’t relax immediately. Your mind will race. You’ll want to check the time constantly. Your body might shake or twitch as it releases tension. All of this is normal. The transformation happens with consistency, not perfection.
Your Complete Summer Yin Yoga Sequence

Pose 1: Sphinx Pose (Heart Opener)
Target areas: Lower back, chest, heart meridian, hip flexors
Step-by-step instructions: Lie on your belly with legs extended behind you. Place your forearms on the floor parallel to each other, elbows roughly under your shoulders. Press your forearms down and lift your chest, creating a gentle backbend. Let your lower back soften—this isn’t about how high you lift, but about opening the front body while allowing the back to release.
Benefits: Opens the front body that collapses from desk work and phone use, stimulates heart meridian energy that governs emotional regulation, counteracts the forward-slouching posture most of us default to all day.
Modifications: If this feels too intense in your lower back, move your elbows forward (creating a gentler curve) or place a bolster under your chest. If you need more intensity, come up onto your hands (Seal Pose).
Hold time: 3-4 minutes. Breathe deeply into your belly and chest. Notice where you feel sensation—lower back, chest, shoulders, or all three.
Pose 2: Saddle Pose (Quad and Hip Flexor Release)
Target areas: Quadriceps, hip flexors, stomach meridian, ankles
Step-by-step instructions: Kneel with your knees hip-width apart and feet alongside your hips (tops of feet on the floor). Slowly recline backward, first to your forearms, then potentially all the way to the floor. Support yourself with blocks, bolsters, or stacked blankets behind you. Your knees should stay on the floor—if they lift, add more support under your back.
Benefits: This is one of the most powerful releases for tight quads and hip flexors—areas that get chronically shortened from sitting, cycling, and running. It improves digestion by stimulating the stomach meridian and creates space in the front of your hips that translates directly to better squat depth and reduced lower back pain.
Modifications: Beginners should absolutely use significant support (a bolster or several folded blankets). You can also do one leg at a time (Half Saddle), which reduces intensity and allows you to address asymmetries. If kneeling bothers your knees, place a folded blanket under them.
Hold time: 3-5 minutes. This pose can be intense—your quads might burn, shake, or feel like they’re being stretched to their limit. Remember: sensation is okay, sharp pain is not.
Pose 3: Toe Squat/Ankle Stretch (Grounding Pose)
Target areas: Feet, toes, ankles, kidney meridian, plantar fascia
Step-by-step instructions: From kneeling, tuck your toes under so you’re on the balls of your feet. Sit back on your heels, bringing your full body weight onto your tucked toes. Place your hands on the floor in front of you for support if needed. Keep your spine neutral—don’t collapse forward.
Benefits: Releases foot and ankle tension from summer sandals, flip-flops, and barefoot walking. Grounds excess fire energy by stimulating the kidney meridian (which runs through the sole of the foot). Prevents and treats plantar fasciitis by addressing fascial restrictions in the feet.
Modifications: Place a rolled blanket under your knees for cushioning. Keep more weight in your hands if the foot sensation is too intense. You can also do one foot at a time. If you have a foot injury, skip this pose.
Hold time: 1-3 minutes. This one is genuinely intense for most people—your feet might burn, tingle, or feel like they’re cramping. Start with 60 seconds and build gradually. The sensation should ease slightly after the first minute as your tissue begins to release.
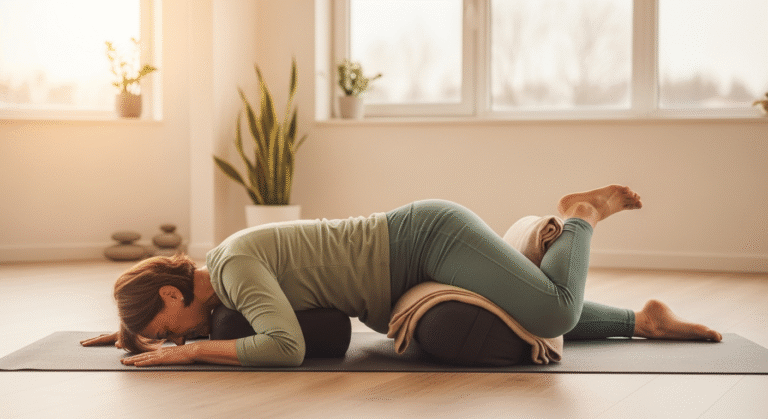
Pose 4: Butterfly Pose (Hip Opener)
Target areas: Inner thighs, hips, groin, kidney and liver meridians, lower back
Step-by-step instructions: Sit on the floor and bring the soles of your feet together, letting your knees fall open to the sides. Bring your feet as close to or as far from your pelvis as feels appropriate (closer = more intense). Fold forward from your hips, allowing your spine to round naturally. Rest your forearms on the floor, on blocks, or on a bolster.
Benefits: Effective, accessible hip release that works for all levels. Calms the nervous system through gentle compression of the belly. Addresses the chronic inner thigh and groin tightness that limits hip mobility in squats, lunges, and daily movement.
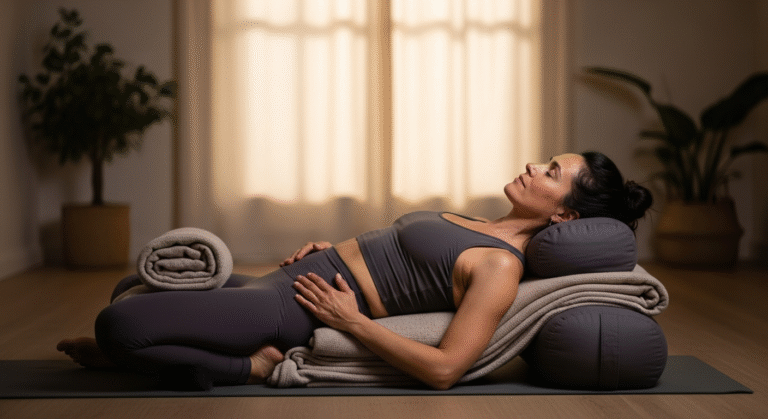
Modifications: Place blocks or folded blankets under your knees if they’re hovering uncomfortably high. Use a bolster under your forehead or chest for support. Keep your feet further from your pelvis if the inner thigh sensation is too intense. You can also lie back instead of folding forward (Reclined Butterfly).
Hold time: 4-5 minutes. Let gravity do the work—don’t actively pull yourself deeper. Focus on softening and releasing with each exhale.