8 EffectiveYoga Poses for Back Pain Relief
You’re hunched over your desk at 3 PM, and that familiar ache creeps into your lower back. You shift in your chair, trying to find a comfortable position that doesn’t exist.
Maybe you stand up, press your hands into your lower back, and lean backward—a temporary relief that lasts about 30 seconds before the tightness returns.
Sound familiar? You’re not alone. Research shows that 80% of adults experience back pain at some point in their lives, with lower back pain being the single leading cause of disability worldwide.
But here’s what most people don’t realize: you don’t need expensive chiropractor visits, fancy gym equipment, or even a gym membership to find real, lasting relief.
When I first started dealing with chronic lower back pain five years ago, I tried everything. I bought a standing desk. I scheduled massage appointments I couldn’t really afford.
I even invested in one of those lumbar support cushions that promised to “revolutionize” my sitting experience. Nothing provided more than temporary relief. The pain always came back, usually worse than before.
Then I discovered something that actually worked: just 10 minutes of specific, science-backed yoga stretches on my living room floor. No fancy equipment. No intimidating yoga studio. Just me, a mat (honestly, a towel works fine), and a commitment to consistency.
This guide reveals the most effective yoga poses backed by actual research to relieve back pain, whether you’re dealing with occasional stiffness or chronic discomfort. I’m not going to promise you’ll be pain-free overnight—that’s not how bodies work. But I will show you exactly what to do, how to do it safely, and what realistic results you can expect. These are the same poses that helped me go from daily back pain that interrupted my sleep to maybe one or two minor episodes per month. The difference? I finally addressed the root cause instead of just treating symptoms.
Why Your Back Is Screaming for Help (And Why Yoga Is the Answer)

The Real Culprits Behind Your Back Pain
Let’s talk about what’s actually happening in your back right now. Your spine wasn’t designed for the way most of us live. We sit for 8-12 hours daily—commuting, working at desks, eating meals, watching TV. Every hour of sitting tightens your hip flexors and weakens your glutes, creating what physical therapists call “lower cross syndrome.” Essentially, your body gets stuck in a seated position even when you’re standing.
Add poor posture to that equation—shoulders rounded forward, head jutting out to stare at screens—and you’ve created a perfect storm. Your upper back muscles are constantly strained trying to hold your head up (which weighs about 10-12 pounds), while your lower back compensates for weak core muscles that should be doing the stabilizing work.
Then there’s stress. When you’re anxious or overwhelmed, your body responds by tensing muscles, particularly in your neck, shoulders, and lower back. This chronic muscle tension restricts blood flow, limiting the oxygen and nutrients your muscles need to function properly. Over time, this creates trigger points—those painful knots that make you wince when someone presses on them.
Here’s what most people miss: there’s a crucial difference between acute and chronic back pain, and it matters for how you approach treatment. Acute pain is sudden—you lifted something wrong, you slept in a weird position. It’s sharp, specific, and usually resolves within a few weeks. Chronic pain is the sneaky one. It develops gradually, persists for three months or longer, and often doesn’t have a single identifiable cause. It’s your body’s way of saying the system is breaking down, not just one component.
The Science Behind Yoga for Back Pain Relief
I used to think yoga was just fancy stretching with Sanskrit names. I was completely wrong. A landmark study published in the Annals of Internal Medicine found that yoga was more effective than standard medical care for chronic lower back pain, with participants reporting significant improvements in both pain and function after just 12 weeks of practice.
But why does yoga work when simple stretching often doesn’t? It’s the trifecta approach: yoga simultaneously addresses strength, flexibility, and stress reduction—the three pillars of back health. When you hold a plank variation or bridge pose, you’re building the core and glute strength that supports your spine. When you move through cat-cow or child’s pose, you’re restoring flexibility to muscles that have become rigid from repetitive positioning. And when you focus on breath work and mindful movement, you’re activating your parasympathetic nervous system, which literally tells your muscles it’s safe to relax.
Research from the National Institutes of Health shows that yoga changes how your brain processes pain signals. Regular practitioners develop increased gray matter in brain regions associated with pain modulation. Translation: your nervous system becomes less reactive to pain signals over time. This isn’t about “toughing it out”—it’s about retraining your neuromuscular system to function properly.
What Makes Yoga Different from Other Solutions
Here’s what I learned the hard way: most back pain solutions are temporary fixes. Pain medication masks symptoms but doesn’t address why you’re hurting. Massage feels amazing but the relief typically lasts a few days at most. Even physical therapy, while valuable, often stops once your insurance coverage runs out.
Yoga is different because it works with your body’s natural healing mechanisms rather than overriding them. You’re not dependent on appointments, equipment, or anyone else. Once you learn these poses, they’re yours forever—a tool you can use anytime, anywhere. I’ve done this sequence in hotel rooms, during lunch breaks in my office (door closed), and even modified versions in airport terminals during long layovers.
The sustainability factor is huge. This isn’t a 30-day challenge or a quick fix. This is a practice that becomes more effective the longer you do it, not less. Your body adapts, strengthens, and literally reshapes itself around healthier movement patterns. Six months into my yoga practice, I noticed I was unconsciously sitting up straighter, engaging my core while standing, and moving more fluidly throughout the day. The yoga wasn’t just something I did for 10 minutes—it was changing how my body functioned all day long.
The 8 Most Powerful Yoga Poses for Back Pain Relief

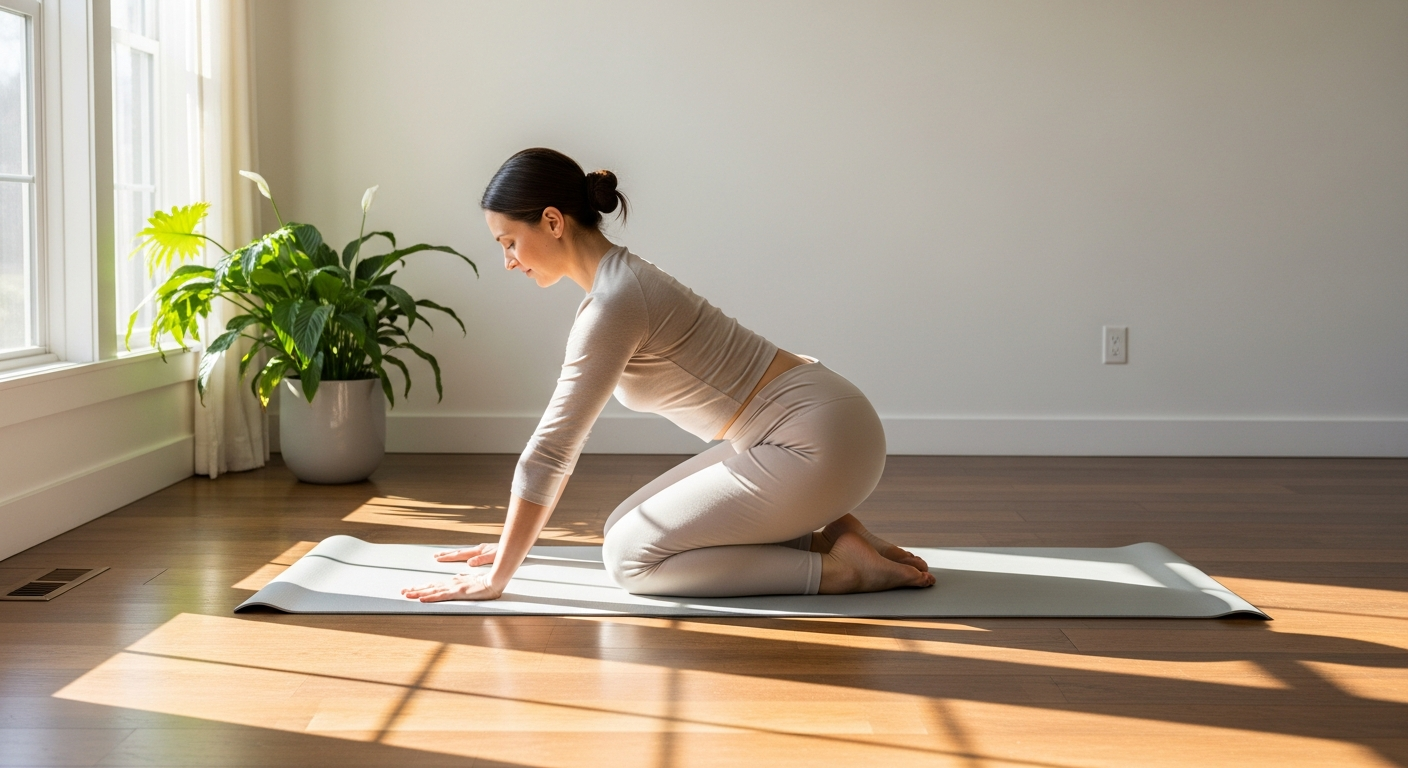
1. Child’s Pose (Balasana) – Your Go-To Reset Button
Start here, return here often. Child’s pose is the foundation of any back pain relief sequence because it gently lengthens your entire spine while giving your nervous system permission to calm down.
Begin on your hands and knees, then sit your hips back toward your heels while extending your arms forward on the floor. Your forehead rests on the mat (or a folded towel if that’s more comfortable). The key that most people miss: this isn’t a passive pose. Actively reach your fingertips forward while simultaneously pressing your hips back. You should feel a gentle traction along your entire spine.
Breathe deeply here. Inhale into your lower back, feeling your ribs expand against your thighs. Exhale completely, allowing your body to soften and settle deeper into the pose. This breath pattern activates the muscles between your ribs (intercostals) and gently massages your internal organs, promoting relaxation throughout your entire torso.
If your hips don’t reach your heels comfortably, place a pillow or folded blanket between your thighs and calves for support. If your forehead doesn’t reach the floor, stack your fists or use a yoga block—forcing yourself into an uncomfortable position defeats the purpose. Hold for 1-3 minutes, and return to this pose anytime during your practice when you need to reset.
2. Cat-Cow Stretch (Marjaryasana-Bitilasana) – Mobilize Your Spine
This dynamic movement is non-negotiable for spinal health. Your spine has 33 vertebrae designed to move in multiple directions, but most of us only use a fraction of that available range. Cat-cow restores mobility to every segment of your spine, from your tailbone to the base of your skull.
Start on hands and knees with your wrists directly under your shoulders and knees under your hips. For cow pose, inhale as you drop your belly toward the floor, lift your chest and tailbone toward the ceiling, and gaze slightly upward. For cat pose, exhale as you round your spine toward the ceiling, tuck your tailbone, and draw your chin toward your chest.
Here’s the common mistake I made for months: moving too quickly without connecting breath to movement. The magic happens when you move slowly and deliberately, taking 4-5 seconds for each transition. Your breath should lead the movement, not the other way around. Inhale initiates the extension (cow), exhale initiates the flexion (cat).
Pay attention to your entire spine, not just your lower back. Many people hinge primarily from their lower back because that’s where they feel the most restriction. Instead, imagine your spine is a wave, with the movement flowing sequentially from your tailbone through your mid-back and finally your neck. This distributes the motion evenly and prevents overworking any single area. Complete 8-10 slow, mindful rounds.
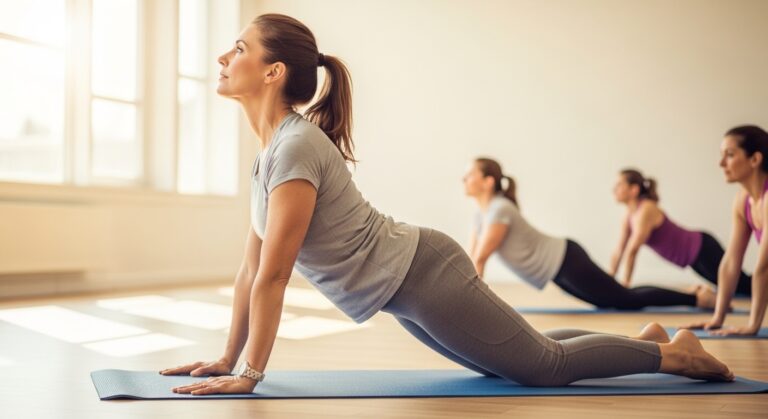
3. Downward-Facing Dog (Adho Mukha Svanasana) – Build Strength While You Stretch
This pose simultaneously lengthens your entire posterior chain while building the shoulder and core strength that protects your back. But here’s what nobody tells beginners: Downward Dog is actually a resting pose once you learn to do it correctly. It shouldn’t feel like torture.
From hands and knees, tuck your toes under and lift your hips toward the ceiling, forming an inverted V-shape with your body. Your hands should be shoulder-width apart with fingers spread wide, middle fingers pointing forward. Press firmly through your entire hand, especially the base of your index finger and thumb—this takes pressure off your wrists.
The biggest mistake? Forcing straight legs when your hamstrings aren’t ready. If your hamstrings are tight (they probably are if you sit a lot), bend your knees generously and focus on lengthening your spine instead. A long spine with bent knees is infinitely better than a rounded back with straight legs. You can “walk the dog” by alternately bending and straightening each leg, which provides a gentle calf stretch while keeping your spine long.
For your back specifically, think about drawing your chest toward your thighs while pushing the floor away with your hands. This creates traction through your entire spine, decompressing the vertebrae and relieving pressure on spinal discs. If this feels too intense, try the modification against a wall: place your hands on a wall at hip height and walk your feet back until your body forms an L-shape. This provides the same spinal benefits with less intensity. Hold for 30-60 seconds, building up to longer holds as you develop strength.
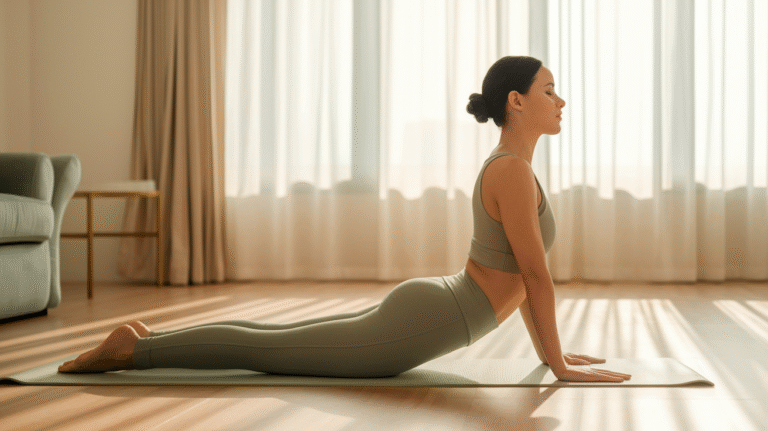
4. Sphinx Pose – Gentle Backbend for Lower Back Relief
This is the antidote to your desk posture. Most back pain sufferers spend their days in spinal flexion (rounded forward), and sphinx pose provides the opposite—gentle extension that restores your spine’s natural curves.
Lie on your belly with your legs extended behind you, hip-width apart. Place your forearms on the floor parallel to each other, elbows directly under your shoulders. Press your forearms and palms firmly into the floor as you lift your chest, drawing your shoulder blades down your back. Your gaze is forward and slightly upward, creating a long line from the crown of your head through your tailbone.
Here’s the critical detail most people miss: this isn’t about how high you lift. It’s about where you feel the backbend. You should feel a gentle, even arch distributed throughout your entire spine—not compression in your lower back. If you feel pinching or sharp pain in your lower back, you’re going too high. Lower down slightly and engage your abdominals—yes, even in a backbend. Drawing your navel gently toward your spine protects your lower back by preventing excessive compression.
Think about lengthening your spine forward and up rather than just lifting. Imagine someone is gently pulling the crown of your head forward while you press your pubic bone into the floor. This creates traction rather than compression. Hold for 1-3 minutes, breathing steadily. If this feels too intense, place a folded blanket under your chest for support. As you build strength and flexibility, you can progress to deeper backbends like cobra or upward-facing dog, but there’s no rush. Sphinx pose provides tremendous therapeutic benefit on its own.
5. Supine Twist – Release Deep Tension
Your spine rotates—it’s designed to—but most of us never actually rotate it. This spinal twist releases tension in your back muscles, massages your internal organs, and helps realign your vertebrae after they’ve been pulled out of optimal position by daily activities.
Lie on your back with your knees bent and feet flat on the floor. Extend your arms out to the sides in a T-position, palms facing up. Draw your knees toward your chest, then slowly lower both knees to the right side while turning your head to the left. Your left shoulder might lift off the floor—that’s okay. Don’t force it down.
The key to safe, effective twisting: move from your core, not your momentum. Lower your knees slowly and with control, using your abdominal muscles to guide the movement. Once you’re in the twist, take 5-10 deep breaths. With each exhale, see if you can soften a little deeper into the pose, but never force it. The release happens through relaxation, not aggression.
Here’s what makes this pose so effective for back pain: it creates space between your vertebrae on one side while gently compressing the other side, essentially “wringing out” your spine like a towel. This helps restore fluid to your spinal discs and releases muscular tension that builds up from one-sided activities (like always carrying a bag on the same shoulder or favoring one side while sitting).
Hold for 2 minutes on each side. If your knees don’t reach the floor comfortably, place a pillow or folded blanket under them for support. The goal isn’t to touch the floor—it’s to feel a gentle, sustained stretch through your spine and outer hip.
6. Pigeon Pose (Modified) – Unlock Your Hips to Free Your Back
Tight hips are often the hidden cause of back pain. When your hip flexors and external rotators are restricted, your lower back compensates by moving more than it should, leading to strain and pain.
Start on hands and knees. Bring your right knee forward toward your right wrist, then angle your right shin across your mat (your right foot ends up somewhere near your left hip). Extend your left leg straight behind you. Square your hips toward the front of your mat—this is crucial. Most people let their right hip hike up, which misses the entire point of the pose.
If your right hip is floating way off the floor, this pose is too intense for you right now, and that’s perfectly fine. Instead, do the modified version: lie on your back, cross your right ankle over your left thigh just above the knee, and draw your left thigh toward your chest. Thread your right hand through the space between your legs and clasp your hands behind your left thigh. This figure-4 stretch provides the same hip opening benefits without the risk of knee or back strain.
The hip-back connection is real and powerful. Your hip flexors (particularly the psoas muscle) attach directly to your lumbar spine. When these muscles are chronally tight from sitting, they pull your lower back into excessive arch, creating compression and pain. Regular hip opening work—even just 2-3 minutes per side, 3-4 times per week—can dramatically reduce lower back pain by addressing this root cause.
Hold for 2-3 minutes on each side, breathing deeply and allowing gravity to do the work. Never force this pose. If you feel sharp pain in your knee, back out immediately and stick with the modified version.
7. Legs-Up-The-Wall – Instant Relief After Long Days
This is the most accessible pose in this entire sequence, and it’s devastatingly effective. After a long day of gravity pulling down on your spine, this gentle inversion reverses that pressure and allows your back muscles to completely release.
Sit with your right hip against a wall. Swing your legs up the wall as you lower your back to the floor, ending with your legs extended up the wall and your arms relaxed by your sides, palms up. Your hips can be touching the wall or a few inches away—whatever feels comfortable for your hamstrings.
Here’s what happens physiologically: this position allows fluid that has accumulated in your lower body throughout the day to drain back toward your heart, reducing inflammation and swelling. More importantly for back pain, it removes all compression from your spine. There’s no weight-bearing, no muscular effort required—your back muscles can completely let go in a way they rarely get to during waking hours.
The nervous system benefits are equally powerful. This pose activates your parasympathetic nervous system (rest-and-digest mode), lowering your heart rate and blood pressure. Remember how stress creates muscle tension? This pose is the antidote. Many people find that 10-15 minutes of legs-up-the-wall before bed improves their sleep quality, which further supports back pain recovery since sleep is when your body does its deepest healing work.
Stay for 5-15 minutes. Set a timer and let yourself completely relax. If your hamstrings are very tight and your legs feel strained, move your hips farther from the wall or place a folded blanket under your hips for elevation. The benefits beyond back pain—improved circulation, reduced stress, better sleep—make this a pose worth doing even on days when your back feels fine.
8. Bridge Pose – Strengthen Your Foundation
Pain relief is great, but prevention is better. Bridge pose builds the core, glute, and hamstring strength that prevents future back pain by properly supporting your spine during daily activities.
Lie on your back with your knees bent and feet flat on the floor, hip-width apart.