30-Days Chair Fitness Challenge For Women
You don’t need a gym membership, fancy equipment, or even the ability to get down on the floor to build real strength and transform your fitness level.
If you’ve been told that effective workouts require standing, high-impact movement, or a trainer yelling at you, that’s simply not true.
The research is clear: resistance training builds muscle and burns calories regardless of your position, and seated exercise delivers measurable strength gains, improved balance, and functional fitness that actually translates to daily life.
The problem is that traditional workouts feel inaccessible when you’re managing joint pain, mobility limitations, a packed schedule, or a body that doesn’t move like it used to. You’re tired of programs that assume you can do burpees, planks, or high-impact movements.
You’ve been told you need expensive equipment or a trainer to see real results. And the idea of changing into gym clothes, driving somewhere, and showering afterward feels impossible when you’re juggling work, family, or recovery from surgery or injury.
This 30-day chair fitness challenge delivers proven, effective workouts using only a sturdy chair and 15-20 minutes of your day. By day 30, you’ll notice measurable improvements in how your body moves, feels, and performs in daily life.
You’ll build functional strength, improve balance, and tone muscles without ever leaving your living room or office. Each exercise is designed specifically for seated positions—this isn’t a “modified” version of something else; it’s a complete, powerful workout system built on the same muscle-building and cardiovascular principles that trainers use in expensive studios.
Why Chair Exercises Actually Work

The science behind seated strength training is straightforward: muscle grows in response to resistance and progressive overload, regardless of whether you’re standing, sitting, or lying down.
When you perform a 30 day chair exercise challenge, you’re activating the same muscle fibers, triggering the same adaptations, and burning calories through the same metabolic pathways as someone doing standing movements.
The difference is that seated work removes impact on your joints, stabilizes your spine against a backrest, and allows you to focus entirely on muscle engagement without worrying about balance or falling.
In a seated position, you’ll target core stabilizers (the deep abdominal muscles that hold your spine upright), hip flexors (crucial for climbing stairs and walking), shoulder girdle muscles (responsible for posture and arm strength), quadriceps (the front thigh muscles that power everyday movement), and upper back muscles (often weak from desk work). These aren’t isolation exercises—they’re functional movement patterns that strengthen the muscles you actually use.
The calorie burn potential is real. A 20-minute session of moderate-intensity seated resistance training can burn 80-150 calories depending on your body weight, intensity level, and how much resistance you add.
While that’s less than high-impact cardio, it’s consistent, sustainable, and compounds over 30 days. More importantly, the muscle you build increases your resting metabolic rate, meaning you burn more calories even when you’re not exercising.
Who Benefits Most From Chair Fitness
Women managing arthritis, knee problems, balance issues, or post-surgical recovery see immediate functional improvements.
Office workers who need workplace-compatible movement breaks can do these exercises in work clothes at their desk. Anyone intimidated by traditional gym environments or high-impact exercise culture finds that chair-based fitness removes the barrier of feeling out of place.
Parents with limited childcare, caregivers with unpredictable schedules, and anyone dealing with chronic pain or mobility limitations finally have a system that works within their actual life, not against it.
What Results Look Like in 30 Days
Functional improvements arrive first: climbing stairs with less effort, better posture at your desk, increased endurance during daily activities like grocery shopping or playing with grandchildren.
Strength markers show up by week 3—you’ll complete more reps with better form, add resistance without compensation, and notice improved range of motion in tight areas.
Visible changes (muscle definition in arms, shoulders, or legs) typically appear by week 4, even without significant weight loss.
Here’s the honest part: the scale might not move much. That’s not a failure. You’re building muscle while potentially losing some fat, and muscle weighs more than fat. The real progress shows up in how clothes fit, how you move, and how you feel—not the number on a scale.
Setting Up Your 30 Day Chair Exercise Challenge

Choosing the Right Chair for Safety
Your chair is your equipment. It needs to be stable, sturdy, and the right height. Non-negotiable requirements: no wheels, no swivel base, and a weight capacity that exceeds your body weight by at least 50 pounds (so a 150-pound person needs a chair rated for 225+ pounds).
Check the manufacturer’s specifications before you start. Ideally, when you sit with your feet flat on the floor, your knees should bend at approximately 90 degrees.
If your feet dangle, use a footrest or stack of books to create a solid base. If your knees are higher than your hips, the chair is too low.
Armrests are optional. They help if you need support getting in and out of the chair or if you have shoulder mobility limitations.
They can limit range of motion for arm exercises, so you might remove cushions or use a chair without them during your workout.
A sturdy dining chair, desk chair (with wheels locked), or wooden kitchen chair works perfectly. Avoid recliners or heavily padded chairs—you need firm support to maintain proper spinal alignment and feel the muscles working.
Optional Equipment That Enhances Results
You need nothing to start a 30 day chair workout challenge, but a few additions amplify results. Resistance bands (light to medium tension) cost $5-15 and add upper body resistance without requiring dumbbells.
Household items work as weights: water bottles (1 pound each when full), canned goods (typically 15-30 ounces), or filled grocery bags.
A yoga block or firm cushion helps with seated alignment if you have lower back discomfort. None of these are required. Your bodyweight provides sufficient resistance to build strength, especially in weeks 1-3.
Space and Time Requirements
You need minimal space: ideally 3 feet of clearance in front of and on each side of your chair so you can extend your legs and arms without hitting furniture.
If space is tight, move a coffee table or push your chair to the center of the room. Total time commitment is 15-20 minutes per day, six days per week.
Most people find morning or lunchtime works best—morning gives you energy for the day, lunchtime breaks up desk work, and evening helps with stress relief. Pick the time you’re most likely to stick with it. Consistency matters more than timing.
The 30 Day Chair Workout Challenge Structure

Weekly Progression Overview
Week 1 focuses on foundation building and body awareness. You’ll learn proper form, discover which movements feel challenging, and establish the habit of showing up daily. Week 2 shifts to endurance—you’ll increase reps and add controlled breathing to make each movement more efficient.
Week 3 introduces strength building by slowing your tempo, adding resistance (bands or weights), and reducing rest periods. Week 4 is integration and challenge: you’ll combine movements, test your progress, and see how much stronger you’ve become.
This progression follows a proven training principle called progressive overload—you gradually increase the challenge to your muscles so they continue adapting. Without progression, your body plateaus around week 2. With it, you see continuous improvement through day 30.
Daily Workout Format
Every session follows the same structure: 5-minute warm-up, 12-minute working sets, 3-minute cool-down. The warm-up prepares your muscles and joints with gentle seated marches (lifting your knees alternately), shoulder rolls (forward and backward), and gentle torso twists.
This increases blood flow and signals to your body that movement is coming. The working sets rotate through upper body, lower body, and core exercises with specific rep counts and rest periods.
The cool-down stretches major muscle groups (hamstrings, hip flexors, chest, shoulders) and includes breath work to bring your heart rate down and signal recovery to your nervous system.
Rest Day Strategy
Two rest days per week maximize results because muscles grow during recovery, not during the workout itself. Exercise creates the stimulus; rest allows adaptation.
On rest days, you can do active recovery—gentle seated stretching, chair yoga, or breathing exercises—or complete rest if you’re sore or tired.
Listen to your body. If you’re exhausted or sore, rest. If you feel energized, gentle movement feels good. The most common mistake is pushing through soreness thinking it proves toughness. That’s backwards. Recovery is where the transformation happens.
Essential Chair Exercises With Proper Form

Lower Body Movements That Build Strength
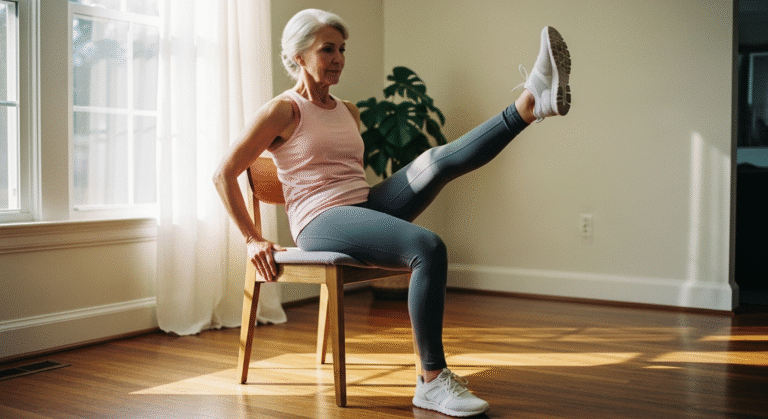
Seated Leg Extensions target your quadriceps (front thigh). Sit upright with your back against the chair. Straighten one leg fully in front of you, flex your foot so your toes point toward your shin, and hold for 3 seconds.
Slowly lower your leg without letting your foot touch the floor. Complete 10-15 reps, then switch legs. Common mistake: rounding your lower back to lift your leg higher. Keep your spine tall. The leg should move only from the knee.
Chair Squats build glutes and thighs. Stand in front of your chair with feet hip-width apart. Lower your body as if you’re about to sit down, pause when your glutes just touch the seat, then stand back up using your legs (not your arms).
Move slowly and with control—no momentum. Complete 8-12 reps. Common mistake: letting your knees collapse inward or leaning forward. Keep your chest upright and your weight in your heels.
Seated Marches build hip flexors and provide cardio benefits. Sit upright and lift one knee toward your chest, then lower it. Immediately lift the other knee. Alternate quickly for 30-45 seconds. As you progress, increase speed and add a slight pause at the top. This burns more calories than it looks.
Upper Body Exercises for Tone and Posture
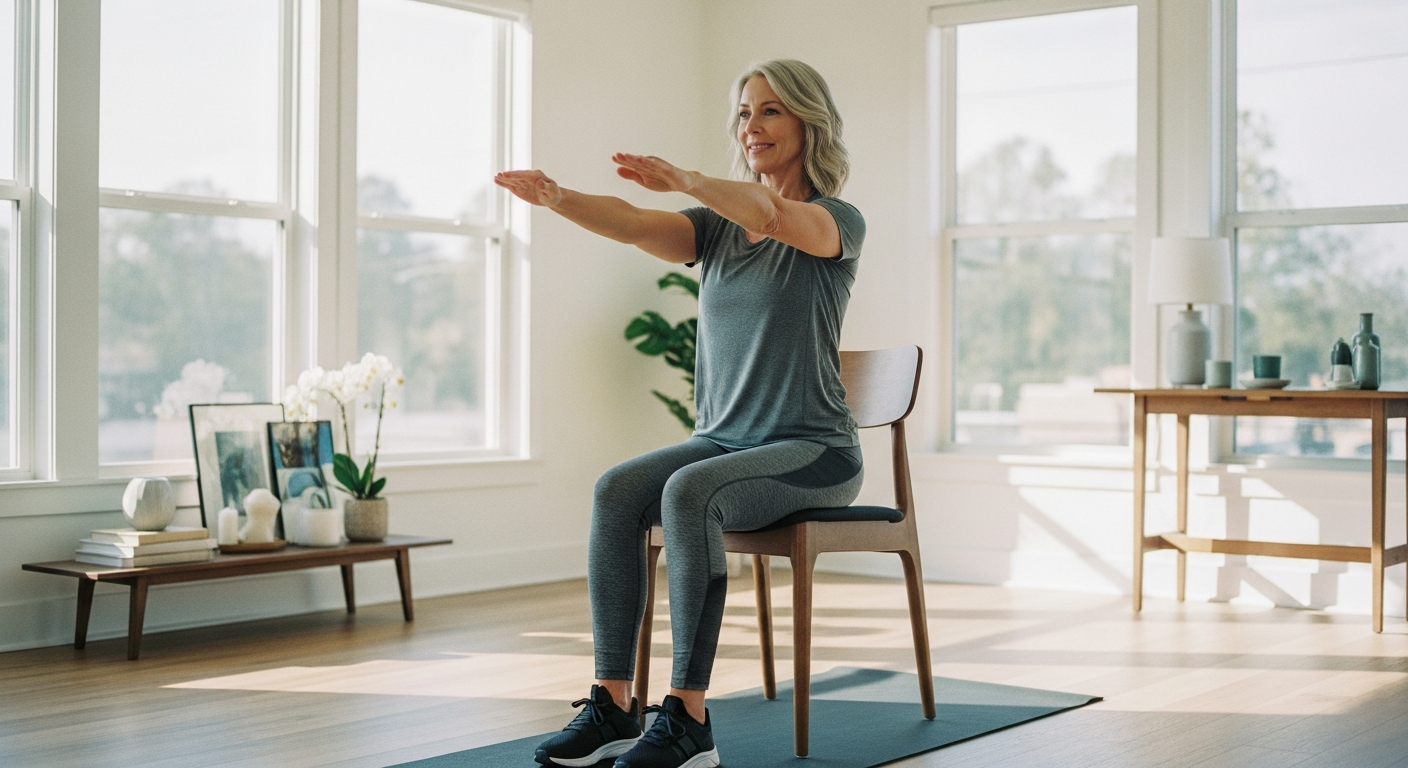
Seated Arm Circles strengthen shoulders and improve posture. Extend both arms out to your sides at shoulder height, palms facing forward.
Make small controlled circles forward for 15 reps, then backward for 15 reps. You’ll feel a burn in your shoulders—that’s the signal the muscles are working. Common mistake: making circles too large or too fast. Small, controlled movements build more strength.
Overhead Press (with or without weights) targets shoulders and upper back. Hold water bottles or light weights at shoulder height, elbows bent.
Press straight up overhead, pause for 1 second, then lower with control. Complete 10-12 reps. If using bodyweight only, make fists and press your hands upward. This builds shoulder stability and improves posture.
Seated Rows strengthen your upper back and counteract desk slouch. Hold a resistance band anchored at chest height (wrap it around a door frame or sturdy object), or simulate the movement by pulling your elbows back. Squeeze your shoulder blades together, pause for 1 second, then return to start.
Complete 12-15 reps. Proper posture correction happens here—you’re literally pulling your shoulders back into alignment.
Core Work You Can Do Completely Seated
Seated Twists target obliques (side abdominal muscles). Sit upright, feet flat. Place your hands behind your head or cross them over your chest.
Rotate your ribcage to one side, pause for 1 second, return to center, then rotate to the other side. Complete 10 reps per side. Move slowly and with control. Your lower body stays still—only your upper body rotates.
Seated Pelvic Tilts engage deep abdominal muscles. Sit upright and rock your pelvis forward (arching your lower back slightly), then rock it backward (rounding your lower back). Complete 15-20 reps. This small movement awakens core stability and improves lower back health.
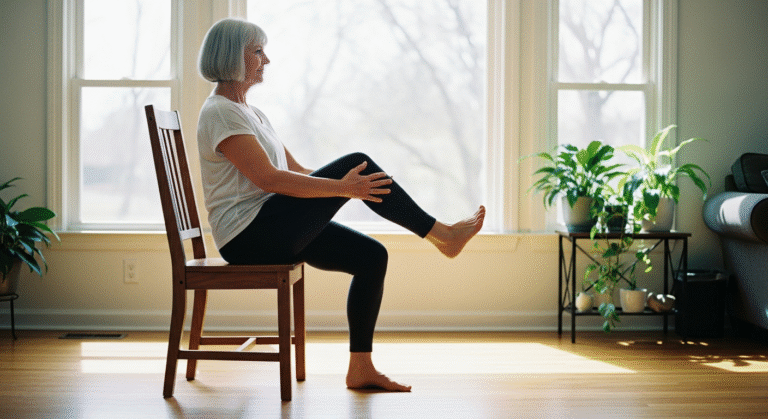
Knee Lifts with Hold challenge your entire core. Sit upright and lift both knees toward your chest simultaneously. Hold for 5-10 seconds, then lower. Complete 8-10 reps. As you get stronger, increase the hold time. This builds serious core endurance.
Your First Week Sample Schedule

Days 1-3: Learning the Foundation
Day 1 is your baseline. Complete 5 basic exercises (seated marches, leg extensions, arm circles, seated twists, knee lifts) for 8 reps each with perfect form. Rest 45 seconds between exercises.
Your only job is to learn how each movement feels and correct any form issues. Don’t worry about intensity. Focus entirely on movement quality.
Day 2 repeats the same routine but increases to 10 reps. Add breath coordination: exhale as you perform the hardest part of the movement (lifting your leg, pressing your arms), inhale as you return to start.
Day 3 introduces one new exercise (overhead press or seated rows) and maintains 10 reps. Notice which movements feel challenging. That’s where your body needs the most attention.
Days 4-5: Building Consistency
Day 4 completes your full routine with 12 reps per exercise. Reduce rest time between exercises to 30 seconds. Your body is adapting—you’ll notice movements feel slightly easier.
Day 5 adds a 2-minute cardio burst: fast seated marches or rapid arm pumps between your strength exercises. This elevates your heart rate and burns more calories. You’re building both strength and endurance.
Days 6-7: Rest and Assessment
Day 6 is active recovery—gentle stretches only, 10 minutes total. No resistance work. Your muscles need rest to grow. Day 7 is complete rest or a light walk if you feel like moving. Journal what you noticed in week one.
Can you do more reps than day 1? Do movements feel smoother? Did any exercises reveal weak spots? This awareness is your foundation for week 2.
Tracking Progress Beyond the Scale

Functional Fitness Markers
The most meaningful progress shows up in daily life. Can you do more reps with better form than week one? Yes—track that. Do daily activities (carrying groceries, getting in and out of your car, playing with kids or grandchildren) feel easier?
That’s real progress. Has your balance improved when standing on one foot? Test it weekly. Can you stand from a chair without using your arms?
That’s a game-changer. These functional improvements matter more than any number because they translate directly to independence and quality of life.
Physical Changes to Notice
Posture improvements show up early. Your shoulders naturally sit back more, and slouching at your desk requires conscious effort (in a good way—you notice it).
Muscle definition appears in arms, shoulders, and legs even without significant weight loss. Your clothes fit differently—not necessarily smaller, but better distributed. Energy levels shift.
Many people report better sleep, more sustained energy through the day, and improved mood. These aren’t side effects—they’re direct results of consistent strength training and movement.
Simple Logging Methods
You don’t need an app. A notebook works perfectly: date, exercises completed, reps achieved, how you felt. Keep it simple. Phone voice memos work too—record a 30-second summary after each workout describing energy and effort level.
Optional but powerful: progress photos taken from the same angle in the same chair every 10 days. You’ll see changes you don’t feel day-to-day.
The act of tracking creates accountability without judgment. You’re documenting your own transformation, not competing with anyone else.
CONCLUSION

Chair fitness delivers real, measurable results when you commit to consistent 15-20 minute sessions. This 28 day chair workout challenge or full 30-day program proves you don’t need a gym, equipment, or floor exercises to build functional strength that changes how you move through the world.
The proven structure—progressive overload, proper form, and strategic rest—works regardless of your starting fitness level or physical limitations. Your body is capable of more than you
think, and this challenge removes every barrier between you and discovering that strength.
Start today. Choose your chair right now and test it for stability—don’t wait for perfect conditions. Schedule your first workout in your calendar as a non-negotiable appointment, the same way you’d schedule a doctor visit.
Screenshot or print the week one schedule so you can start tomorrow without decision fatigue. Find an accountability partner (friend, family member, or online community doing the same challenge).
Commit to all 30 days. The transformation happens in consistency, not perfection. Some days you’ll nail every rep. Some days you’ll feel tired and do fewer reps.
Both days count. After day 30, assess your results: Can you do more reps? Do stairs feel easier? Does your posture feel different?
Then decide whether to repeat the challenge with added resistance, or design your own ongoing chair fitness routine. Either way, you’ve proven to yourself that you can build strength, improve function, and transform your fitness—all from a chair in your living room.