
Best Chair Exercises for knee pain Relief
Proven chair exercises to relieve knee pain and strengthen supporting muscles. 10-minute seated routine you can do at home—no equipment needed.
You’re sitting in your favorite chair right now, and your knees are reminding you they exist—with that familiar ache that’s become your constant companion. What if that same chair could become your most powerful tool for relief?
Getting down on the floor for traditional exercises feels impossible when your knees already hurt. You’ve tried various remedies but nothing seems to deliver lasting results.
The thought of expensive physical therapy copays or joining a gym makes you want to ignore the problem altogether. You’re tired of well-meaning advice that requires equipment you don’t have or mobility you’ve lost.
Here’s the reality: chair exercises for knee pain relief work because they strengthen the muscles that stabilize and protect your knee joint—without forcing movement your body isn’t ready for.
In just 10 minutes a day, you can build the foundation for effective, long-term pain reduction. No special equipment, no getting on the floor, no intimidating gym environment. Just you, a sturdy chair, and gentle movements that actually work.
Why Chair Exercises Work for Knee Pain Relief

Your knees don’t exist in isolation. They’re supported by a network of muscles—your quadriceps, hamstrings, hip flexors, and calf muscles—that work together to absorb impact, stabilize movement, and distribute load evenly. When these muscles weaken, your knee joint bears excessive stress, and that stress translates into pain.
This is the core principle behind knee strengthening exercises: by building strength in the muscles surrounding the joint, you reduce the load on the cartilage and ligaments that actually hurt.
Research from arthritis organizations consistently shows that people who strengthen their quadriceps and hip muscles experience significant reductions in knee pain, even without changing anything else about their routine.
Why Seated Strength Training Beats Standing Alternatives
Standing exercises demand balance, proprioception, and pain tolerance you might not have right now. A chair eliminates all three barriers.
You’re supported, stable, and able to focus entirely on controlled movement rather than fighting to stay upright. This matters because muscle growth happens during controlled repetitions, not during exercises where you’re compensating for instability.
Chair-based work also removes fall risk—a significant concern if you’ve had knee instability or pain-related balance issues.
You can perform these movements safely at home, which removes the intimidation factor that keeps many people from starting at all. Consistency beats intensity every single time, and consistency is only possible when the barrier to entry is low.
What Results Actually Look Like (Realistic Timeline)
Weeks 1-2: You’ll notice improved range of motion and reduced morning stiffness. Your knees might feel less “creaky” when you stand up from sitting.
Weeks 3-4: Noticeable decrease in pain during daily activities like climbing stairs, walking, or standing for extended periods. You might catch yourself reaching for your knee less often.
Week 6+: Measurable strength gains that transform how your knees feel during functional movement. Many people report being able to walk longer distances or manage stairs without that familiar sharp sensation.
These aren’t promises—they’re realistic expectations based on how muscle adaptation works. Your body needs time to rebuild strength, and that’s okay.
Before You Start: Setup and Safety for Effective Results

The chair you choose matters more than you’d think. A kitchen chair with a firm seat and back support works far better than a couch, recliner, or overstuffed armchair. Your feet should rest flat on the floor with your knees at approximately 90 degrees. If your feet dangle, use a footstool or stack of books to create a platform. If your seat is too soft, you’ll sink, which changes the angle of your knees and reduces exercise effectiveness.
The Critical Distinction: Muscle Fatigue vs. Joint Pain
This is the most important safety principle: therapeutic discomfort is normal; joint pain is a stop signal. Muscle fatigue feels like a burning or tired sensation in the muscle itself. It’s uncomfortable but not sharp or shooting. Joint pain feels like a pinch, catch, or stabbing sensation directly in the knee.
If you feel muscle fatigue, you’re working correctly. If you feel joint pain, stop immediately and rest. Pain that persists beyond 2 hours after exercise or worsens the next day is a sign you’ve done too much too fast. Scale back the number of repetitions or range of motion and try again.
Red flags that require medical evaluation: swelling that doesn’t go down with ice and elevation, instability (your knee giving out), sharp shooting pain, or pain that worsens despite consistent, gentle exercise over 6 weeks.
Your Pre-Exercise Warm-Up (2 Minutes)
Never jump into strengthening work cold. A brief warm-up increases blood flow to your muscles and tells your nervous system that movement is coming.
- Ankle circles: 10 circles clockwise, 10 counterclockwise per foot. This lubricates the ankle joint and warms the surrounding muscles.
- Seated marching: Lift your knees up and down in place for 30 seconds at a comfortable pace. You should feel your legs warming up, not burning.
- Deep breathing: Take 5 slow, deep breaths—in through your nose for 4 counts, out through your mouth for 4 counts. This oxygenates your muscles and calms your nervous system.
Knee Strengthening Exercises You Can Do From Your Chair

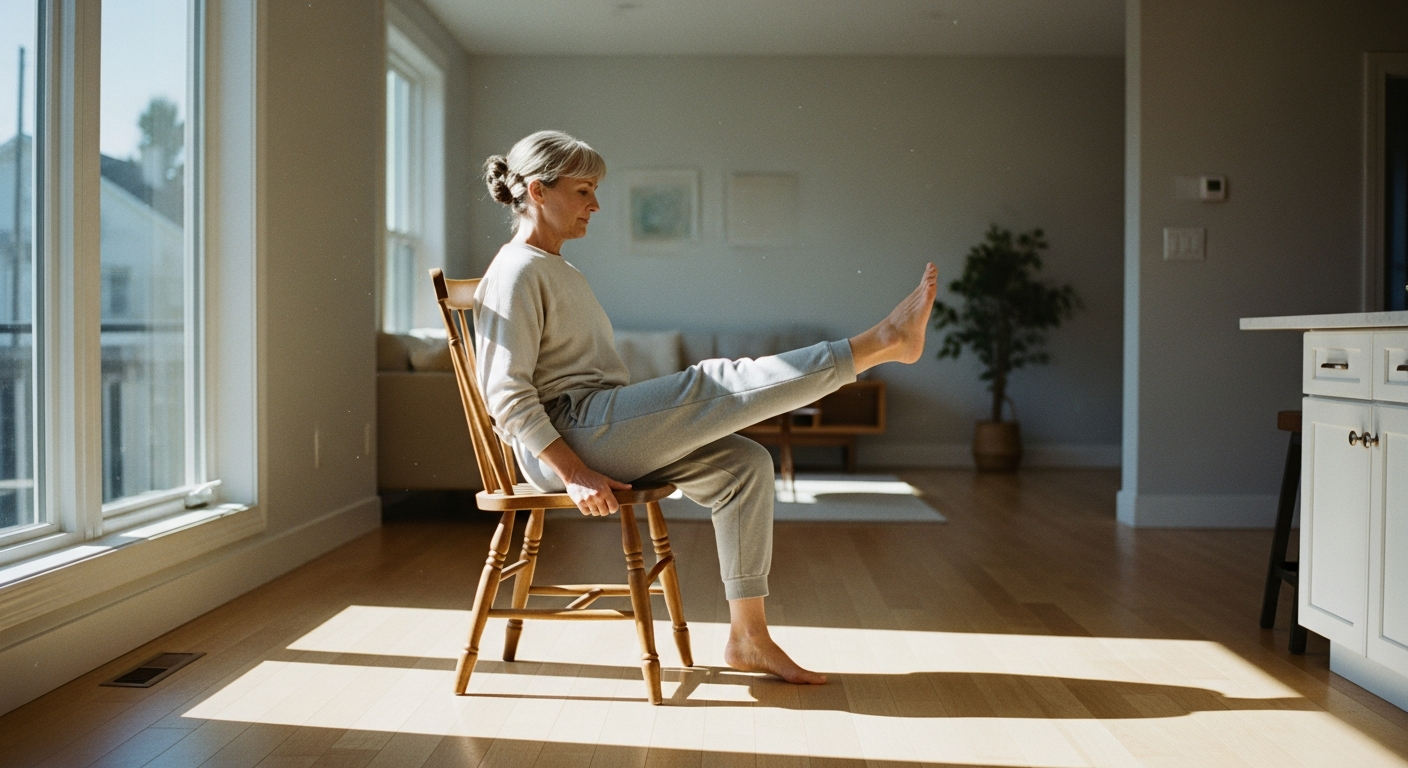
Seated Knee Extensions: The Foundation Exercise
This is the single most effective knee strengthening exercise for building quadriceps strength. Your quadriceps are the muscles on the front of your thigh, and they’re responsible for stabilizing your kneecap and protecting your entire knee joint.
How to perform it:
- Sit upright with your back supported against the chair.
- Keep one foot flat on the floor and extend the other leg straight in front of you until it’s parallel to the ground.
- Hold this position for 3-5 seconds while you feel your thigh muscle contract.
- Lower your leg with control—don’t drop it quickly.
- Rest for 2 seconds and repeat.
Sets and reps: 10-12 repetitions per leg, 2-3 sets total. Rest 30 seconds between sets. Start with just one set if this is new to you.
Common mistake: Locking your knee at the top (straightening it completely). This puts stress on the joint itself. Instead, extend until your leg is straight but your knee remains slightly soft—not hyperextended.
Modification: If full extension is uncomfortable, only lift your leg partway. Partial range of motion still builds strength and reduces pain over time.
Seated Hamstring Curls: Balance Your Leg Strength
Your hamstrings (back of your thighs) work opposite your quadriceps. When both muscle groups are strong, your knee stays stable and balanced. Neglecting hamstring strength is a common mistake that leads to ongoing pain.
How to perform it:
- Sit upright with both feet flat on the floor.
- Slide one heel backward under your chair, bending your knee as you pull your foot toward your buttocks.
- Press your foot down into the floor as you curl—you should feel your hamstring tighten.
- Hold for 2 seconds and slowly straighten your leg back to starting position.
Sets and reps: 12-15 repetitions per leg, 2 sets. Rest 30 seconds between sets.
Progression: After 3-4 weeks, add a resistance band looped around your ankle to increase difficulty. This builds stronger hamstrings without requiring expensive equipment.
Straight Leg Raises: Tone and Stabilize
This exercise targets the vastus medialis obliquus (VMO)—the inner quadriceps muscle that directly stabilizes your kneecap. A weak VMO is linked to persistent knee pain, especially around the kneecap.
How to perform it:
- Sit upright with your back supported.
- Tighten the muscle on the front of your thigh (you can place your hand there to feel it).
- Keeping your knee straight, lift your leg 6-8 inches off the ground.
- Hold for 5 seconds while maintaining the muscle contraction.
- Lower slowly and rest for 2 seconds before repeating.
Sets and reps: 8-10 repetitions per leg, 2-3 sets.
Critical form point: Don’t use momentum. Lift slowly and deliberately. This isn’t about how high you raise your leg—it’s about controlled muscle activation.
Chair Exercises That Improve Flexibility and Range of Motion

Strength without flexibility creates stiffness and limits your ability to move pain-free. These stretches should feel like a gentle pull, never sharp or pinching. Hold each stretch for the full duration—your muscles need time to relax and lengthen.
Seated Figure-4 Stretch: Release Hip Tension
Tight hip muscles transfer stress directly to your knee joint. This stretch targets your hip external rotators and glutes, which are often overlooked but critical for knee stability.
How to perform it:
- Sit upright in your chair.
- Cross one ankle over the opposite knee, creating a “4” shape with your legs.
- Keep your back straight and gently press the raised knee downward.
- You should feel a stretch in your hip and glute on the crossed-over side.
Duration: Hold for 20-30 seconds per side, repeat 2-3 times. Breathe deeply—exhale as you deepen the stretch.
Knee-to-Chest Pulls: Gentle Lower Body Release
This stretch relieves pressure on the knee joint itself and improves hip flexor mobility, which supports better posture and reduces compensatory knee stress.
How to perform it:
- Sit upright in your chair.
- Lift one knee toward your chest and clasp your hands behind your thigh.
- Gently pull your knee closer to your chest until you feel a mild stretch in your hip and lower back.
- Keep your other foot flat on the floor for stability.
Duration: Hold for 15-20 seconds per leg, 3 repetitions. If you can’t reach your thigh, use a towel or resistance band looped around your leg to gently pull it closer.
Seated Calf Stretches: Address an Often-Overlooked Contributor
Tight calves change how your foot and ankle move, which creates compensatory stress up the chain to your knee. This is one of the most underrated knee pain contributors.
How to perform it:
- Sit upright with one leg extended in front of you.
- Flex your foot, pulling your toes toward your shin.
- You should feel a stretch down the back of your lower leg.
- Hold this position and breathe steadily.
Duration: Hold for 20 seconds per leg, 2-3 rounds. For extra benefit, point and flex your foot 10 times to increase circulation before holding the stretch.
Knee Pain Relief Exercises for Daily Discomfort

These movements are designed for the moments when your knees hurt most—morning stiffness, end-of-day swelling, or flare-up days when traditional exercise feels impossible. They’re gentle enough to perform multiple times throughout the day.
Ankle Pumps: Reduce Swelling and Boost Circulation
This simple movement increases blood flow to your lower leg, which reduces inflammation and accelerates healing. You can do this while watching TV, working at a desk, or anytime your knees feel stiff.
How to perform it:
- Sit comfortably with both feet flat on the floor.
- Point your toes away from your body, then flex them back toward your shin.
- Move rhythmically and smoothly—this isn’t about range of motion, it’s about pumping motion.