Pelvic Tilt Exercise during pregnancy
At 25 weeks pregnant, your lower back is screaming every time you stand up from your desk, and the thought of waddling to the gym makes you want to cry into your pregnancy pillow.
What if I told you there’s a simple, 5-minute exercise you can do right now—on your couch, in your bed, or even at your desk—that could transform your pregnancy comfort?
I learned about pelvic tilts during my second trimester when I couldn’t tie my shoes without my back seizing up. My midwife showed me the movement in about thirty seconds, and I remember thinking, “That’s it?
That’s the magic exercise?” But here’s what shocked me: within three days of doing these consistently, I could actually feel the difference. My morning back pain decreased noticeably, and I stopped walking like I’d aged forty years overnight.
Here’s what makes this powerful: pelvic tilts require zero equipment, no gym membership, and less time than you’ll spend scrolling Instagram today.
You don’t need previous fitness experience, and you can do them while watching Netflix, sitting in a meeting, or lying in bed before you even get up.
This is pregnancy-safe core work that actually addresses the biomechanical changes happening in your body right now.
In this guide, you’ll learn exactly what pelvic tilt exercises are, why they’re scientifically proven to reduce pregnancy back pain, how to perform them correctly in four different positions (so you can do them anywhere), when and how often to practice for maximum results, and the common mistakes that sabotage effectiveness. Whether you’re a first-time mom navigating pregnancy fitness or this is baby number three and your back already knows what’s coming, these exercises will build your confidence and comfort throughout all three trimesters—starting today.
What Are Pelvic Tilt Exercises? (Understanding the Basics)
The Simple Science Behind Pelvic Tilts
Think of your pelvis as a bowl of water. During pregnancy, that bowl naturally tips forward as your belly grows and your center of gravity shifts—this is called anterior pelvic tilt. Your lower back arches more, your butt sticks out, and suddenly you’re experiencing that classic pregnancy waddle and persistent lower back ache.
A pelvic tilt exercise is the deliberate movement of rotating your pelvis backward (posterior tilt), flattening your lower back and engaging your deep core muscles. You’re essentially tipping that bowl the opposite direction. This movement activates your transverse abdominis (your deepest core muscle), your pelvic floor, and your lower abdominal muscles—all while gently stretching your lower back muscles that are working overtime.
Here’s what’s actually happening: as your uterus expands, it pulls your pelvis forward and down, creating increased lumbar lordosis (that exaggerated lower back curve). This puts tremendous strain on your spinal erectors and can compress spinal nerves, causing pain that radiates into your hips and legs. When you perform a posterior pelvic tilt, you’re counteracting this forward pull, redistributing pressure more evenly across your spine and pelvis.
The movement itself is subtle—we’re talking maybe 10-15 degrees of rotation—but the impact on your muscular system is significant. You’re training your body to find a neutral pelvic position even as your belly grows, which is exactly what physical therapists mean when they talk about “pregnancy core stability.”
Why Every Pregnant Woman Should Know This Exercise
I’m going to be direct: most pregnancy exercise advice either tells you to avoid everything or pushes you toward expensive prenatal classes. Pelvic tilts sit in that perfect middle ground—they’re medically recommended, completely free, and you can start them today without clearing your schedule.
Research consistently shows that women who practice pelvic stabilization exercises during pregnancy report significantly lower rates of lower back and pelvic girdle pain. We’re not talking about marginal improvements—studies have documented pain reductions of 30-50% when these exercises are done consistently throughout pregnancy.
This addresses every major barrier my clients mention: You don’t have time? These take five minutes, and you can do them while brushing your teeth. You’re intimidated by fitness? There’s no performance aspect here—you’re literally just rocking your pelvis back and forth. You can’t afford a gym? Your living room floor is your gym. You’re a complete beginner? Perfect—this is one of the safest, most accessible exercises you can do while pregnant.
What makes this different from scrolling past another “pregnancy workout” video on social media is that pelvic tilts are specific, targeted, and backed by decades of physical therapy research. The American College of Obstetricians and Gynecologists specifically recommends pelvic tilt exercises for pregnancy-related back pain. This isn’t fitness hype—it’s evidence-based medicine you can do at home.
What Makes This Different from Regular Core Work
Here’s the critical distinction: during pregnancy, you’re not trying to sculpt visible abs or achieve a six-pack. You’re building functional stability to support a rapidly changing body and prepare for the physical demands of labor and postpartum recovery.
Traditional core exercises often focus on spinal flexion (crunches) or rotation (Russian twists)—movements that can increase intra-abdominal pressure and worsen diastasis recti (the separation of your abdominal muscles that happens during pregnancy). Pelvic tilts, by contrast, work in the safest plane of motion for pregnancy: gentle spinal articulation that engages your transverse abdominis without bearing down.
This exercise creates a connection between your core and pelvic floor muscles—what physical therapists call the “core cylinder.” When you tilt your pelvis posteriorly, you’re naturally engaging your pelvic floor in a coordinated pattern, which is exactly what you need during pushing in labor. You’re essentially practicing the muscular coordination you’ll use when it matters most.
Unlike exercises that isolate one muscle group, pelvic tilts train your body to move as an integrated system. Your deep core stabilizes, your pelvic floor lifts slightly, your glutes engage, and your lower back releases—all from one simple movement. That’s the kind of functional strength that translates to easier daily movements, better posture, and genuine pregnancy comfort.
The Powerful Benefits You’ll Actually Feel

Immediate Relief from Pregnancy Back Pain
Let’s address the number one reason you’re reading this: your back hurts. Not just a little sore—we’re talking about that deep, persistent ache that makes you want to lie down on the floor of the grocery store.
The biomechanics here are straightforward. As your uterus grows, it shifts your center of gravity forward by approximately 2-3 inches. Your body compensates by increasing the curve in your lower back, which forces your spinal erector muscles (the long muscles running along your spine) to work constantly just to keep you upright. By 28 weeks, these muscles can be under 30-40% more continuous tension than pre-pregnancy. That’s exhausting, and it hurts.
When you perform a pelvic tilt, you’re giving those overworked back muscles a break. The posterior rotation of your pelvis temporarily flattens your lumbar curve, allowing those muscles to lengthen and release. Even better, you’re activating your abdominal muscles to share the load—essentially recruiting help so your back muscles don’t have to do all the work alone.
Here’s what realistic results look like: After your first session of 10-15 pelvic tilts, you might feel temporary relief—kind of like a good stretch. That’s normal. After three to five days of consistent practice (once or twice daily), you’ll likely notice that your back pain doesn’t hit as intensely first thing in the morning. After two to three weeks, many women report that their baseline back discomfort has decreased noticeably, and they’re reaching for heating pads or pain relief less frequently.
This isn’t a miracle cure—pregnancy back pain is complex and multifactorial. But pelvic tilts address one of the primary mechanical causes, and that makes a measurable difference for most women.
Transform Your Posture as Your Belly Grows
The classic pregnant posture—butt tucked, shoulders rounded forward, head jutting out—isn’t just unflattering. It’s biomechanically inefficient and sets you up for postpartum postural problems that can persist for years.
Here’s what actually happens: As your belly grows, your body instinctively tries to counterbalance by shifting your hips forward. This creates a chain reaction: your pelvis tilts anteriorly, your lower back hyperextends, your ribcage flares out, and your shoulders round forward to compensate. Before you know it, you’re standing in a position that puts maximum stress on your spine, shoulders, and hips.
Pelvic tilts teach your body a different pattern. When you practice finding posterior pelvic tilt throughout the day, you’re essentially resetting your default posture. You’re training your neuromuscular system to maintain a more neutral spinal position even as your center of gravity continues shifting.
I’ve worked with clients who were shocked to see their posture improve in photos taken just four weeks apart—same belly size, completely different spinal alignment. That’s the power of consistent neuromuscular retraining. Your body learns that it doesn’t have to collapse into that exaggerated curve; it can find stability through muscular engagement instead.
The long-term benefit extends beyond pregnancy. Women who maintain better pelvic and spinal alignment during pregnancy typically have an easier time restoring their pre-pregnancy posture postpartum. You’re not just surviving pregnancy—you’re protecting your long-term musculoskeletal health.
Pelvic Floor Protection and Strengthening
Your pelvic floor is under siege during pregnancy. It’s supporting the weight of your growing uterus, baby, and amniotic fluid—that’s an extra 25-35 pounds of downward pressure by the third trimester. No wonder pelvic floor issues like urinary leakage and pelvic organ prolapse are so common during and after pregnancy.
Here’s what most pregnancy exercise advice gets wrong: they tell you to do Kegels (isolated pelvic floor contractions) without teaching you how to integrate your pelvic floor with the rest of your core. That’s like trying to strengthen your bicep without ever using it to lift anything—limited functional value.
Pelvic tilts create coordinated core and pelvic floor engagement. When you rotate your pelvis posteriorly and engage your lower abdominals, your pelvic floor naturally lifts slightly in response. This is called “core synergy,” and it’s how your pelvic floor is designed to function—not in isolation, but as part of your entire core cylinder.
This coordinated engagement helps in several ways: First, it reduces excessive downward pressure on your pelvic floor by redistributing intra-abdominal forces more evenly. Second, it strengthens the connection between your core and pelvic floor, which you’ll need during pushing in labor (when you need to relax your pelvic floor while engaging your core—a surprisingly difficult coordination). Third, it helps prevent or minimize diastasis recti by engaging your transverse abdominis, which acts like a corset to support your growing belly.
Research on pregnancy exercise and pelvic floor outcomes shows that women who do regular core stabilization exercises (including pelvic tilts) throughout pregnancy have lower rates of postpartum urinary incontinence and pelvic floor dysfunction. We’re talking about meaningful differences—studies show reductions of 30-40% in these issues.
Better Sleep and Daily Comfort
Let’s talk about the quality-of-life benefits that don’t make headlines but genuinely matter when you’re pregnant: sleeping better, moving more comfortably, and feeling less like a waddling penguin.
Pelvic tilts improve circulation to your lower body by reducing compression on major blood vessels. When your pelvis is stuck in anterior tilt, it can compress the inferior vena cava (the large vein that returns blood from your lower body to your heart), contributing to swelling in your legs and feet. By practicing posterior pelvic tilt, you temporarily relieve this compression and improve venous return.
The hip and pelvic discomfort that keeps you awake at night—that’s often related to joint instability and muscular tension. Pregnancy hormones (specifically relaxin) loosen your pelvic ligaments to prepare for birth, which can make your pelvis feel unstable and achy. Strengthening the muscles around your pelvis through pelvic tilts provides muscular support that compensates for ligamentous laxity.
Women consistently report that after adding pelvic tilts to their daily routine, they can walk longer distances without that heavy, pulling sensation in their pelvis. They can stand at the kitchen counter or sit at their desk without their back screaming. They can roll over in bed without that sharp pelvic pain. These aren’t dramatic transformations—they’re the small daily comforts that make pregnancy more manageable.
How to Do Pelvic Tilts: Step-by-Step Instructions
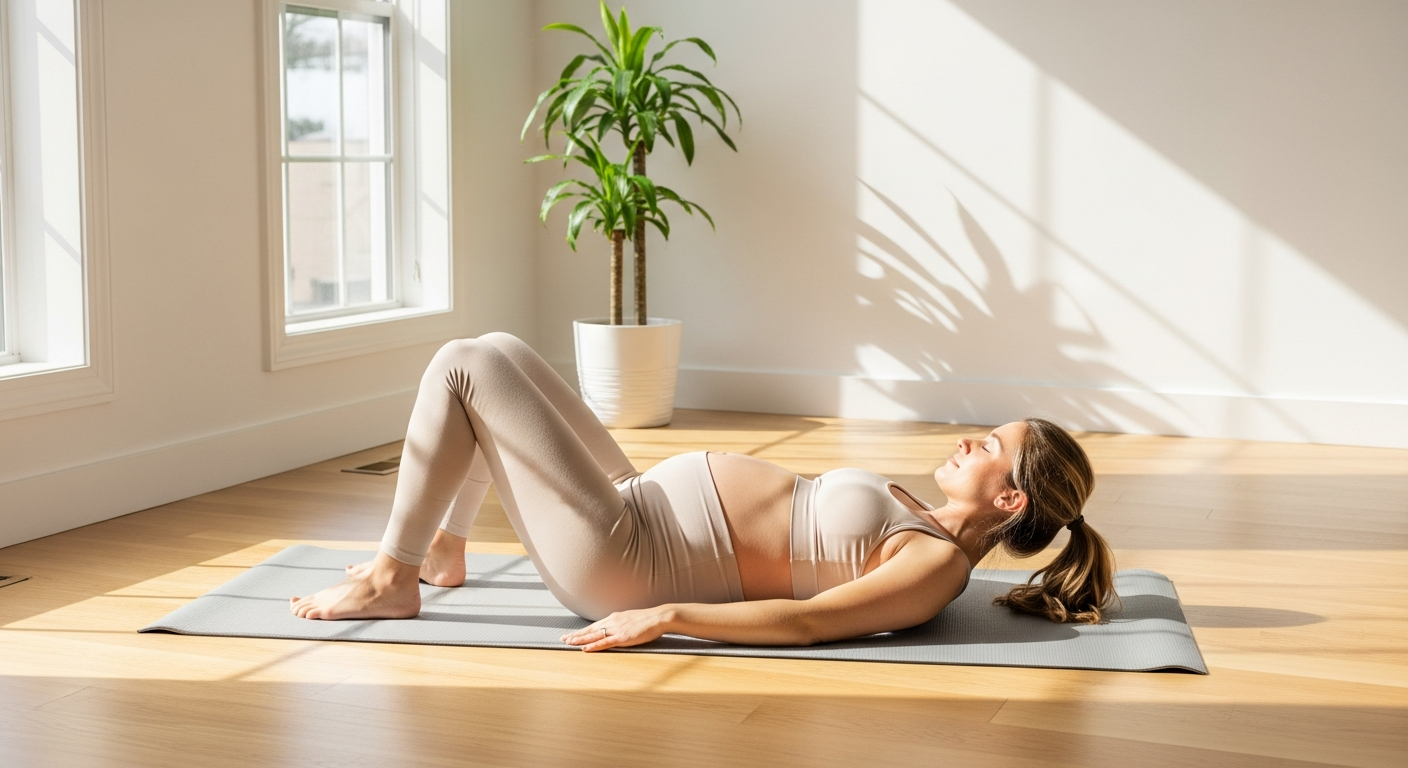
The Classic Lying Down Position (Best for First & Second Trimester)
What you’ll need: A yoga mat, carpeted floor, or firm bed. Avoid soft surfaces that don’t provide feedback.
Step 1: Lie on your back with your knees bent and feet flat on the floor, hip-width apart. Your arms should rest by your sides, palms down.
Step 2: Find your neutral spine by noticing the natural curve in your lower back. You should be able to slide your hand under your lower back with a little space—not pressed flat, not hugely arched.
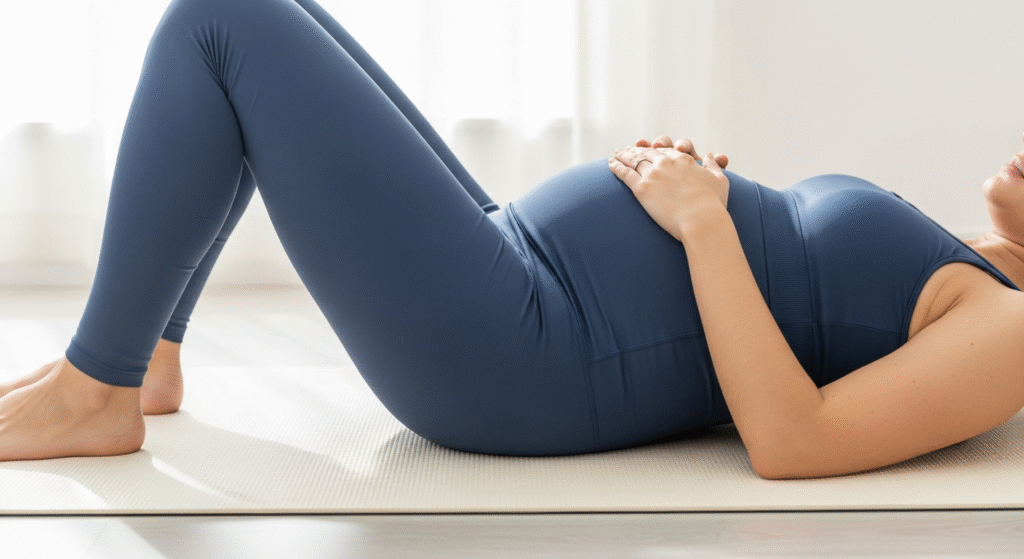
Step 3: Inhale through your nose, allowing your belly and ribcage to expand naturally. This is your starting position.
Step 4: As you exhale through your mouth, gently engage your lower abdominals (imagine drawing your belly button toward your spine) and rotate your pelvis backward, pressing your lower back toward the floor. Your tailbone will lift slightly off the ground.
Visual cue: You should feel your lower back flatten against the floor or your hand (if it’s under your back). The movement is subtle—maybe an inch or two of pelvic rotation.
Step 5: Hold this posterior tilt for 3-5 seconds while breathing normally. You should feel gentle engagement in your lower abs and a stretch in your lower back.
Step 6: Inhale and slowly release back to neutral spine. Don’t arch your back past neutral—just return to that natural curve.
Repeat: Start with 10-12 repetitions, moving slowly and deliberately. This should take about 2-3 minutes.
What you should feel: Gentle abdominal engagement, a stretch in your lower back, and possibly a subtle lift in your pelvic floor. You should NOT feel strain in your neck, holding your breath, or any sharp pain.
When to modify: After 20 weeks or whenever lying flat on your back feels uncomfortable or makes you dizzy, transition to seated or hands-and-knees variations. Lying supine can compress your vena cava in later pregnancy, reducing blood flow to your baby.
Seated Pelvic Tilts (Perfect for Busy Professionals)
What you’ll need: A sturdy chair or exercise ball. No back support is ideal, but you can use a chair with a back if needed.
Step 1: Sit toward the front edge of your chair with your feet flat on the floor, hip-width apart. Your knees should be at or slightly below hip level.
Step 2: Sit up tall with your shoulders stacked over your hips. Place your hands on your hip bones (the bony points at the front of your pelvis) to feel the movement.
Step 3: Inhale and allow your pelvis to tilt slightly forward, creating a small arch in your lower back. You should feel your hip bones tilt forward under your hands. This is anterior pelvic tilt.
Step 4: Exhale and engage your lower abs, rotating your pelvis backward and rounding your lower back slightly. Your hip bones tilt backward, and you’ll feel your tailbone tuck under.
Visual cue: Imagine you’re rocking your pelvis back and forth on your sit bones (the bony points you sit on). The movement comes from your pelvis, not from slouching your whole spine.
Step 5: Hold the posterior tilt for 3-5 seconds, then inhale and return to neutral (not all the way to anterior tilt).
Repeat: 12-15 repetitions. You can do these at your desk, in the car at a stoplight, or while sitting at dinner.
What you should feel: Movement in your pelvis and lower back, gentle abdominal engagement, and a subtle shift in pressure on your sit bones. Your upper back and shoulders should stay relatively still.
Pro tip: This variation is perfect for breaking up long periods of sitting. Set a timer for every hour and do one set of seated pelvic tilts. This prevents your pelvis from getting “stuck” in one position and keeps blood flowing.
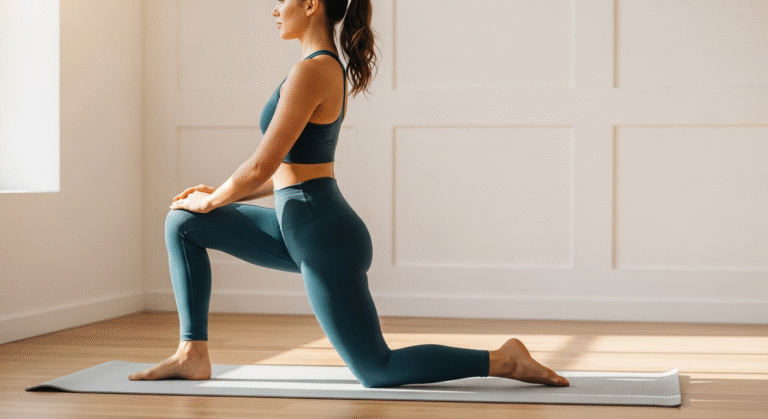
Standing Pelvic Tilts (Third Trimester Friendly)
What you’ll need: A wall for support (optional but recommended).
Step 1: Stand with your back against a wall, feet hip-width apart and about 6 inches away from the wall. Your head, upper back, and buttocks should touch the wall.
Step 2: Notice the natural curve in your lower back—there should be space between your lower back and the wall. Slide one hand into this space to monitor the movement.
Step 3: Inhale and allow your pelvis to be in its natural position, with that curve in your lower back.
Step 4: Exhale and engage your lower abs and glutes, rotating your pelvis backward and pressing your lower back toward the wall (and your hand). Your knees may bend very slightly.
Visual cue: Your lower back should flatten against the wall, eliminating the space under your hand. Your ribcage stays down—don’t thrust your chest forward.
Step 5: Hold for 3-5 seconds while breathing normally, then inhale and release back to neutral.
Repeat: 10-12 repetitions. This variation is excellent in later pregnancy when getting down on the floor feels like a major expedition.
What you should feel: Gentle engagement in your lower abs and glutes, your lower back pressing into the wall, and possibly a slight stretch in your hip flexors (the muscles at the front of your hips).
Modification without a wall: Stand with feet hip-width apart, knees slightly bent. Place your hands on your hips and perform the same pelvic rotation. This requires more balance and core control, so master the wall version first.
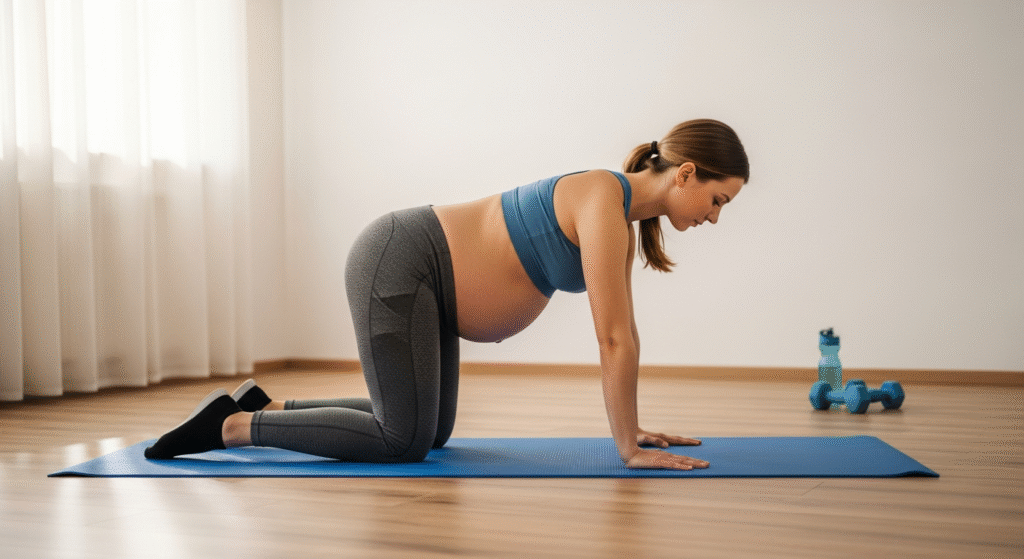
On All Fours (Cat-Cow Variation)
What you’ll need: A yoga mat or carpeted surface for knee comfort. You can also use a folded towel under your knees.