7 Stress Release Exercises for Hips
Ever notice how your hips feel impossibly tight after a stressful day? You’re not imagining it—your body literally stores emotional tension in your hips, creating physical discomfort that no amount of sitting or resting seems to fix.
Here’s what most people don’t realize: that nagging tightness in your hips isn’t just from sitting too long or skipping your workout.
Your hips act like an emotional storage unit, holding onto stress, anxiety, and even past experiences you thought you’d moved beyond.
When you’re stressed, your body activates its fight-or-flight response, and your hip flexors contract and tighten as part of this protective mechanism.
The result? You end up carrying around physical tension that affects everything from your posture to your mood. You might feel stiff getting out of your car, struggle to bend down comfortably, or experience persistent lower back pain that seems to have no clear cause. What’s actually happening is your body is gripping onto stress, and your hips are bearing the burden.
The good news? You can release this stored tension through simple, targeted exercises that don’t require any special equipment or athletic ability.
These proven hip release exercises work with your body’s natural stress-response system to create both physical relief and emotional freedom.
When you open your hips, you’re not just stretching muscles—you’re giving your nervous system permission to let go of what it’s been holding onto.
In this complete guide, you’ll discover seven effective exercises specifically designed to release hip tension and the stress that comes with it. Whether you’re a complete beginner or someone who’s tried stretching before without much success, these movements will help you feel lighter, more mobile, and genuinely more relaxed.
Why Your Hips Store Stress and Tension
The Mind-Body Connection in Your Hips
Your hips aren’t just joints that help you walk—they’re central players in your body’s stress response system. The psoas muscle, your primary hip flexor, connects directly to your diaphragm and runs through your lower back to your inner thigh. This placement makes it uniquely connected to your nervous system and breathing patterns.
When you experience stress, your sympathetic nervous system activates the fight-or-flight response. Your psoas muscle automatically contracts, preparing your body to run or defend itself.
This response made perfect sense for our ancestors facing physical threats, but today’s stress is chronic and psychological.
You’re not running from predators—you’re sitting in traffic, meeting deadlines, or worrying about finances. Your psoas still contracts, but you never complete the physical action that would release it.
Research in somatic psychology demonstrates that unprocessed emotions and traumatic experiences create physical imprints in our tissues.
Your hips, particularly the psoas, become a repository for these unresolved feelings. The body doesn’t distinguish between physical and emotional threats—it responds to both by creating tension in the same muscle groups.
This explains why hip-opening exercises sometimes trigger unexpected emotional releases. You might find yourself tearing up during a deep stretch, not because it hurts, but because you’re finally releasing what your body has been storing. This isn’t weakness—it’s your body’s natural healing process.
Common Signs You’re Storing Tension in Your Hips
Physical symptoms show up first. You’ll notice restricted range of motion when you try to cross your legs or get into your car. Your hips feel tight and inflexible, especially first thing in the morning or after sitting for extended periods. Lower back pain often accompanies hip tension because these areas are biomechanically connected—when your hips are tight, your lower back compensates.
You might experience what feels like a “pinching” sensation in your hip crease when you lift your knee, or your hips might feel uneven, with one side noticeably tighter than the other. Knee pain can also stem from hip tightness, as your body adjusts movement patterns to avoid using restricted hip muscles.
Emotional indicators are equally telling. You might feel “stuck” in certain areas of your life, unable to move forward despite wanting to. There’s often a sense of heaviness or holding on that you can’t quite explain. Some people describe feeling emotionally guarded or having difficulty letting people get close—your body’s physical tightness mirrors your emotional state.
The modern lifestyle of prolonged sitting compounds this problem significantly. When you sit for eight hours at a desk, your hip flexors remain shortened and contracted. Add stress to this equation, and those muscles never get the signal to release. Your body essentially learns to maintain tension as its default state.
The Amazing Benefits of Hip Release Work
The benefits of releasing hip tension extend far beyond just feeling less tight. Improved mobility transforms your everyday activities—getting in and out of your car becomes easier, playing with your kids on the floor feels natural again, and you move through your day with greater ease and comfort.
Lower back pain often disappears or significantly decreases when you address hip tightness. Your body no longer needs to compensate for restricted hip movement, allowing your spine to maintain its natural alignment. Many people report that chronic knee pain also improves because proper hip function takes pressure off the knee joints.
The emotional benefits surprise most people. After releasing hip tension, you’ll likely feel lighter, both physically and emotionally. That heavy, weighed-down feeling lifts. You might notice improved mood, reduced anxiety, and a greater sense of emotional freedom. Some people describe feeling like they’ve “put down a burden” they didn’t know they were carrying.
Your posture improves naturally when your hips release. You’ll stand taller without effort because your body can stack properly over your foundation. Better alignment means less fatigue—you’re no longer fighting against your own tension to maintain an upright position.
Perhaps most importantly, hip release work creates a powerful mind-body connection. You learn to listen to your body’s signals and respond with care rather than pushing through discomfort. This awareness extends beyond your practice, helping you recognize and address stress before it becomes chronic tension.
Preparing for Your Hip Release Practice

Creating the Perfect Environment
Your environment significantly impacts the effectiveness of your hip release practice. Choose a quiet space where you won’t be interrupted for at least 20-30 minutes. This might be a corner of your bedroom, a living room area, or even a peaceful outdoor spot if weather permits. The key is privacy and minimal distractions.
Essential props make these exercises more accessible and comfortable. You’ll need a yoga mat or thick blanket for cushioning. If you don’t have a yoga mat, a carpeted area works fine. Gather cushions, pillows, or folded blankets—these provide crucial support under your knees, hips, or head during various positions. Yoga blocks are helpful but not required; thick books wrapped in towels work as simple alternatives.
Set the mood to support relaxation. Dim lighting or natural light works better than harsh overhead lights. Your nervous system responds to environmental cues, and softer lighting signals safety and relaxation. Consider playing gentle, instrumental music at low volume, or practice in silence if you prefer. Keep the room at a comfortable temperature—slightly warm is ideal since cold muscles resist stretching.
Turn off your phone or put it in another room. These exercises require your full attention and presence. Every notification pulls you out of the body awareness you’re cultivating. This is your time to disconnect from external demands and reconnect with your physical and emotional self.
Important Safety Guidelines
Warming up your body before deep hip stretches prevents injury and makes the exercises more effective. Spend 5-10 minutes doing gentle movement—walk around your space, do some easy leg swings, or practice simple joint rotations. Warm muscles stretch more easily and safely than cold ones.
Understanding the difference between productive discomfort and pain is crucial. Productive discomfort feels like a deep stretch, a “good hurt” that you can breathe through. You feel sensation and intensity, but it’s bearable and even satisfying. Pain, on the other hand, feels sharp, pinching, or shooting. Pain means you’ve gone too far—back off immediately.
Modifications aren’t just for beginners; they’re for anyone whose body needs support on any given day. Your flexibility varies based on stress levels, sleep quality, hydration, and time of day. Honor where your body is today rather than pushing to match where it was yesterday or where you think it “should” be.
Consult a healthcare provider before starting these exercises if you have hip injuries, recent surgeries, or conditions like hip labral tears or severe arthritis. These exercises are generally safe for most people, but individual circumstances vary. When in doubt, get professional guidance.
Setting Your Intention
Mindful movement creates dramatically different results than simply going through the motions. Before you begin, take a moment to acknowledge that you’re doing something kind for your body. You’re creating space for release, both physical and emotional.
Simple breathing awareness prepares your nervous system for the work ahead. Sit comfortably and take five slow, deep breaths. Notice your inhale filling your belly, then your ribs, then your chest. Exhale completely, letting your body soften. This signals to your nervous system that you’re safe and it’s okay to let go of protective tension.
Be open to emotional releases without judgment. If tears come, let them flow. If you feel anger, frustration, or sadness, acknowledge these emotions without trying to suppress them. Your body is releasing what it’s been storing—this is the healing process in action. You’re not being dramatic or weak; you’re being courageously present with your experience.
Hold each position for 1-3 minutes for effective results. This duration allows your nervous system time to register safety and release the protective muscle contraction. Quick stretches don’t create the same depth of release. Set a gentle timer so you’re not constantly checking the clock—this frees you to fully experience each position.
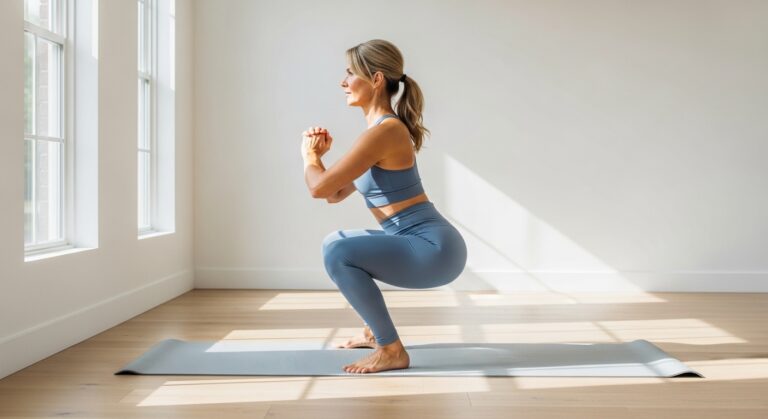
Exercise 1 – Butterfly Pose (Baddha Konasana)
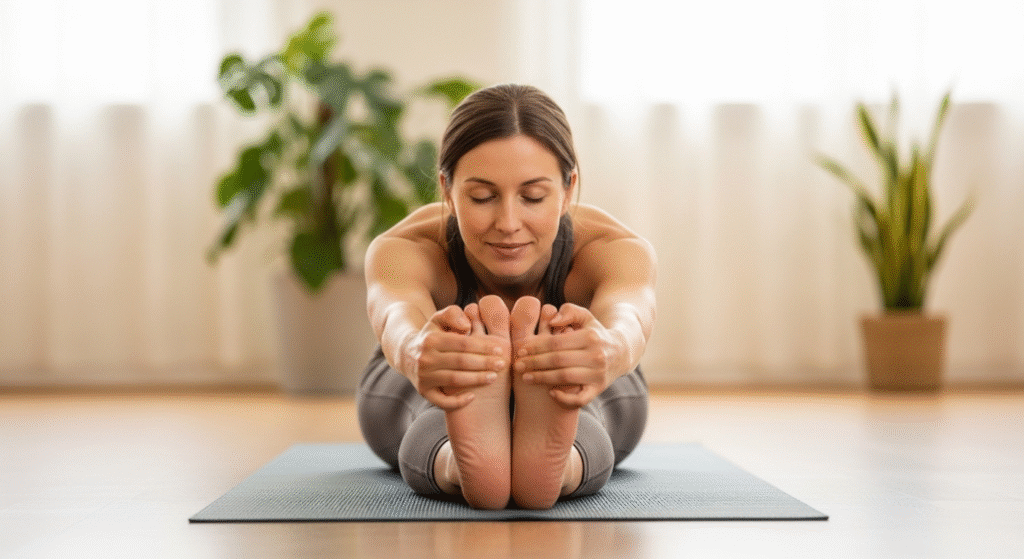
How to Perform This Simple Hip Opener
Start by sitting on your mat with your legs extended in front of you. Bend your knees and bring the soles of your feet together, letting your knees fall open to the sides like butterfly wings. Draw your feet as close to your pelvis as feels comfortable—this might be right up close or several inches away, and both are perfectly fine.
Hold your feet or ankles with your hands. Sit up tall, lengthening through your spine. Imagine a string pulling the crown of your head toward the ceiling. This upright position is your starting point. If sitting upright feels challenging, sit on a folded blanket or cushion to elevate your hips—this simple adjustment makes the pose significantly more accessible.
For a deeper release, maintain your long spine and hinge forward from your hips (not your lower back). Lead with your chest rather than rounding your shoulders forward. You can rest your forearms on your shins or bring your hands to the floor in front of you. Only fold as far as you can while maintaining some length in your spine.
If your knees are high off the ground, place blocks, cushions, or folded blankets under each thigh for support. This removes the strain of holding your legs up and allows your inner thighs to release more effectively. There’s no prize for knees touching the floor—support is smart, not weak.
Proper alignment protects your knees and lower back. Keep your feet flexed rather than letting them sickle (curl inward). Don’t push down on your knees with your hands—let gravity do the work. If you feel any pinching in your hip joints, adjust your feet farther from your body or sit up taller.
What This Exercise Releases
Butterfly pose targets your inner thighs and groin, areas that tighten from sitting, walking, and general life stress. These adductor muscles connect to your pelvis and play a crucial role in hip stability. When they’re chronically tight, they limit your hip mobility and contribute to that “stuck” feeling.
This pose opens your hip external rotators—the muscles that allow your thighs to turn outward. Modern life keeps us in neutral or internally rotated hip positions, so external rotation feels foreign and tight for most people. Creating openness here improves your walking pattern and reduces knee stress.
The gentle nature of butterfly pose makes it perfect for encouraging release without force. You’re not aggressively pushing your body into submission; you’re inviting it to open. This approach works with your nervous system rather than against it, creating sustainable flexibility rather than temporary gains followed by rebound tightness.
Common sensations include a deep stretch through your inner thighs and groin. You might feel pulling or tension in your outer hips as they work to support the position. Some people feel sensation in their lower back, especially if they’re folding forward. All of these are normal responses to the opening process.
Quick Modifications for Every Body
Beginner modification: Sit with your back against a wall for support. This removes the effort of holding yourself upright and allows you to focus entirely on the hip opening. Place blocks or thick cushions under each knee so your legs are fully supported. Stay upright rather than folding forward. This version is completely effective—you don’t need to fold forward to get results.
Intermediate variation: Sit without back support, maintaining an upright spine. Allow your knees to fall naturally without props underneath (unless needed for comfort). Practice a gentle forward fold, keeping length in your spine. Your torso might come just a few inches forward—that’s perfect. Hold here and breathe deeply.
Advanced option: Bring your feet closer to your body and fold forward more deeply, walking your hands forward on the floor. You might eventually bring your forehead toward your feet, though this takes time and consistent practice. Even in the advanced variation, maintain some spinal length rather than completely rounding forward.
Breathing cue: Take slow, deep belly breaths throughout the hold. As you inhale, feel your spine lengthen. As you exhale, allow your body to soften slightly deeper into the stretch. Don’t force the deepening—let it happen naturally with your breath.
Pro Tip: This is an ultimate beginner-friendly pose—if you can sit on the floor, you can do this exercise. Don’t worry if your knees are high off the ground; that’s completely normal and will improve with consistent practice. Some people’s bone structure means their knees will never touch the floor, and that’s okay. The benefits come from the practice, not from achieving a specific shape.
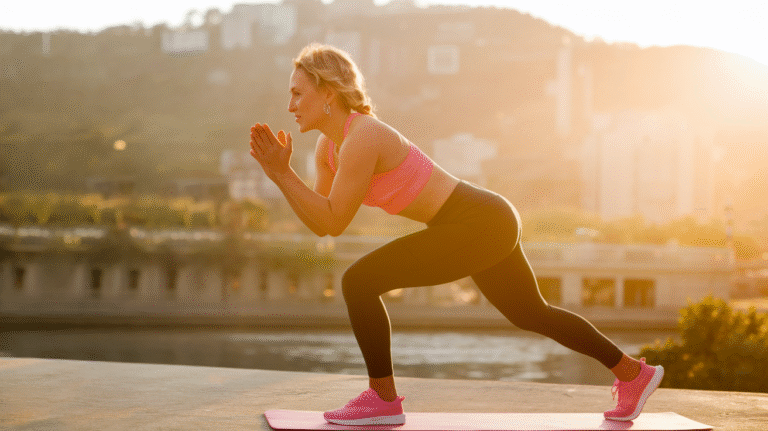
Exercise 2 – Low Lunge (Anjaneyasana)
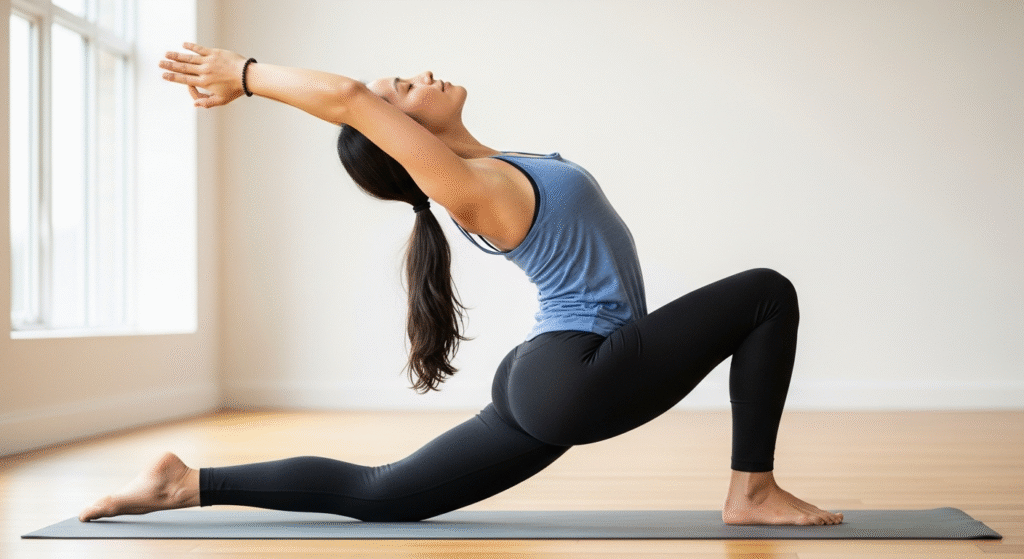
Step-by-Step Guide to This Effective Hip Flexor Stretch
Begin on your hands and knees in a tabletop position. Step your right foot forward between your hands, positioning your knee directly above your ankle. Your right shin should be roughly vertical. Slide your left knee back as far as feels comfortable, keeping your toes pointed behind you.
Pad your back knee with a folded blanket or towel for comfort—kneeling on a hard surface creates unnecessary discomfort that distracts from the hip opening. Lower your hips forward and down, feeling a stretch through the front of your left hip and thigh. This is where you’ll feel the psoas releasing.
Keep your front knee aligned over your ankle throughout the hold. If your knee drifts forward past your toes, step your front foot farther forward. This alignment protects your knee joint from excessive pressure. Your back leg should feel like it’s actively lengthening behind you rather than collapsing.
For arm positioning, you have several options. Rest your hands on your front thigh for support and stability—this is perfect for beginners or anyone who needs extra balance. Place your hands on your hips to help you focus on hip alignment and sinking deeper. For a more active stretch, reach your arms overhead, which also opens your chest and shoulders.
Why This Exercise Works So Well
Low lunge directly targets your psoas muscle, the primary hip flexor that stores stress and tension. This deep muscle runs from your lower spine through your pelvis to your inner thigh. When you sink into a low lunge, you’re lengthening and releasing the exact muscle that contracts during stress responses.
This pose effectively counteracts the effects of prolonged sitting. When you sit, your hip flexors remain shortened for hours. Low lunge creates the opposite position, actively lengthening what’s been chronically contracted. Regular practice literally reverses the physical effects of a desk-bound lifestyle.
The stretch opens your entire front body, not just your hips. You’ll feel it through your thigh, hip flexor, lower abdomen, and potentially into your chest if you’re reaching your arms overhead. This full-body opening helps release the protective “armor” many people develop across their front body in response to stress.
Low lunge creates space in your hip socket, decompressing the joint and allowing fresh blood flow and synovial fluid to nourish the area. This improved circulation supports hip health and can reduce stiffness and discomfort.
Because of the psoas connection to your nervous system and emotional processing, low lunge can trigger emotional releases. You might feel sudden sadness, anger, or relief that seems to come from nowhere. This is your body releasing stored emotional content along with physical tension—it’s a sign the exercise is working on a deep level.
Making It Work for Your Body
Beginner modification: Keep your hands on your front thigh for support and stability. Take a gentler lunge with less forward and downward sinking. Keep your torso upright and focus on steady breathing. If kneeling bothers your back knee even with padding, place a thick cushion under it or practice a standing lunge variation instead.
Intermediate variation: Place your hands on your hips and sink deeper into the lunge, lowering your hips toward the floor. Keep your torso upright and your core gently engaged. This position allows you to focus on the hip opening without worrying about balance.
Advanced option: Reach your arms overhead, shoulder-width apart or palms together. Add a slight backbend by lifting your chest and gazing upward, creating even more opening through your hip flexors and front body. Sink your hips as low as comfortable while maintaining the backbend.
Common mistake to avoid: Letting your front knee drift forward past your toes puts excessive pressure on your knee joint. Regularly check your alignment—your shin should stay roughly vertical. If your knee keeps moving forward, step your front foot farther forward to create more room.
Pro Tip: Hold this proven position for 1-2 minutes per side, breathing deeply. You might feel emotions bubbling up—that’s your body releasing what it’s been storing. Allow it without judgment. If you feel tears or frustration arising, take it as a positive sign that you’re accessing deep release. Breathe through the intensity and trust that you’re safe to let go.
Exercise 3 – Pigeon Pose (Eka Pada Rajakapotasana)
The Complete Guide to This Powerful Hip Opener
Start on your hands and knees. Bring your right knee forward toward your right wrist. Position your right shin somewhere between parallel to the front of your mat (advanced) or angled with your right foot closer to your left hip (beginner). The angle of your shin depends entirely on your hip flexibility—there’s no “correct” angle.
Slide your left leg straight back behind you, with your toes pointed and the top of your foot resting on the mat. Square your hips toward the front of your mat as much as possible. This means both hip points should face forward rather than one hip hiking up toward your shoulder.
Your right hip will want to lift off the ground—this is completely normal. Place a folded blanket, cushion, or yoga block under your right hip for support. This prop is essential for most people and allows you to hold the pose comfortably enough to achieve release. Trying to force your hip to the floor creates tension rather than release.
For an upright variation, place your hands on the floor in front of you or on blocks, keeping your torso lifted. This gentler version still provides significant hip opening. For a deeper stretch, walk your hands forward and lower your torso over your front leg. You can rest on your forearms or extend your arms fully and rest your forehead on your hands or the mat.
Ensure your back leg is straight behind you, not angled out to the side, and that your back hip point faces down toward the mat. This alignment ensures you’re targeting the correct muscles and protects your lower back from strain.
Understanding the Deep Release
Pigeon pose targets your hip external rotators and gluteal muscles—the deep muscles that create hip stability and allow your thigh to rotate outward. These muscles, particularly the piriformis, often hold significant tension from sitting, stress, and protective patterns your body develops.
This pose is often called the “most emotional” hip opener in yoga and physical therapy circles. The combination of deep physical release and the vulnerable nature of the position (you’re quite literally opening your hips while in a grounded, forward-folding position) creates conditions for emotional release.
Why do people sometimes cry in pigeon pose? The physical release triggers a nervous system response that can unlock stored emotional content. Your body has been holding tension as a protective mechanism, and when that tension releases, the emotions it was “protecting” you from can surface. This is amazing—it means you’re finally processing and releasing rather than continuing to store.
Physical sensations in pigeon pose include deep stretching through your outer hip and glute on the front leg side. You might feel pulling across your hip or deep in your buttock. Some people feel sensation in their groin or inner thigh. The back leg’s hip flexor also stretches, though less intensely than in low lunge.
The importance of staying in pigeon pose for 2-3 minutes minimum cannot be overstated. Quick stretches don’t access the deep release this pose offers. Your nervous system needs time to register safety and allow the protective muscle contraction to release. The first minute often feels intense; the second and third minutes are where the real magic happens as your body softens.
Essential Modifications and Alternatives
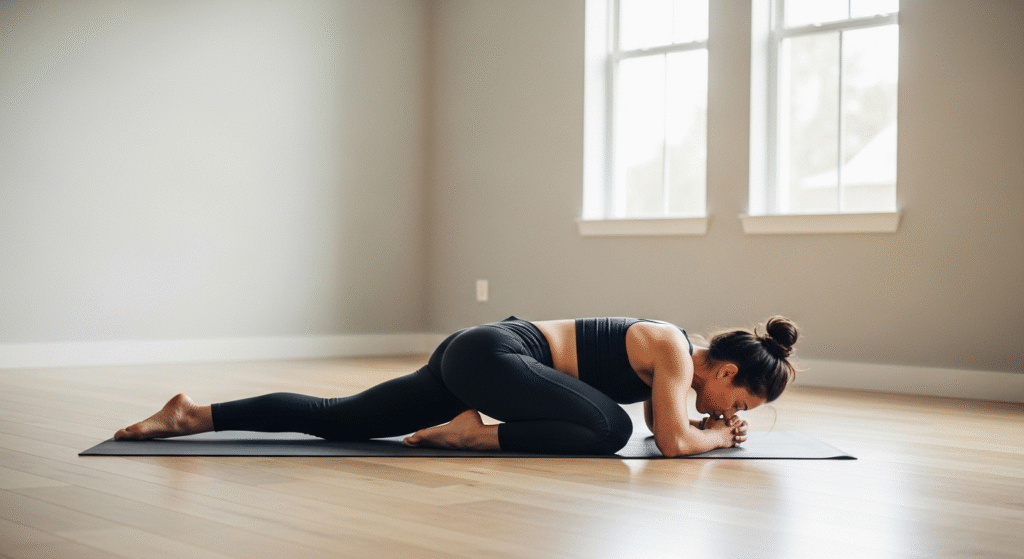
Beginner modification: Use substantial support under your front hip—a bolster, thick cushion, or stack of folded blankets. This support should be high enough that you feel stable and comfortable. Stay upright rather than folding forward. Practice reclined pigeon pose on your back as an alternative: lie down, cross your right ankle over your left thigh, and draw your left knee toward your chest. This provides the same hip opening with less intensity and better control.
Intermediate variation: Use minimal support under your front hip or none if your hip comfortably reaches the floor. Maintain an upright torso with your hands on the floor in front of you. Focus on squaring your hips and breathing deeply into the sensation.
Advanced option: Fold forward over your front leg, walking your hands forward and lowering your torso. Eventually, you might rest your forehead on the mat with your arms extended. Even in this deep variation, maintain support under your front hip if needed—depth isn’t about forcing your body into a shape but about finding sustainable opening.
Alternative for tight hips or knee issues: Figure-4 stretch while lying on your back provides the same benefits with easier access. Lie down, bend both knees with feet flat. Cross your right ankle over your left thigh just above the knee. Reach through the space between your legs and clasp behind your left thigh. Gently draw your left knee toward your chest, feeling the stretch in your right hip. This position gives you complete control over the intensity.
When folding forward in pigeon pose, use blocks under your hands to bring the floor closer to you. This prevents over-rounding your spine and allows you to maintain length while still getting the benefits of the forward fold.
Pro Tip: This is the ultimate emotional release exercise. If you’ve been carrying stress or past experiences in your body, pigeon pose creates the perfect conditions for letting go. Breathe through any intensity, and remember—you’re safe to release. If emotions arise, let them flow without trying to understand or analyze them in the moment. Your body knows what it needs to release. Stay present, keep breathing, and trust the process.
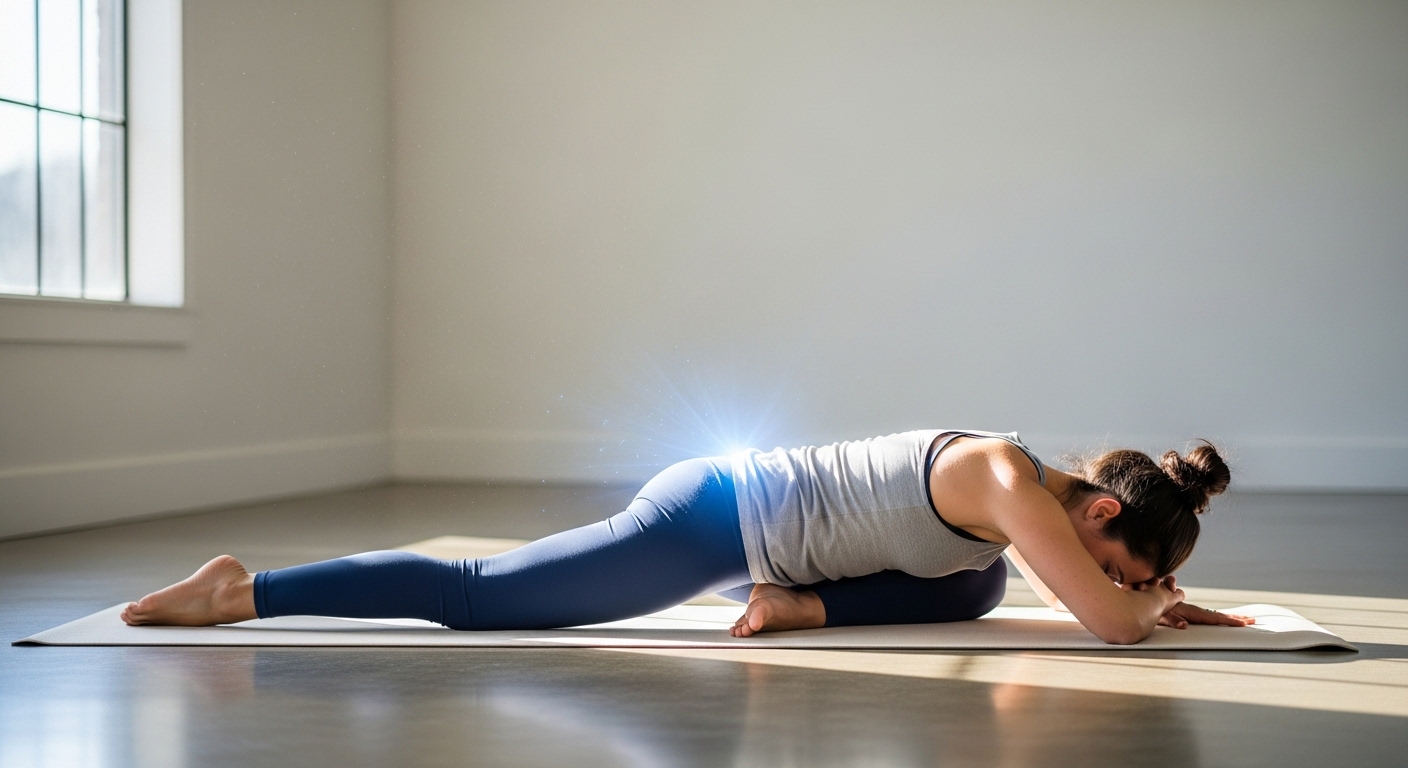
Exercise 4 – Supine Hip Twist (Supta Matsyendrasana)

Simple Steps for This Gentle Release
Lie on your back with your knees bent and feet flat on the floor, hip-width apart. Extend your arms out to the sides in a T-position at shoulder height, palms facing up. This arm position helps anchor your upper body and creates a grounding effect.
On an exhale, slowly lower both knees to your right side. Let them fall naturally—they don’t need to touch the floor. Keep your left shoulder blade on the mat even as your knees drop to the right. This creates the twist through your spine and hips. Turn your head to look toward your left hand, or keep your gaze straight up if neck turning feels uncomfortable.
Your knees can stack on top of each other, or your top knee can rest slightly in front of the bottom one—whatever feels natural. If your knees are far from the floor, place a cushion or folded blanket under them for support. This support allows your muscles to release rather than working to hold your legs up.
For a variation with deeper hip opening, keep your right knee bent with the foot flat on the floor, and cross your left ankle over your right thigh (like the figure-4 position). Then let both legs fall to the right. This increases the stretch in your left hip.
Hold for 1-2 minutes on each side, breathing slowly and deeply. With each exhale, allow your body to soften slightly more into the twist without forcing. Come back to center gently, pause for a breath, then repeat on the second side.
Quick Benefits of This Easy Twist
Supine hip twist releases tension in your hips and lower back simultaneously—these areas are biomechanically connected, so addressing both together creates more complete relief. The gentle twisting motion massages your spine, improving mobility through your back while opening your hips.
This pose has a gentle detoxifying effect on your digestive organs. The twisting motion compresses and then releases your abdominal organs, stimulating circulation and supporting healthy digestion. While this isn’t the primary reason to practice this pose, it’s a nice bonus benefit.
The position massages your spine while opening your hips, creating a two-for-one effect. Many people carry tension in both areas, and this pose addresses both simultaneously. The twist mobilizes your spinal joints while the leg position stretches your hip rotators and outer hip muscles.
Supine hip twist is perfect for evening relaxation or before bed. The grounded, supported nature of the pose signals safety to your nervous system. Practicing this pose before sleep can help release the day’s accumulated tension and prepare your body for rest.
This exercise is accessible for nearly everyone. Because you’re lying down with full support from the floor, balance isn’t a concern. You have complete control over the intensity by adjusting how far your knees drop to the side.
Enhancing the Stretch
Beginner modification: Place a thick pillow or cushion between your knees. This provides support and reduces the intensity of the stretch. You can also place a cushion under your knees as they drop to the side, so they’re fully supported. Keep your knees bent at a 90-degree angle rather than extending them for a gentler twist.
Intermediate variation: Cross your top ankle over your bottom knee before dropping both legs to the side. This creates more stretch in your outer hip and glute. Keep both shoulders grounded on the mat and breathe into the deeper sensation.
Advanced option: Extend your top leg straight while keeping your bottom leg bent. As you drop your bent knee to the side, your straight leg crosses over it, creating an even deeper hip and spinal twist. This variation requires more flexibility and body awareness.
Hold each side for 1-2 minutes with slow, deep breathing. Count your breaths if it helps you stay present—aim for 10-15 full breath cycles per side. As you inhale, maintain your position. As you exhale, allow any holding or gripping to soften.
Pro Tip: This is an amazing wind-down exercise. The gentle twisting motion combined with hip opening creates a sense of “wringing out” stress from your entire body. Practice this pose when you get home from work to transition from your busy day into your evening, or include it in your bedtime routine to release tension before sleep. The supported, grounded nature of this pose makes it perfect for those moments when you need gentle release rather than intense stretching.
—
Your Next Step to Hip Freedom
You now have seven proven exercises to release stored tension and stress from your hips. These aren’t just stretches—they’re tools for emotional and physical freedom. Your tight hips have been holding onto stress, past experiences, and daily tension, and you finally have a clear path to letting it all go.
Start with just 15-20 minutes, three times per week. You don’t need to do all seven exercises every session. Choose 3-4 that feel most needed for your body on any given day. Consistency matters more than duration—regular, mindful practice creates lasting change.
Remember that emotional releases are normal and healthy. If tears come, let them flow. If you feel frustration or anger, acknowledge it. Your body is finally releasing what it’s been storing, and this is exactly what should happen. You’re not being overly sensitive—you’re being courageously present with your healing process.
Create a simple routine: warm up for 5 minutes with gentle movement, practice 3-4 hip release exercises holding each for 1-3 minutes per side, and end with a few minutes lying down in relaxation. This complete practice takes 20-30 minutes and will transform how your body feels.
Your hips will open. Your stress will decrease. You’ll move through your day with greater ease and emotional lightness. The tension you’ve been carrying doesn’t have to stay with you—these exercises give you the power to release it.
Ready to feel the difference? Roll out your mat and start with butterfly pose today. Your body has been waiting for this release.