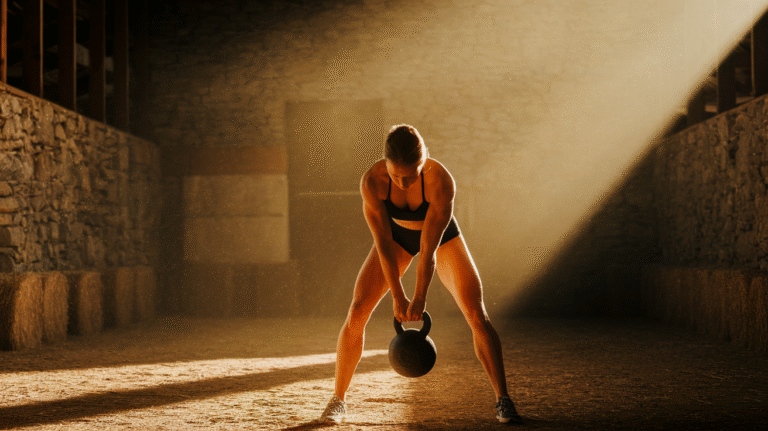
5 Pelvic Floor Exercises That Are Better Than Kegels

If you’ve been doing Kegels religiously but still dealing with bladder leaks, pelvic pressure, or core weakness, you’re not alone—and it’s not your fault.
Traditional Kegel exercises focus on isolating your pelvic floor muscles, but here’s what most people don’t realize: your pelvic floor doesn’t work in isolation. It’s part of an intricate team of muscles that includes your diaphragm, deep abdominals, and back muscles.
The real problem with standard Kegels? They’re like trying to strengthen your arm by only squeezing your fist repeatedly.
You’ll build some muscle, sure, but you’re missing the bigger picture of how your body actually moves and functions in daily life.
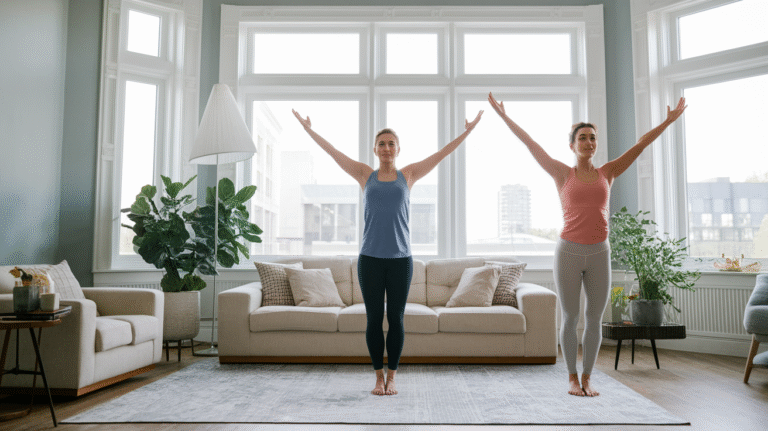
In this complete guide, you’ll discover five proven exercises that engage your entire core system for ultimate pelvic floor strength. These movements work with your body’s natural patterns instead of against them, delivering results that actually stick.
Whether you’re recovering postpartum, experiencing pelvic floor weakness, or simply want to prevent future issues, these exercises offer a more effective approach than Kegels alone.
This is for anyone tired of the same old advice that doesn’t work. Let’s dive into what actually delivers results.
Why Your Pelvic Floor Needs More Than Just Kegels
Understanding Your Pelvic Floor System
Your pelvic floor isn’t a lone ranger—it’s the foundation of your deep core system. Think of it as the bottom of a cylinder, with your diaphragm at the top, your deep abdominal muscles wrapping around the sides, and your back muscles completing the structure. These muscles work together with every breath you take, every movement you make.
When you breathe in, your diaphragm descends and your pelvic floor gently releases downward. When you exhale, both naturally lift back up. This coordination creates internal pressure that supports your organs, stabilizes your spine, and powers your movements. It’s a beautiful system—when it works properly.
But here’s where things get complicated. Your posture affects this system. Your breathing patterns affect it. Even how you walk, sit, and carry groceries affects it. Research shows that pelvic floor dysfunction often stems from problems with this entire coordination system, not just weakness in one specific area.
The Limitations of Traditional Kegels
Traditional Kegels ask you to squeeze and lift your pelvic floor muscles repeatedly, often while holding your breath. Sound familiar? This approach creates several problems that actually work against your goals.
First, most people perform Kegels incorrectly. They over-squeeze, creating excessive tension instead of functional strength. They hold their breath, which disrupts the natural coordination between the diaphragm and pelvic floor. They bear down instead of lifting up, or they engage their glutes and inner thighs instead of their actual pelvic floor.
Second, isolated contractions don’t teach your pelvic floor how to respond during real-life activities. Your pelvic floor needs to engage automatically when you laugh, sneeze, jump, or lift something heavy. Lying on your back squeezing doesn’t prepare you for these dynamic challenges.
The missing link is coordination. Your pelvic floor must work in harmony with your breathing, your posture, and your movement patterns. Functional exercises that integrate all these elements deliver far better results than isolated squeezes.
Signs You Need a Better Approach
How do you know if Kegels alone aren’t cutting it? Pay attention to these clear signals your body sends.
Symptoms that indicate you need a more comprehensive approach include: persistent bladder leaks despite doing Kegels regularly, pelvic pressure or heaviness that worsens throughout the day, difficulty emptying your bladder, pain during intercourse, or lower back pain that won’t resolve.
Here’s something surprising: sometimes the problem isn’t weakness at all. Many people actually have pelvic floor muscles that are too tight, constantly gripping without the ability to relax. For these individuals, more Kegels make things worse, not better. They need exercises that teach release and coordination, not just strength.
These alternative exercises address the root cause by working with your entire core system. They teach your body proper movement patterns, restore natural breathing coordination, and build functional strength that supports you in everyday life.
The 5 Essential Pelvic Floor Exercises That Deliver Real Results
Exercise #1: Diaphragmatic Breathing with Pelvic Floor Release
How to do it: Lie on your back with knees bent and feet flat on the floor. Place one hand on your chest and one on your belly. As you breathe in through your nose, allow your belly to expand fully—your bottom hand should rise while your top hand stays relatively still. As your belly expands, consciously allow your pelvic floor to gently release downward. Exhale slowly through your mouth, feeling your belly naturally fall and your pelvic floor gently lift back up. Continue for 5-10 breaths, focusing on the smooth coordination between breathing and pelvic floor movement.
Why it’s effective: This exercise restores the natural rhythm between your diaphragm and pelvic floor. Many people with pelvic floor dysfunction have lost this coordination—they hold their breath during activities or breathe shallowly into their chest. Diaphragmatic breathing retrains this essential pattern, creating a foundation for all other movements. Research demonstrates that proper breathing mechanics significantly improve pelvic floor function by reducing excessive tension and improving coordination.
Perfect for: Anyone with pelvic floor tension, difficulty relaxing the pelvic floor, or those who feel like they’re “gripping” constantly. This exercise is also essential for anyone who holds their breath during daily activities.
Quick tip: Practice this for five minutes daily, either lying down before bed or sitting comfortably during a break. The more you practice, the more automatic this breathing pattern becomes throughout your day.
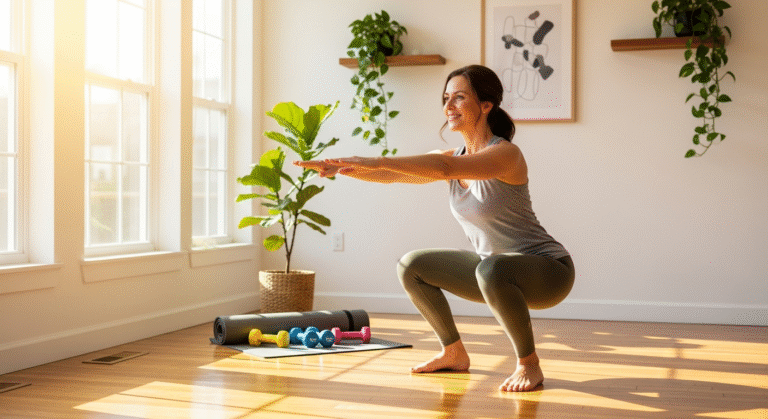
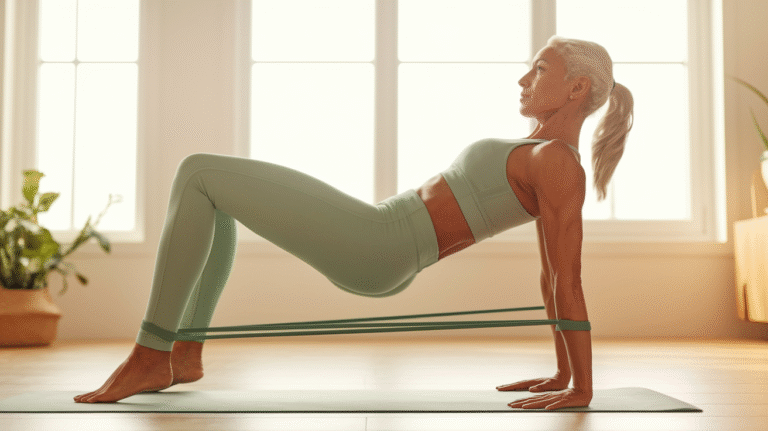
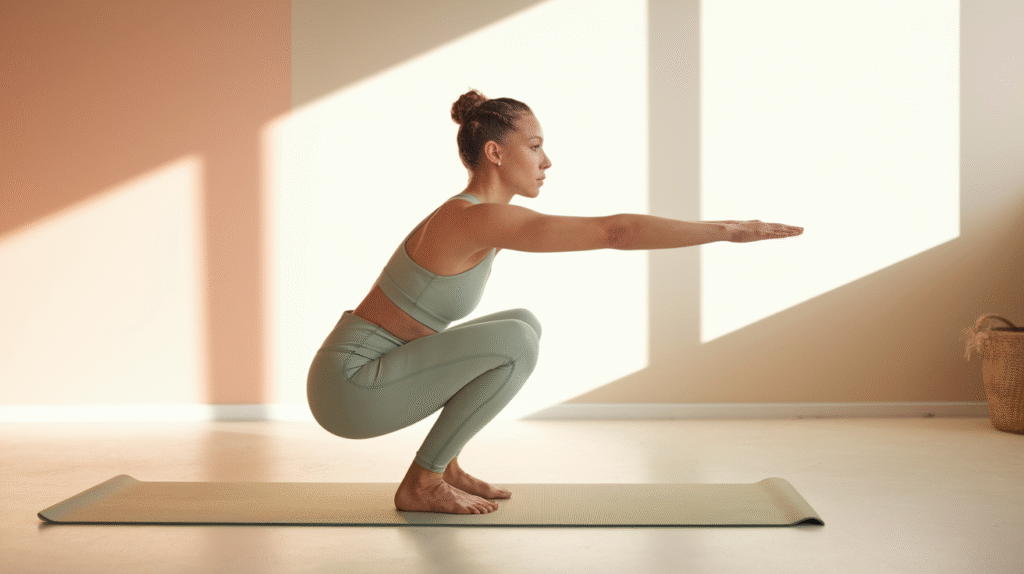
Exercise #2: Functional Squats
How to do it: Stand with feet shoulder-width apart, toes pointing slightly outward. As you inhale, sit back as if lowering into a chair, keeping your chest lifted and weight in your heels. Lower as far as comfortable—this might be a small squat at first. As you exhale, press through your heels to stand back up, naturally engaging your pelvic floor as you rise. Start with 10 repetitions, building to 15-20 as you get stronger.
Why it’s effective: Squats are one of the most functional movements you do daily—sitting down, standing up, picking things off the floor. This exercise strengthens your glutes, legs, and core while teaching your pelvic floor to engage naturally during movement. The exhale as you rise creates intra-abdominal pressure that automatically activates your deep core and pelvic floor without forced squeezing. Studies show that functional movements like squats improve pelvic floor coordination better than isolated exercises.
Simple modifications: If full squats feel challenging, start with chair squats—lower until you barely touch a chair behind you, then stand. You can also practice wall squats, using a wall for back support. As you build strength, progress to deeper squats without support.
Quick tip: Focus on the exhale as you rise. This breathing pattern naturally engages your pelvic floor without you having to think about it. Never hold your breath during squats—this creates excessive downward pressure on your pelvic floor.
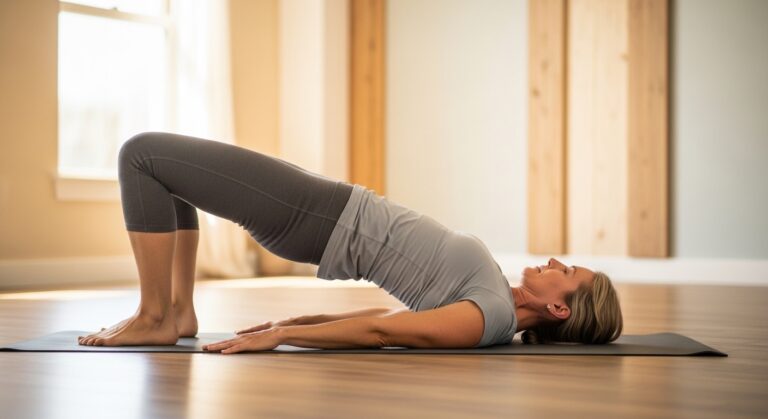
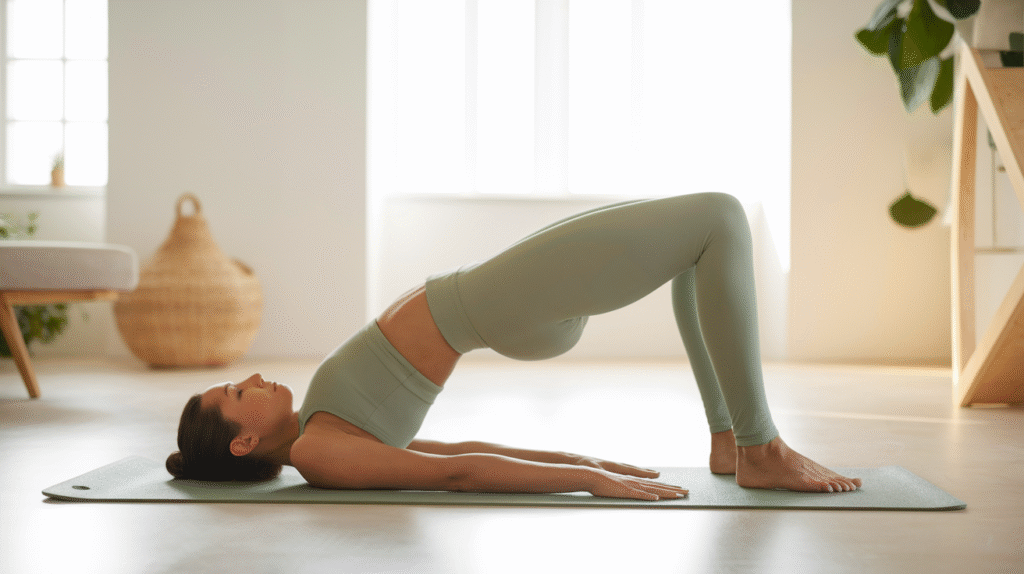
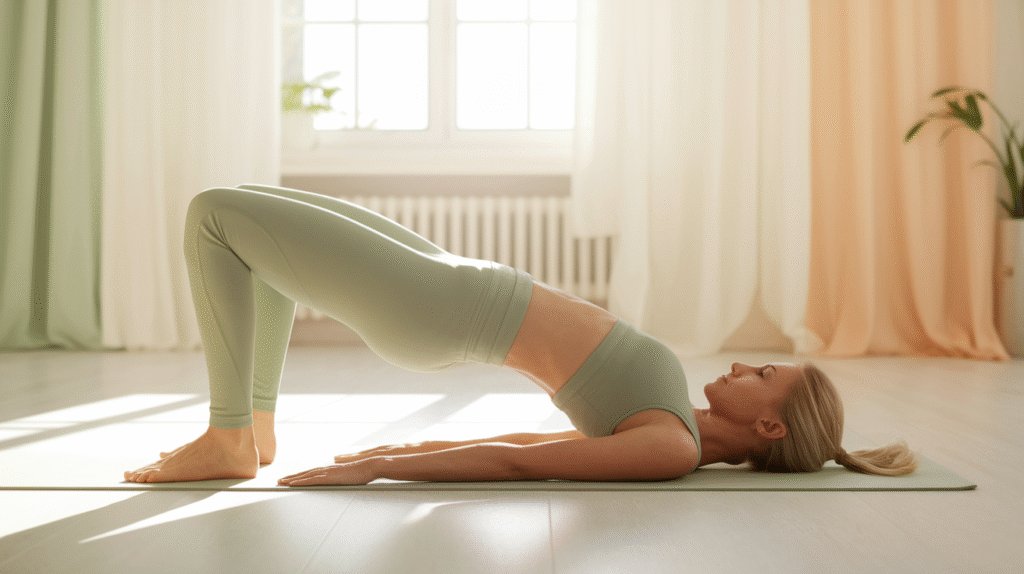
Exercise #3: Bridge Pose with Controlled Breathing
How to do it: Lie on your back with knees bent, feet flat on the floor hip-width apart, arms by your sides. Take a breath in to prepare. As you exhale, press through your feet and lift your hips off the ground, creating a straight line from your shoulders to your knees. Hold this position for 2-3 breaths, continuing to breathe naturally. Inhale as you slowly lower your hips back down. Complete 10-12 repetitions.
Why it’s effective: Bridges strengthen your posterior chain—glutes, hamstrings, and lower back—while teaching proper pelvic floor coordination. As you lift your hips, your pelvic floor naturally engages to support the movement. This exercise also improves hip mobility and core stability, both essential for pelvic floor health. The controlled breathing ensures you’re not creating excessive pressure or holding your breath.
Easy progression: Start with basic bridges, holding for just one breath at the top. As you get stronger, progress to holding for 3-5 breaths. Advanced variations include single-leg bridges or adding a resistance band around your thighs to increase glute activation.
Quick tip: Imagine gently lifting your pelvic floor as you lift your hips—not a hard squeeze, but a subtle engagement. Keep your ribs soft and avoid arching your back excessively. The power comes from your glutes, not from overextending your spine.
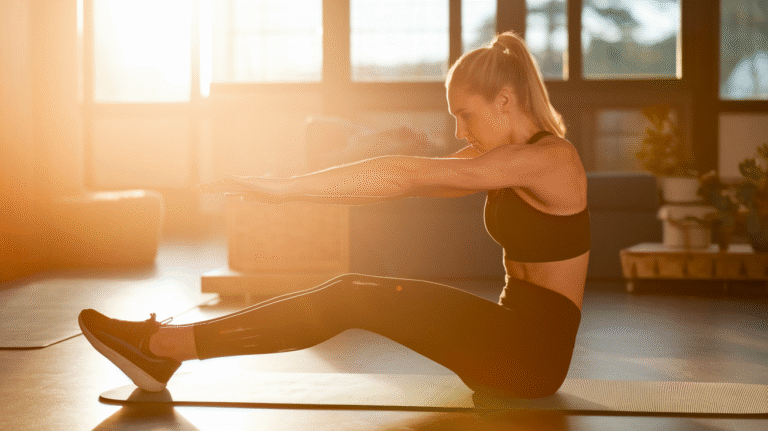
Exercise #4: Dead Bug Exercise
How to do it: Lie on your back with arms extended straight up toward the ceiling and knees bent at 90 degrees (shins parallel to the floor). Press your lower back gently into the floor. As you exhale, slowly lower your right arm overhead while straightening your left leg, hovering it just above the floor. Inhale as you return to starting position. Exhale and repeat on the opposite side. Complete 10 repetitions per side, moving slowly and with control.
Why it’s effective: The dead bug challenges coordination between your deep core muscles and pelvic floor while your limbs move in opposite directions. This builds stability and control that translates directly to daily activities. Your core must work to keep your spine stable while your arms and legs move—exactly what happens when you walk, carry groceries, or play with your kids. Research confirms that core stability exercises significantly improve pelvic floor function.
Simple variations: If the full movement feels too challenging, start by moving just your arms or just your legs. You can also keep your knees bent instead of straightening your legs. As coordination improves, progress to the full movement with straight limbs.
Quick tip: Maintain steady breathing throughout—never hold your breath. If you feel your lower back arching off the floor, you’ve gone too far. Keep movements small and controlled until you build strength. Quality matters more than range of motion.
Exercise #5: Bird Dog Exercise
How to do it: Start on your hands and knees with hands directly under shoulders and knees under hips. Engage your core by gently drawing your belly button toward your spine. As you exhale, slowly extend your right arm forward and left leg back, creating a straight line from fingertips to toes. Hold for 2-3 seconds, breathing naturally. Inhale as you return to starting position. Exhale and repeat on the opposite side. Complete 10 repetitions per side.
Why it’s effective: Bird dog improves balance, stability, and functional pelvic floor strength by challenging your body to maintain stability while moving. This exercise strengthens your back extensors, glutes, and deep core while teaching your pelvic floor to engage automatically for balance. It’s one of the most effective exercises for building the coordination your pelvic floor needs during real-life activities.
Easy modifications: Start by practicing just arm lifts or just leg lifts until you master the balance. You can also tap your hand or foot on the floor instead of holding the extended position. As you get stronger, hold the extended position for longer periods, working up to 5-10 seconds.
Quick tip: Keep movements slow and controlled—this isn’t a race. Focus on maintaining a neutral spine without letting your hips rotate or your back sag. The challenge is stability, not speed. If you feel wobbly, reduce your range of motion and focus on control.
Creating Your Complete Pelvic Floor Exercise Routine
Building Your Daily Practice
You don’t need hours at the gym to see amazing results. These five exercises combine into an effective 10-15 minute routine that fits easily into your day. Here’s a simple structure that delivers proven results:
Start with 2-3 minutes of diaphragmatic breathing to establish proper coordination. This primes your nervous system and prepares your pelvic floor for movement. Next, perform 10-12 squats, focusing on breathing and form. Follow with 10-12 bridges, then 10 dead bugs per side, and finish with 10 bird dogs per side. Cool down with another 2 minutes of diaphragmatic breathing.
The perfect frequency is 3-4 times per week for building strength, with daily breathing practice. Your pelvic floor muscles respond well to consistent training but also need recovery time. Training every other day allows for both stimulus and rest.
Morning practice works well because your muscles are fresh and you’re setting the tone for proper movement patterns throughout the day. Evening practice helps release tension accumulated during the day. Choose whatever timing fits your lifestyle—consistency beats perfection every time.
Progressive Training Tips
Your body will tell you when you’re ready to advance. Signs you’re ready for harder variations include: completing all repetitions with perfect form, no longer feeling challenged by the current level, and experiencing no pain or excessive fatigue.
Track your progress with simple observations rather than complicated measurements. Notice if daily activities feel easier—climbing stairs, carrying groceries, playing with kids. Pay attention to symptom improvement—fewer leaks, less pelvic pressure, better bladder control. These real-life improvements matter more than how many reps you can do.
Watch for warning signs that indicate you need to ease back: increased pelvic pressure or heaviness, more frequent bladder leaks, pain during or after exercises, or excessive muscle soreness that lasts more than two days. These signals mean you’re pushing too hard or your form needs adjustment.
Integrating Movement into Everyday Life
The ultimate goal is making pelvic floor awareness automatic during daily activities. Practice proper breathing while doing dishes, folding laundry, or standing in line. Notice your posture throughout the day—are you slouching or standing tall? Your alignment directly affects pelvic floor function.
Quick exercises you can do anywhere include: practicing diaphragmatic breathing at red lights, doing calf raises while brushing your teeth, or engaging your core while waiting for coffee to brew. These micro-practices add up to significant improvements.
Proper posture throughout the day supports your exercise efforts more than you realize. Stand and sit with your weight evenly distributed, ribs stacked over pelvis, shoulders relaxed. This alignment allows your pelvic floor to function optimally without fighting against poor positioning.
Common Mistakes to Avoid and Expert Tips for Success
The Top Mistakes That Sabotage Results
The biggest mistake people make is holding their breath during exercises. Breath-holding creates excessive downward pressure on your pelvic floor, working directly against your strengthening goals. Every exercise should include continuous, controlled breathing—inhale on the easier phase, exhale on the effort.
Gripping or over-tightening muscles is another common problem. Many people squeeze their pelvic floor as hard as possible, thinking more intensity equals better results. Wrong. Your pelvic floor needs functional strength with the ability to engage and release smoothly. A gentle, controlled engagement beats a hard squeeze every time.
Skipping the relaxation phase sabotages your progress. Your pelvic floor must be able to relax completely between contractions. A muscle that only knows how to contract becomes tight, dysfunctional, and painful. The release is just as important as the engagement—remember, your pelvic floor needs to lengthen during activities like bowel movements and childbirth.
Essential Tips for Maximum Effectiveness
The breathing technique that makes every exercise more effective is simple: exhale during effort. Whether you’re rising from a squat, lifting your hips in a bridge, or extending your limbs in dead bug, exhale as you perform the challenging part. This breathing pattern naturally engages your deep core and pelvic floor without forced squeezing.
Check if you’re engaging the right muscles by placing your hand on your lower belly. You should feel gentle tension, not bulging or bearing down. Your shoulders should stay relaxed—if they’re hunched up by your ears, you’re using the wrong muscles. Your glutes and inner thighs should support movement but not dominate it.
Simple self-assessment techniques include: checking if you can stop your urine stream mid-flow (occasionally, not regularly), noticing if you can feel a gentle lift internally when you engage, and observing whether symptoms improve over 4-6 weeks of consistent practice.
When to Seek Professional Help
Certain signs indicate you need guidance from a pelvic floor physical therapist. Seek professional help if you experience: pain during exercises, worsening symptoms despite consistent practice, inability to feel your pelvic floor muscles at all, or symptoms that significantly impact your quality of life.
A professional pelvic floor assessment includes internal examination to evaluate muscle tone, strength, and coordination. The therapist checks for trigger points, assesses your ability to contract and relax, and identifies specific dysfunction patterns. This assessment provides personalized information that generic exercises can’t address.
These exercises complement professional treatment beautifully. Your therapist might prescribe specific variations or additional exercises based on your individual needs. Think of these five exercises as your foundation, with professional guidance adding the personalized touches that accelerate your results.
Your Path to a Stronger, Healthier Pelvic Floor
You now understand why these five exercises offer a more complete approach than Kegels alone. They work with your body’s natural coordination systems instead of isolating one muscle group. They teach functional strength that supports you during real-life movements—laughing, sneezing, lifting, and everything in between.
The ultimate benefit isn’t just fewer leaks or less pelvic pressure (though those improvements are amazing). It’s the confidence that comes from a strong, functional core system. It’s the freedom to move through life without worry. It’s the ability to play with your kids, exercise without fear, and feel comfortable in your own body.
Quick Takeaways to Remember
Your pelvic floor health requires coordination with your entire core system—it’s not just about one isolated muscle group. Breathing and relaxation are just as important as strengthening; your pelvic floor must be able to engage and release smoothly. Consistency beats intensity every time—even 10 minutes daily creates amazing results that compound over weeks and months.
Listen to your body and progress at your own pace. Some days you’ll feel strong and capable. Other days you’ll need to scale back. Both approaches build strength when you stay consistent over time. Your body is incredibly adaptable when you give it the right stimulus and adequate recovery.
Your Next Steps
Start today with diaphragmatic breathing—it’s the foundation of all pelvic floor health. Practice for just five minutes while lying in bed tonight. Notice the gentle release of your pelvic floor as you inhale, the natural lift as you exhale. This simple practice begins retraining the coordination your body needs.
Practice these proven exercises 3-4 times per week for best results. Schedule them like any important appointment. Morning, evening, or during lunch break—whatever works for your life. The perfect time is the time you’ll actually do them consistently.
Be patient with yourself. Meaningful change takes time, but these effective exercises deliver lasting results. You might notice small improvements within 2-3 weeks—slightly better bladder control, less pelvic pressure at the end of the day. Significant improvements typically emerge around the 6-8 week mark with consistent practice.
Your pelvic floor supports you through every moment of life. It’s time to support it back with exercises that actually work. Start with just one or two movements today, and build from there. Your stronger, healthier pelvic floor is waiting—and it’s absolutely within your reach.