5 Morning Yoga Poses for Lower Back Pain Relief
You know that feeling when you wake up and your lower back is already screaming at you? Before you’ve even had your coffee, you’re moving like someone twice your age, wondering why mornings have to be so brutal.
Here’s the good news: you don’t have to live like this.
Morning lower back pain is incredibly common—you’re definitely not alone in this struggle. But here’s what most people don’t realize: a simple 15-minute yoga routine can completely transform how you start your day. No expensive treatments, no complicated equipment, just gentle, effective stretches that actually work.
In this guide, you’ll learn five proven yoga poses specifically designed to ease morning back pain. These aren’t advanced moves that require years of practice—they’re beginner-friendly stretches that anyone can do, right in your bedroom, before you even get dressed.
Whether you’ve been dealing with back pain for years or just started noticing that morning stiffness, these poses will help you move freely, feel stronger, and actually enjoy your mornings again. Let’s get started.
Why Your Lower Back Hurts in the Morning (And How Yoga Helps)
Understanding Morning Back Pain
Ever wonder why your back feels worse in the morning than any other time of day? There’s actually a scientific explanation.
While you sleep, your body stays in one position for hours. Your muscles get stiff, blood flow decreases, and inflammation builds up in your joints. If your sleeping position isn’t ideal—maybe you’re curling into a ball or your mattress is too soft—your spine gets compressed in ways that create tension. Add in tight hip flexors from sitting all day, and you’ve got the perfect recipe for morning misery.
Your lower back also supports your entire upper body, which means it takes on a ton of stress even when you’re not moving. After hours of inactivity, those muscles need gentle movement to wake up properly. Without it, you’re basically asking cold, stiff muscles to suddenly support your full body weight the moment you stand up.
The Amazing Benefits of Morning Yoga for Back Pain
This is where yoga becomes your secret weapon.
Morning yoga increases blood flow to all those tight, angry muscles in your lower back. As you move through gentle stretches, you’re literally bringing fresh oxygen and nutrients to the areas that need healing most. This reduces inflammation and speeds up your body’s natural recovery process.
But yoga does more than just stretch—it strengthens the complete support system around your spine. Your core muscles, hip flexors, and the tiny stabilizing muscles along your back all get activated and engaged. Over time, this creates a stronger foundation that prevents pain from returning.
The beauty of a morning practice is that it sets you up for success all day long. When you start your day with movement, your muscles stay flexible and resilient. You’ll notice less stiffness when you sit at your desk, fewer aches when you bend over, and more energy throughout your entire day.
Why These 5 Poses Are Perfect for Beginners
I chose these specific poses because they work for everyone—no yoga experience required.
You don’t need fancy equipment or a dedicated studio space. A yoga mat is helpful, but even a carpeted floor or folded blanket works perfectly fine. Each pose takes just a few minutes, and the complete routine fits easily into even the busiest morning schedule.
These poses flow naturally from one to the next, gradually warming up your body without shocking your system. We start gentle and slowly build to deeper stretches, which is exactly what your lower back needs first thing in the morning.
Essential Tips Before You Start Your Morning Practice
Creating Your Perfect Yoga Space
Your environment matters more than you might think.
Find a quiet spot where you won’t be interrupted—even if it’s just a corner of your bedroom. You need enough room to stretch your arms out wide and extend your legs fully. Clear away any clutter so you can focus completely on how your body feels.
A yoga mat provides cushioning and prevents slipping, but don’t let the lack of one stop you. A folded blanket, thick towel, or even a soft rug works just fine. Keep a couple of pillows nearby—they’re perfect for modifications when you need extra support.
If you have yoga blocks, great. If not, thick books or sturdy boxes work as substitutes. The goal is having something to lean on if you can’t reach the floor comfortably.
Important Safety Guidelines
Let’s be crystal clear about something: yoga should never cause sharp, shooting pain.
You’ll feel stretching—a gentle pull in your muscles that might be slightly uncomfortable but not painful. That’s normal and good. But if you feel any sharp, stabbing sensations or pain that makes you catch your breath, stop immediately. Back off the stretch or skip that pose entirely.
Your breath is your best guide. If you’re holding your breath or breathing in short, shallow gasps, you’re pushing too hard. Deep, steady breathing means you’re in the right zone—challenged but safe.
Never bounce or jerk into positions. Every movement should be slow and controlled. Think of yourself as moving through honey—smooth, deliberate, and mindful. This approach protects your joints and prevents injury.
Even just two or three minutes of gentle movement before you start these poses makes a huge difference. Roll your shoulders, do some easy neck stretches, or simply breathe deeply while sitting comfortably. This brief warm-up prepares your body for deeper work.
The Ultimate Morning Yoga Mindset
Consistency beats intensity every single time.
Doing these poses gently for 15 minutes every morning will transform your back pain far more effectively than pushing yourself into advanced poses once a week. Your body responds to regular, sustained practice—not occasional heroic efforts.
Focus on how your body feels, not how the poses look. Yoga isn’t a performance. Nobody’s judging your flexibility or form. The only thing that matters is connecting with your body and giving it what it needs.
Breathe deeply through your nose, making your exhales as long as your inhales. This activates your parasympathetic nervous system, which helps your muscles release tension naturally. When you hold your breath, your muscles tighten protectively—exactly what we don’t want.
The 5 Best Morning Yoga Poses for Lower Back Pain Relief
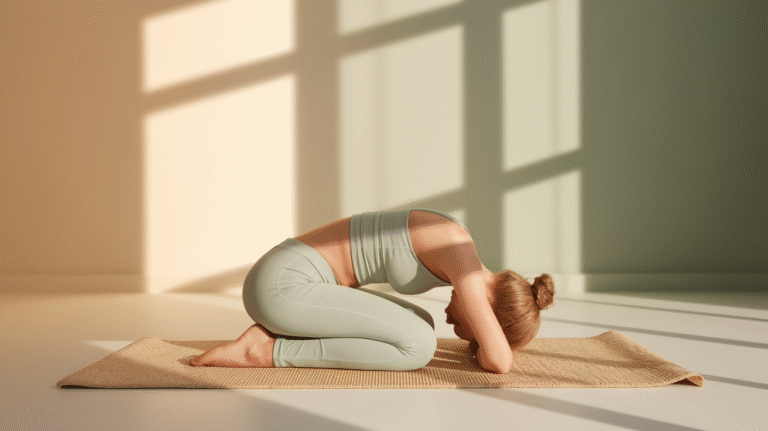
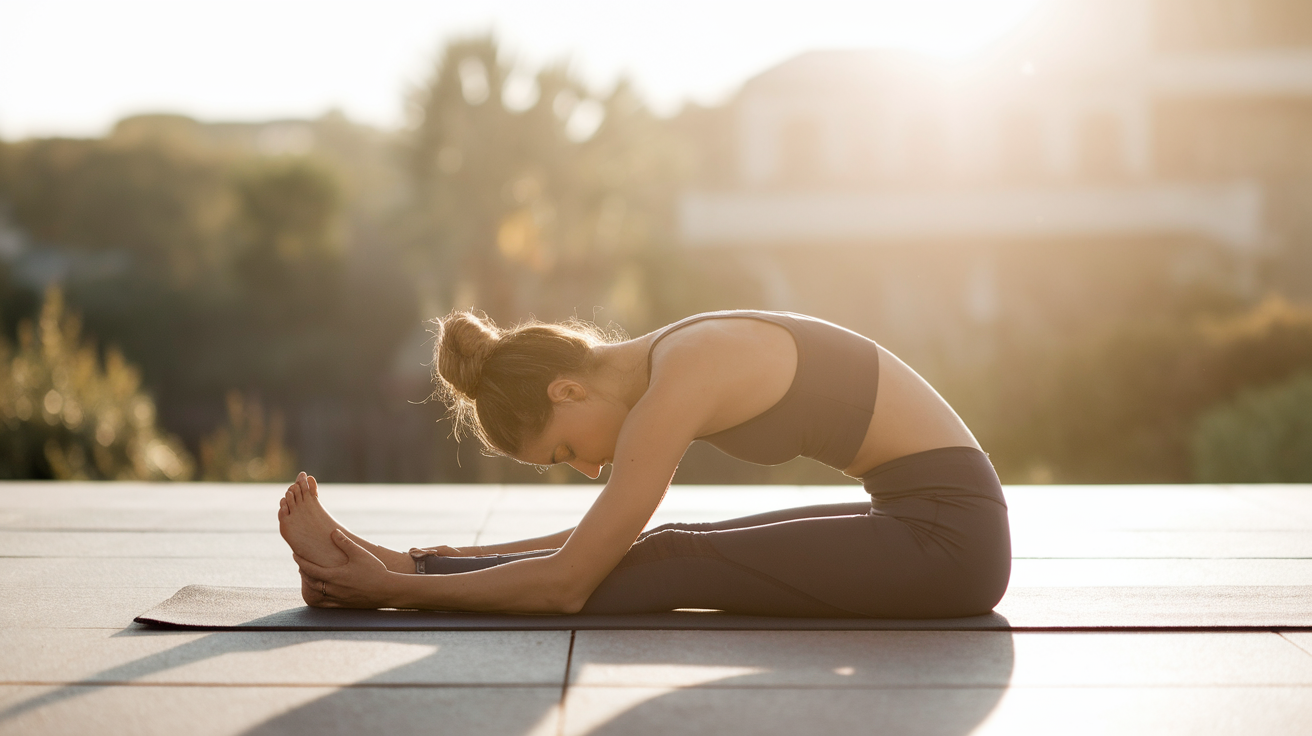
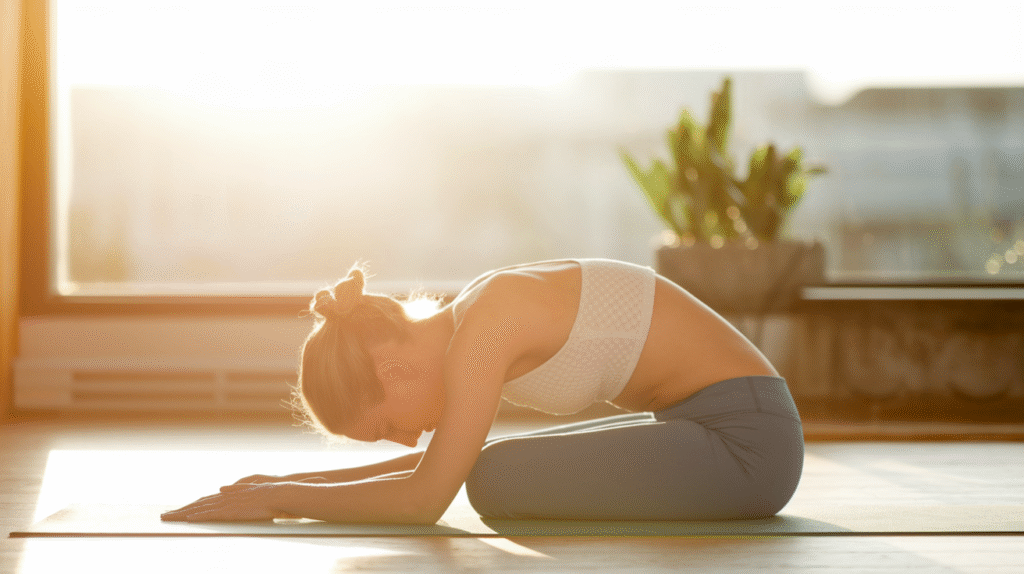
Pose 1: Child’s Pose (The Gentle Awakening Stretch)
Child’s Pose is the perfect way to ease into your practice because it’s deeply restful while still providing an effective stretch.
How to do it: Start on your hands and knees with your knees wider than hip-width apart. Bring your big toes to touch behind you. As you exhale, sit your hips back toward your heels and extend your arms forward, lowering your chest toward the floor. Rest your forehead on the mat (or on a folded blanket if it doesn’t reach comfortably). Let your shoulders relax away from your ears and breathe deeply into your lower back.
Why it works: This pose gently stretches your entire spine, from your tailbone all the way up to your neck. It creates space between your vertebrae, releasing compression that built up overnight. The forward fold also stretches your hip flexors and inner thighs, which often contribute to lower back tension.
Hold time: Stay here for 5-8 deep breaths, focusing on expanding your back with each inhale.
Pro tip: If your hips don’t reach your heels comfortably, place a pillow or folded blanket between your thighs and calves for support. You can also rest your chest on a pillow for a more restorative version that’s perfect for extra-stiff mornings.
Pose 2: Cat-Cow Pose (The Spine Mobilizer)
This flowing movement warms up your entire back and gets your spinal fluid moving.
How to do it: Come back to hands and knees with your wrists under your shoulders and knees under your hips. As you inhale, drop your belly toward the floor, lift your chest and tailbone toward the ceiling, and look gently upward (Cow Pose). As you exhale, press into your hands, round your spine toward the ceiling, tuck your tailbone, and drop your head (Cat Pose). Move smoothly between these two positions, letting your breath guide the movement.
Why it works: Cat-Cow increases flexibility throughout your complete back by moving your spine through its full range of motion. This gentle articulation lubricates the joints between your vertebrae and releases tension in all the tiny muscles along your spine. The flowing movement also increases blood flow, bringing healing nutrients to stiff tissues.
Repetitions: Complete 8-10 slow, controlled flows, taking your time with each transition.
Pro tip: Keep the movements small and gentle if you’re very stiff. You don’t need to create dramatic curves—even subtle movement provides benefits. Focus on moving one vertebra at a time, creating a smooth wave through your spine rather than just moving from your lower back.
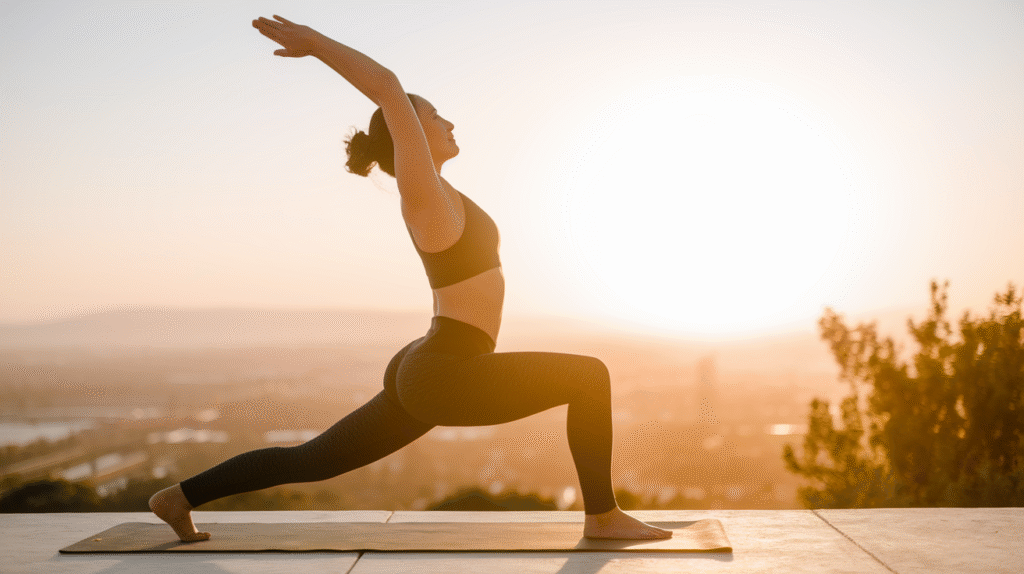
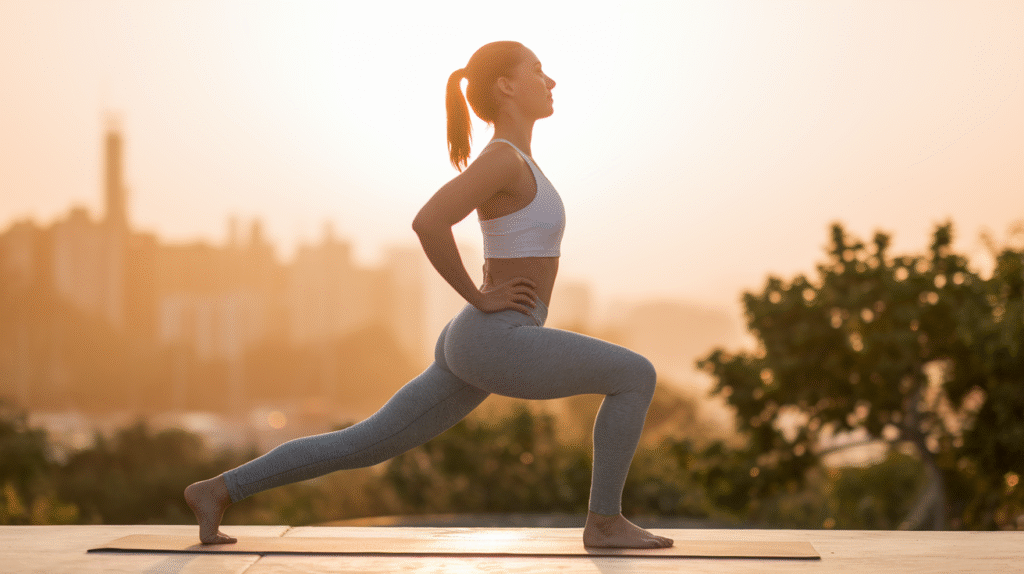
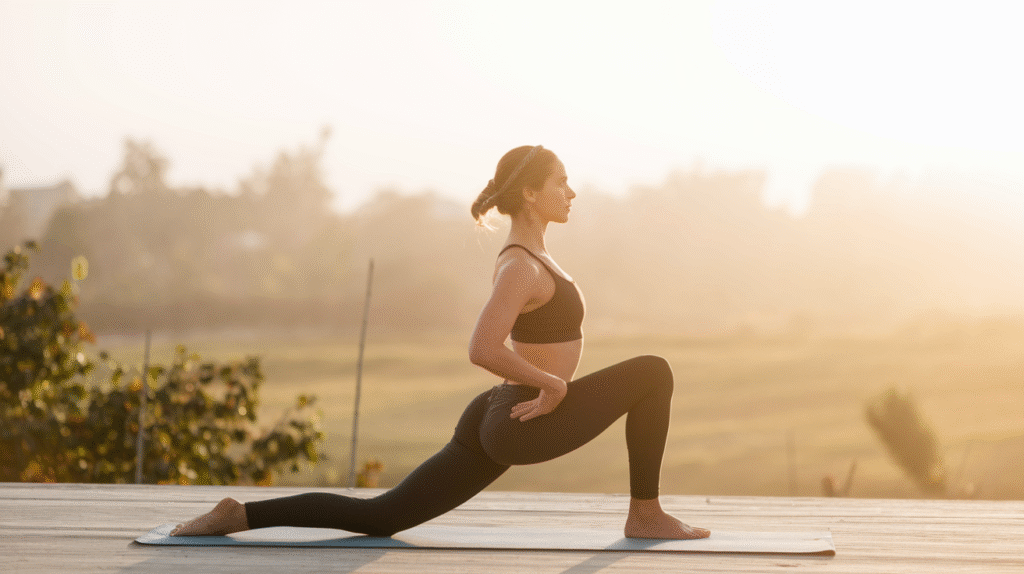
Pose 3: Low Lunge (The Hip Flexor Releaser)
Tight hip flexors pull on your lower back constantly, creating pain that won’t quit. This pose releases that tension beautifully.
How to do it: From hands and knees, step your right foot forward between your hands, stacking your right knee over your ankle. Lower your left knee to the mat and slide it back slightly until you feel a stretch in the front of your left hip. Keep your hands on either side of your front foot (or on blocks if you need the height). Engage your lower abs gently to protect your back. For a deeper stretch, you can lift your torso upright and raise your arms overhead.
Why it works: The hip flexors, including the powerful psoas muscle, attach directly to your lumbar spine. When they’re tight, they pull your pelvis forward, creating excessive arch in your lower back and causing pain. Low Lunge lengthens these muscles, releasing their grip on your spine and allowing your pelvis to return to a neutral position.
Hold time: Breathe deeply for 3-5 breaths on each side, allowing the stretch to deepen naturally with each exhale.
Pro tip: Use blocks under your hands for better balance and support—this lets you focus on the hip stretch instead of worrying about falling over. Keep your front knee aligned over your ankle, not pushing forward past your toes. If you feel any pinching in your lower back, engage your abs more and reduce the depth of the lunge.
Pose 4: Sphinx Pose (The Gentle Backbend)
This mild backbend strengthens your back while opening up your spine—the perfect combination for long-term relief.
How to do it: Lie on your stomach with your legs extended behind you, hip-width apart. Bring your elbows under your shoulders with your forearms parallel on the mat, palms facing down. Press into your forearms and lift your upper torso and head, creating a gentle arch in your back. Draw your shoulders down away from your ears. Engage your lower abdominals by gently pulling your belly button toward your spine—this protects your lower back from compression.
Why it works: Sphinx Pose strengthens the muscles along your spine that support your back throughout the day. It also gently opens the front of your body, counteracting the forward slouch most of us maintain while sitting. This combination of strengthening and opening creates better posture and reduces strain on your lower back.
Hold time: Hold for 5-8 breaths, keeping your neck long and relaxed.
Pro tip: The key to this pose is engaging your lower abs—this creates space in your lower back instead of compression. Think about lifting up through your spine and out through the crown of your head rather than just arching backward. If you feel any pinching, lower down slightly or place a folded blanket under your hips for support.
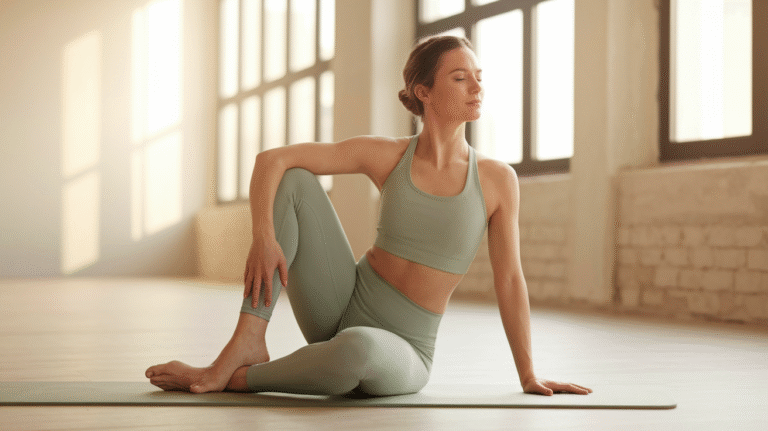
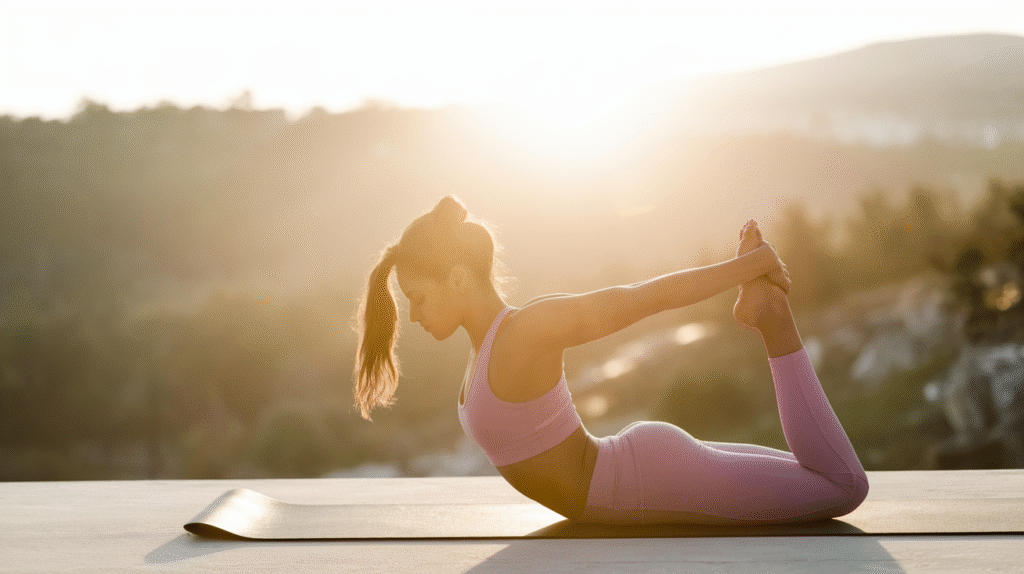
Pose 5: Supine Twist (The Tension Melter)
We finish with this deeply relaxing twist that releases tension throughout your entire back.
How to do it: Lie on your back and hug both knees into your chest. Extend your arms out to the sides at shoulder height, palms facing up. Keep both knees together as you slowly lower them to your right side. Turn your head to look left (opposite direction from your knees). Keep both shoulders pressed into the mat—this is more important than how far your knees drop. Relax completely and let gravity do the work.
Why it works: Twists release deep tension in the muscles along your spine and realign your vertebrae. This pose also stretches the muscles between your ribs and opens your chest, creating more space for deep breathing. The gentle rotation wrings out stagnant fluid and brings fresh blood flow to your entire back.
Hold time: Stay for 5-8 breaths on each side, allowing your body to sink deeper into the stretch with each exhale.
Pro tip: Keep both shoulders firmly on the ground even if it means your knees don’t drop as far—the twist happens in your spine, not your shoulders. Place a pillow under your knees if they don’t reach the floor comfortably. This is a pose where you should feel completely relaxed, not like you’re straining to hold a position.
Creating Your Complete 15-Minute Morning Routine
Your Simple Daily Sequence
Now let’s put all five poses together into a flowing routine that takes just 15 minutes.
Start with a 2-minute warm-up. Sit comfortably and take several deep breaths, noticing how your body feels. Roll your shoulders back a few times, gently turn your head from side to side, and do a few easy side bends. This brief preparation makes everything that follows more effective and safer.
Flow through the poses in this exact order: Child’s Pose, Cat-Cow, Low Lunge (both sides), Sphinx Pose, and Supine Twist (both sides). This sequence builds gradually from gentle to deeper stretches, which is exactly what your morning back needs.
Why this order works: Child’s Pose and Cat-Cow warm up your spine with gentle, easy movements. Low Lunge releases the hip flexors that pull on your back. Sphinx Pose strengthens your back muscles while they’re warm and pliable. Supine Twist wrings out any remaining tension and leaves you feeling completely relaxed.
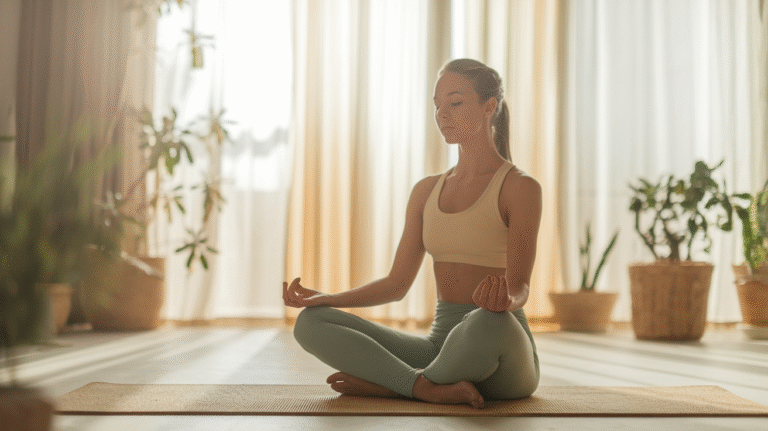
Finish with a 1-2 minute cool-down in Easy Pose (sitting comfortably cross-legged) or lying on your back. Take several deep breaths and notice how different your body feels compared to when you started.
Making It a Sustainable Habit
The secret to lasting relief isn’t doing these poses perfectly—it’s doing them consistently.
If 15 minutes feels overwhelming when you’re just starting, begin with just three poses: Child’s Pose, Cat-Cow, and Supine Twist. These three alone provide significant relief and take less than 8 minutes. Once this becomes easy, add the other two poses.
The best time to practice is right after waking, before you eat breakfast or check your phone. Your body is naturally stiff in the morning, which means you’ll feel the most dramatic improvement. Plus, starting your day with yoga sets a positive, mindful tone for everything that follows.
Track your progress in a simple notebook or phone app. Rate your pain level from 1-10 before and after practice. Within a week, you’ll see clear patterns showing how much these poses help. This data keeps you motivated on days when you’d rather skip your practice.
On extra-stiff mornings, modify everything. Hold poses for fewer breaths, move more slowly, and use props generously. Some movement always beats no movement, even when your body feels particularly tight.
Enhancing Your Practice Over Time
As your back gets stronger and more flexible, you can deepen your practice.
After a few weeks, try holding each pose for an extra 2-3 breaths. This increased time under stretch creates even more flexibility and strength. You can also add extra repetitions of Cat-Cow—12-15 flows instead of 8-10.
Signs your back is improving: you wake up with less pain, you move more freely throughout the day, you can bend and lift without that catch in your back, and you feel stronger overall. These changes happen gradually, but they’re real and lasting.
Once these five poses feel easy, consider adding Downward-Facing Dog, Bridge Pose, or Knees-to-Chest Pose. But don’t rush—master these foundational five first. They provide everything your back needs for significant, lasting relief.
Start Your Pain-Free Mornings Tomorrow
Morning lower back pain doesn’t have to be your reality anymore.
These five simple yoga poses—Child’s Pose, Cat-Cow, Low Lunge, Sphinx Pose, and Supine Twist—take just 15 minutes but deliver relief that lasts all day long. They’re gentle enough for complete beginners yet effective enough to create real, lasting change in how your back feels.
You deserve to wake up feeling strong, flexible, and ready to take on your day. No more hobbling to the bathroom like you’re 90 years old. No more dreading that first moment when you have to get out of bed. Just smooth, easy movement and a back that actually feels good.
Consistency is essential here. Daily practice creates results that occasional heroic efforts never will. Your body responds to regular, sustained care—give it that, and it will reward you with freedom from pain.
Start tomorrow morning with just one or two poses if that feels more manageable. Set your alarm five minutes earlier and give yourself this gift. Your back has been asking for help—these poses are the answer.
Pin this guide so you can reference it easily during your morning practice. Better yet, bookmark it on your phone so it’s right there when you wake up.
Share your progress in the comments below—which pose feels best for your back? What changes are you noticing after a week of practice? Your experience might be exactly what someone else needs to hear to start their own journey toward a pain-free back.
Remember: every journey to a stronger, healthier back begins with a single stretch. Make that stretch happen tomorrow morning. Your future self will thank you.